How can we help you?
Browse Categories
How to Set Up Single Sign-On (SSO) and SCIM Provisioning with Microsoft Entra ID

⚠️ Important: turning on SCIM revokes any pending invitations for your single sign-on domains, and turning on Require SSO blocks password, passkey and Google sign-in for members on those domains. Run a Test sign-in before you switch on Require SSO.
This guide is for Contactzilla team administrators and Microsoft Entra administrators. It covers how to connect Microsoft sign-in to your team, how to set up SCIM provisioning from Entra, and how access and devices behave once it is running.
How It Works
Your team signs in to Contactzilla with Microsoft, and Microsoft Entra ID decides who is in the team and with what access. Two things make that work, and they are set up separately:
- Single sign-on (SSO) lets people sign in with their Microsoft work account. It uses Contactzilla's own Microsoft app, so you register nothing for it: a tenant administrator approves it once.
- SCIM provisioning keeps your team in step with Entra. People you assign in Entra join the team before they ever sign in, Entra groups set their role, and people you remove or disable lose access at the next sync. You create a small provisioning app in your own Entra tenant for this.
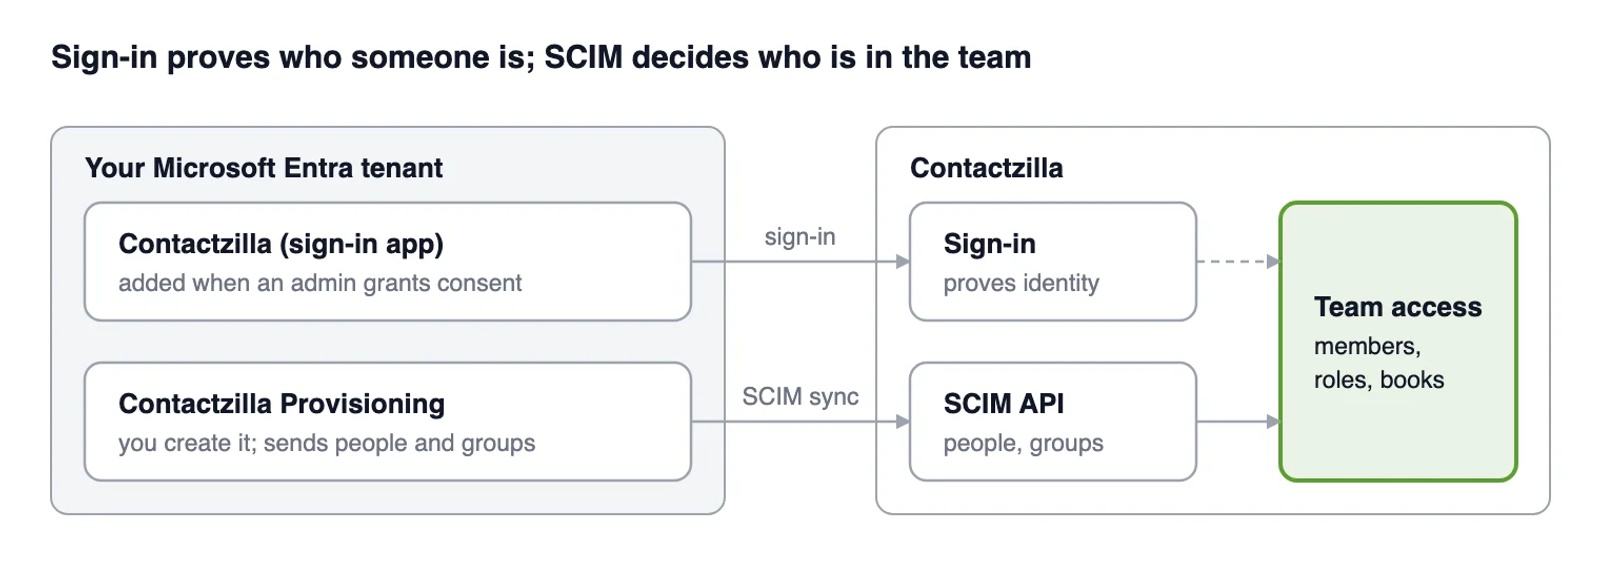
Signing in only lets in existing members, invited people, or whoever your default access allows. With SCIM, Entra sets everyone's access.
SSO works on its own. SCIM is optional, but without it nobody new joins unless you invite them or choose a default access, and leavers are only cut off when their session ends.
What You'll Need
- A Contactzilla team administrator account, to add the provider, turn on SCIM and map groups
- An Entra Global Administrator, Cloud Application Administrator or Application Administrator, to grant consent to Contactzilla's app and create the provisioning app
- Your Directory (tenant) ID, found in the Entra admin center under Overview
- A user with an email address on your domain for the administrator who tests sign-in. Microsoft only confirms you own a domain when the account has an Email property on it (Entra > Users > the user > Properties > Contact information)
- Entra ID P1 (or higher) if you want to assign groups to the provisioning app. On the free tier you assign people one by one, and they all get the default access
⚠️ Important: single sign-on is a premium feature. Until it is enabled for your team, Team Settings > Security > Single sign-on shows a Request single sign-on button that sends a pre-filled request to Contactzilla support. Once support enables it, the settings below appear.
Your email domains must be verified before anyone on them can sign in or be provisioned. The simplest way is a Test sign-in in Step Two with an account that has an email on that domain. You can also add a DNS TXT record instead.
Connecting Microsoft Sign-In
You add Microsoft as a provider in Contactzilla, a tenant administrator approves Contactzilla's app once, and a test sign-in verifies your domain.
Step One: Add Microsoft as a Provider
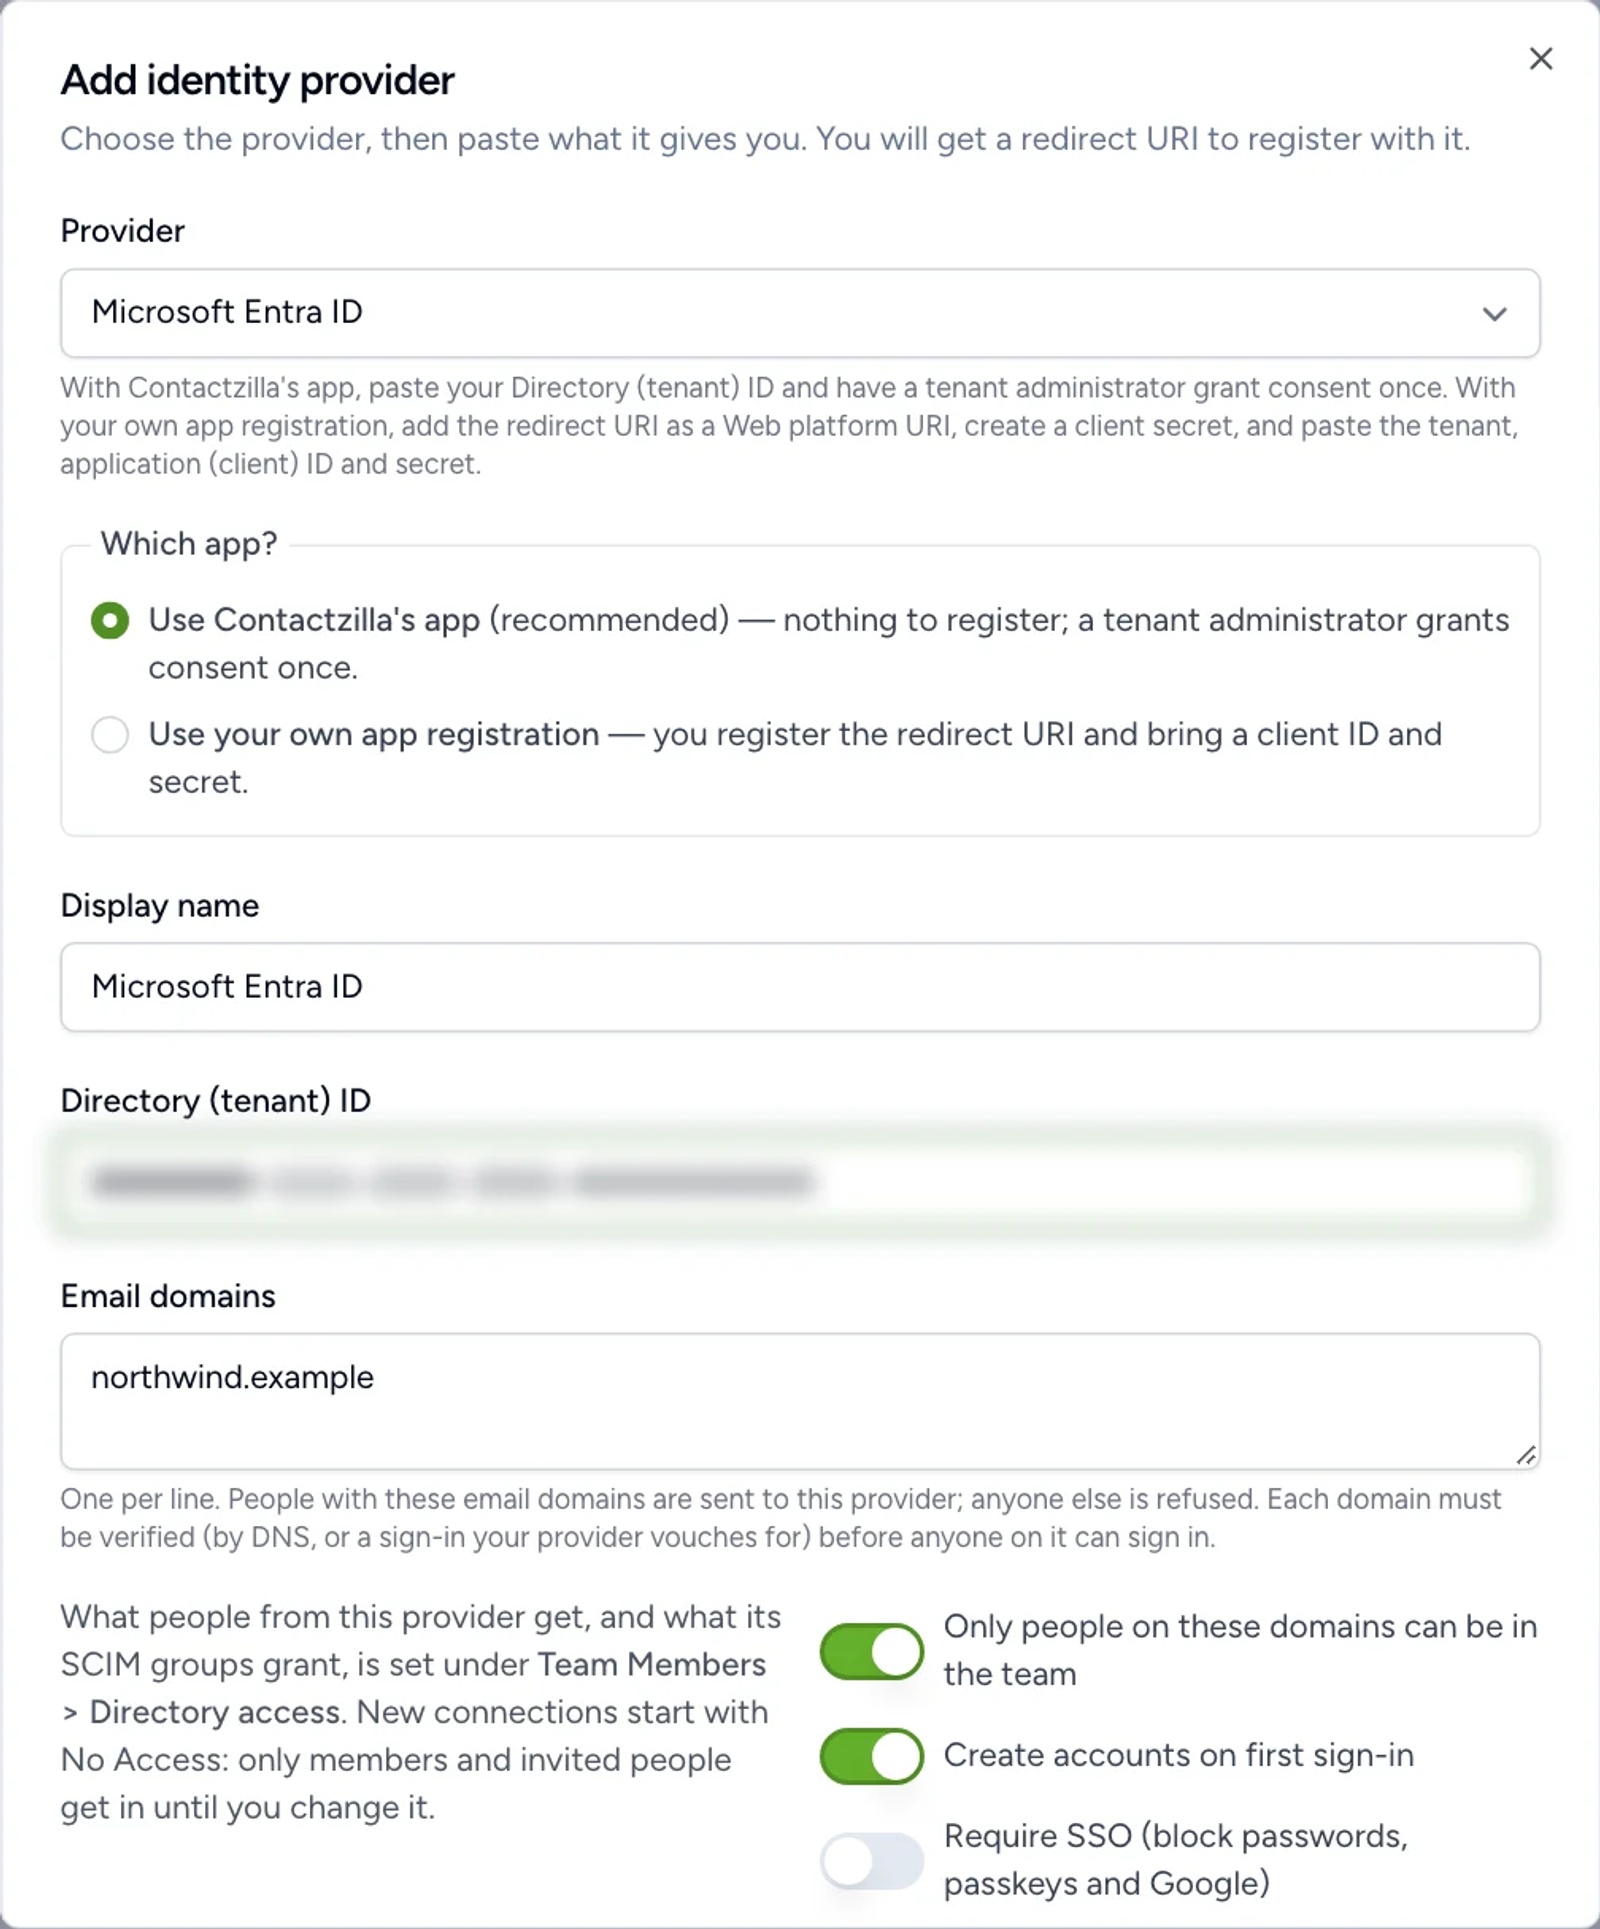
a) Team Settings > Security > Single sign-on, then click Add provider.
b) In the dialog, fill in the following:
- Provider: Microsoft Entra ID
- Which app? Choose Use Contactzilla's app (recommended). There is nothing to register in Entra.
- Directory (tenant) ID: from the Entra admin center under Overview. This is a GUID.
commonandorganizationsare not accepted. - Email domains: every domain your people's email addresses use, one per line.
- Only people on these domains can be in the team: leave it on (the default) unless the team includes people on other domains, such as contractors.
- Require SSO: leave it off until you have tested sign-in.
c) Click Add provider.
Step Two: Grant Consent and Test Sign-In
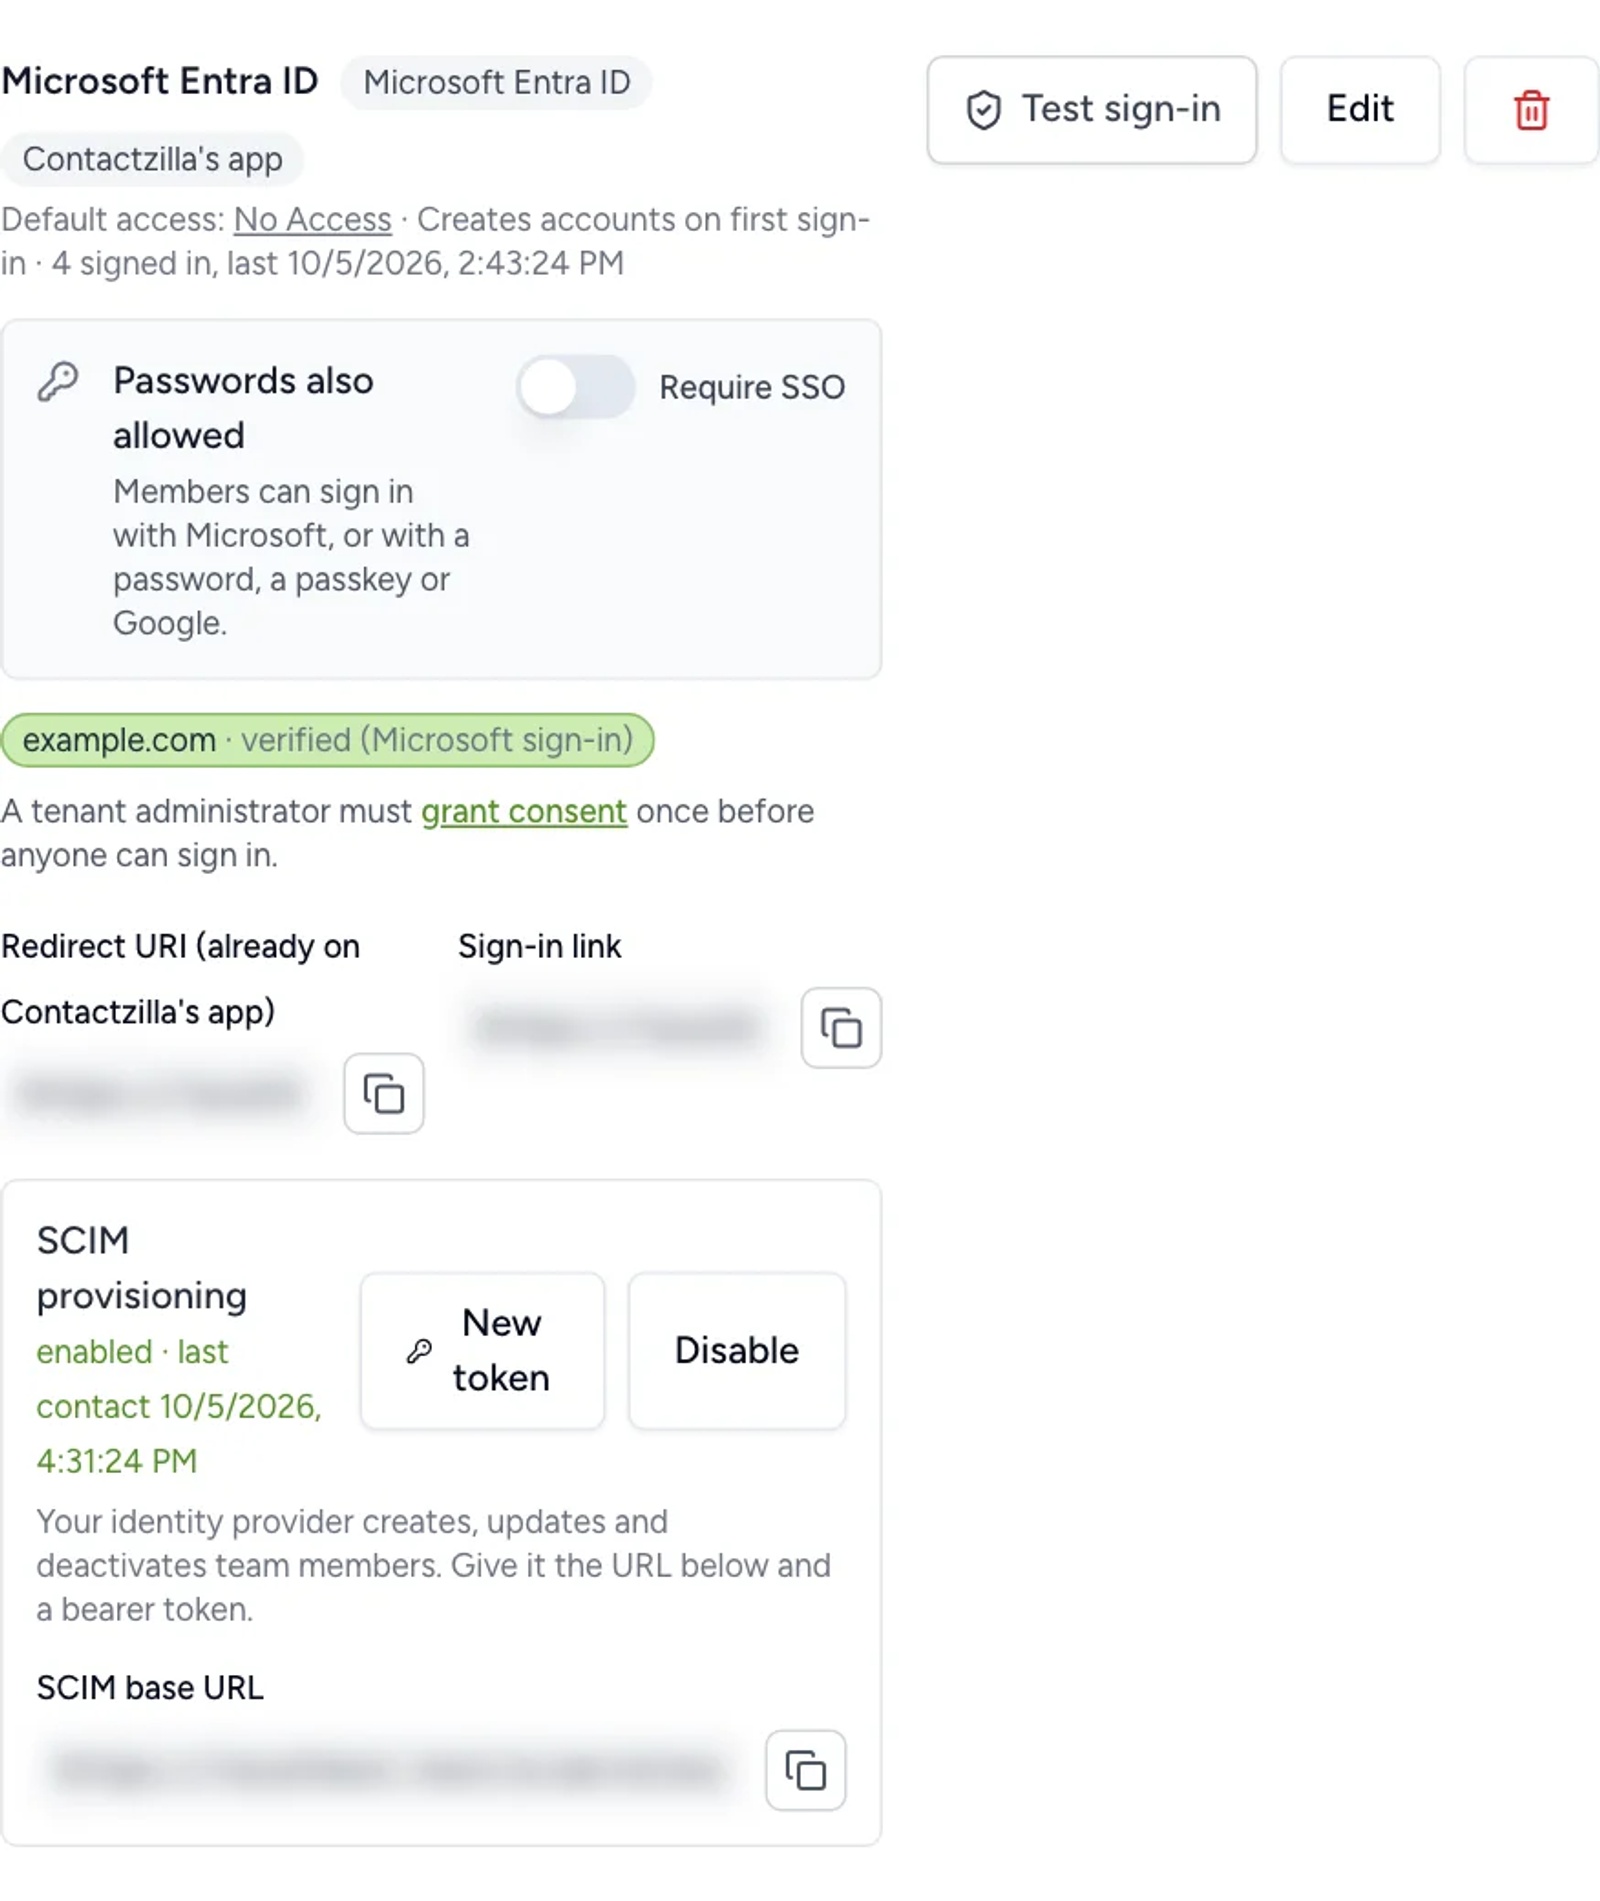
a) On the new connection card, a tenant administrator clicks grant consent. Microsoft asks them to approve Contactzilla for the organisation, then sends them back to Team Settings. They must be signed in to Contactzilla as a team administrator in the same browser.
b) Click Test sign-in and sign in with your Microsoft account. It signs no one in. It reports what Microsoft returned. When your account's email is on one of the listed domains, the domain shows as verified (Microsoft sign-in).
💡 If the test says the domain is not verified, the account usually has no email address in Entra. Set the user's Email property and test again, or add the DNS TXT record shown under Show DNS instructions on the card.
Step Three: Optional Settings
1) Recommended: in Entra, open Enterprise apps > Contactzilla > Properties, set Assignment required to Yes, and assign the groups who may sign in. Without it, anyone in your tenant on a listed domain can authenticate, although your Contactzilla access rules still decide whether they get in.
2) Once sign-in works, turn on the Require SSO switch on the connection card. This blocks password, passkey and Google sign-in for members on your verified domains, and the login page then offers them only Sign in with Microsoft. The card always says which applies: Passwords also allowed or Microsoft sign-in only.
💡 To turn Require SSO on, you need to have signed in with Microsoft first (Test sign-in counts), so you can't lock yourself out.
Turning On SCIM in Contactzilla
Contactzilla gives you two values to paste into Entra: a SCIM base URL and a bearer token.
Step Four: Copy the SCIM URL and Token
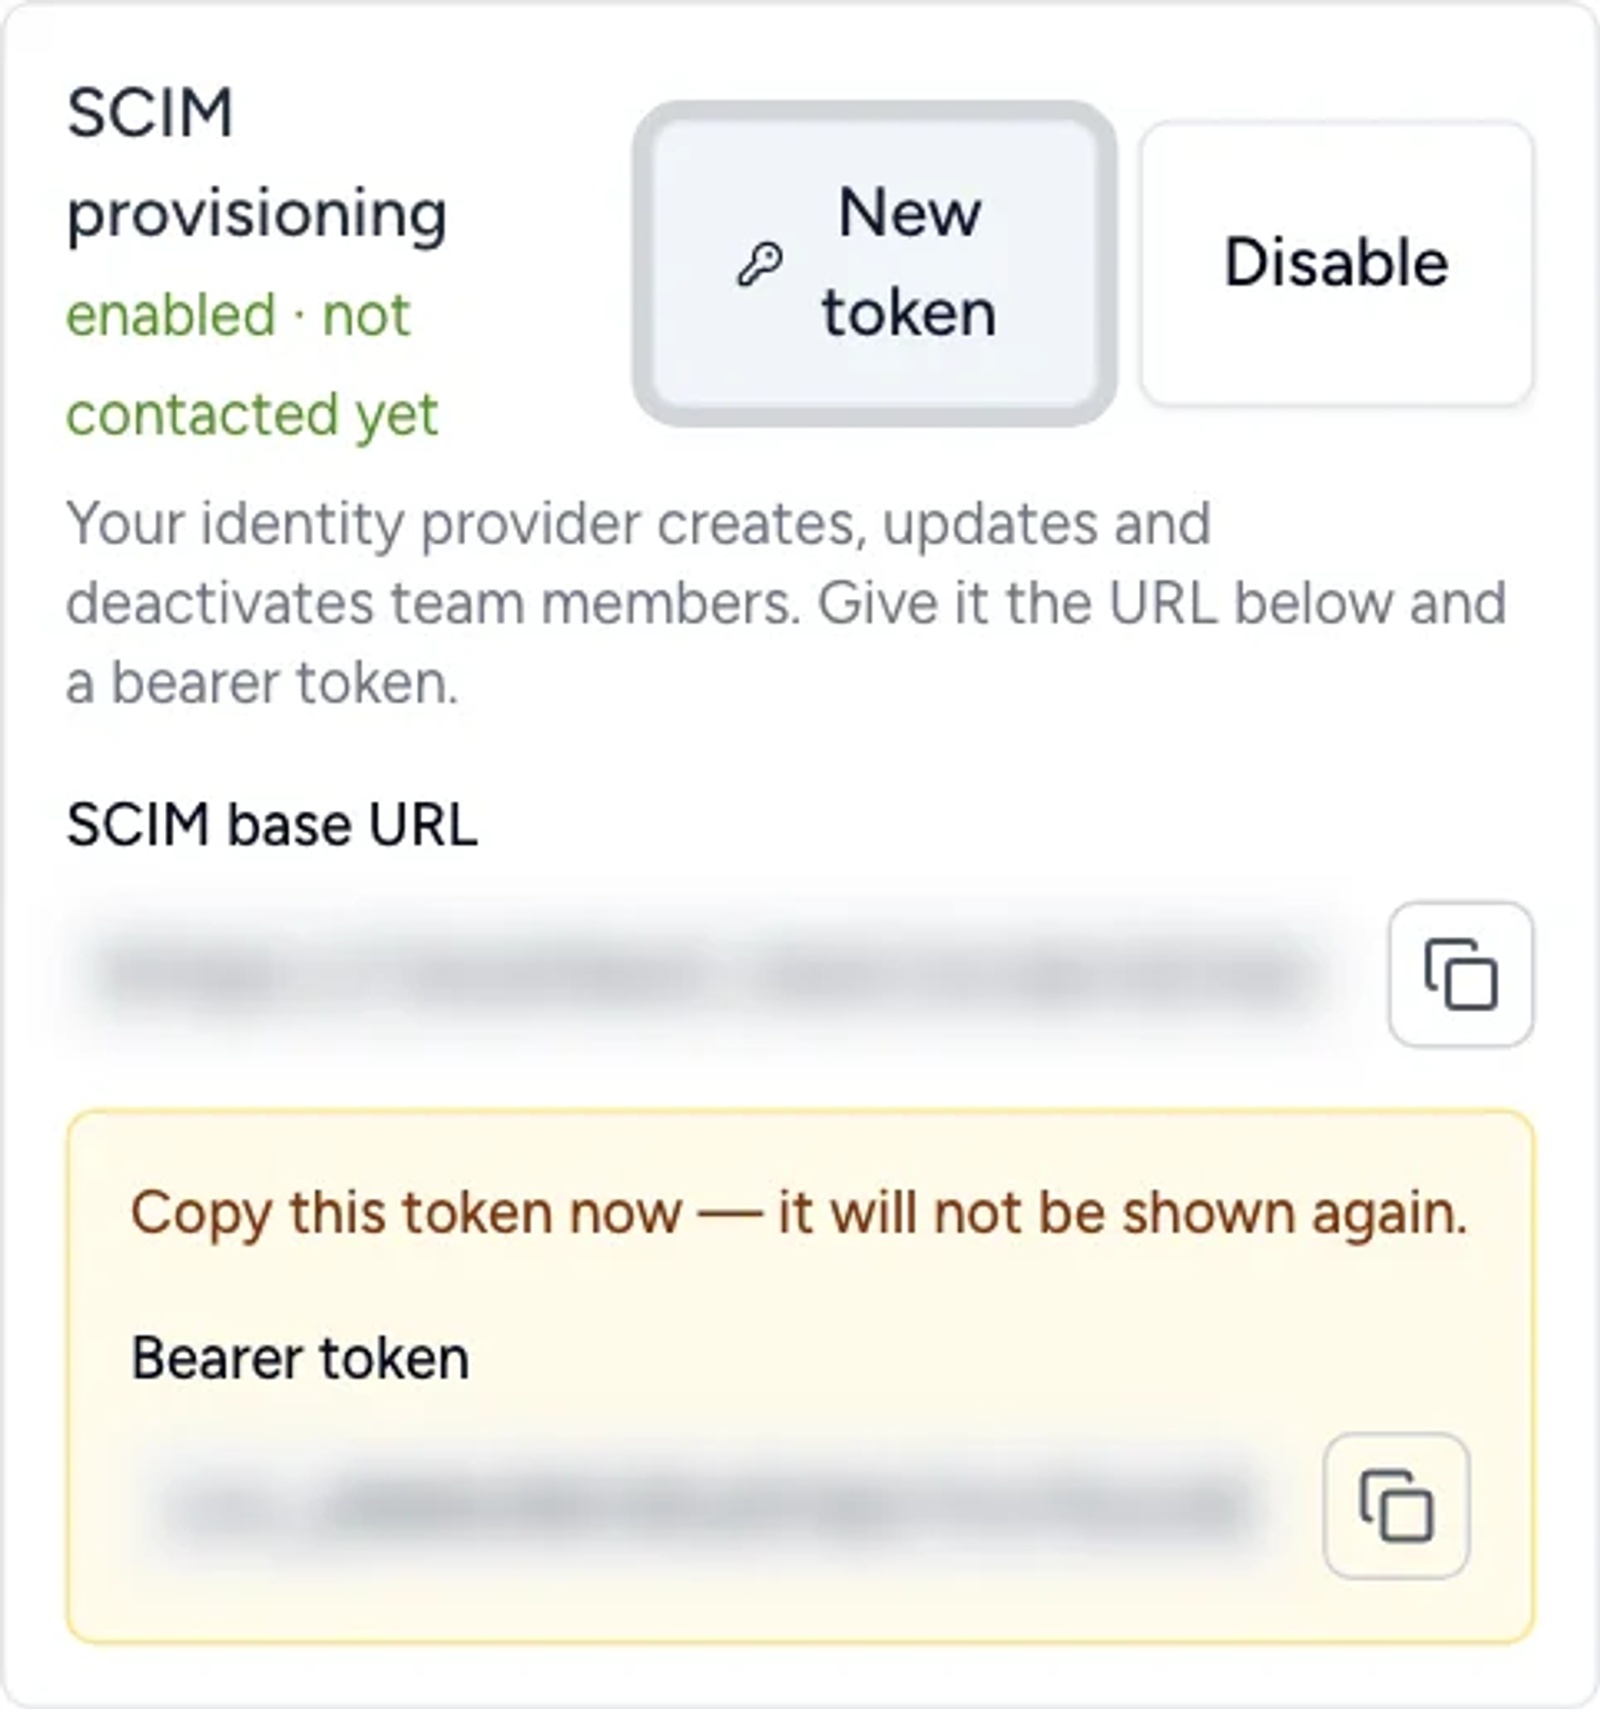
a) On the Microsoft connection card under Team Settings > Security > Single sign-on, click Enable SCIM (or New token if it is already on).
b) Copy the SCIM base URL. It ends in /scim/v2/ followed by your connection's name.
c) Copy the Bearer token straight away.
⚠️ Important: the bearer token is shown once and stored only as a hash. If you lose it, click New token and use the new one. A new token stops the old one working.
Turning SCIM on revokes any pending invitations for the connection's domains. From now on Entra decides who from those domains joins. Contactzilla tells you how many were revoked.
Setting Up SCIM Provisioning in Entra
You create a provisioning app in your own Entra tenant, point it at Contactzilla, and assign the groups whose members should be in the team. All of this is in the Microsoft Entra admin center.
Step Five: Create the Provisioning App
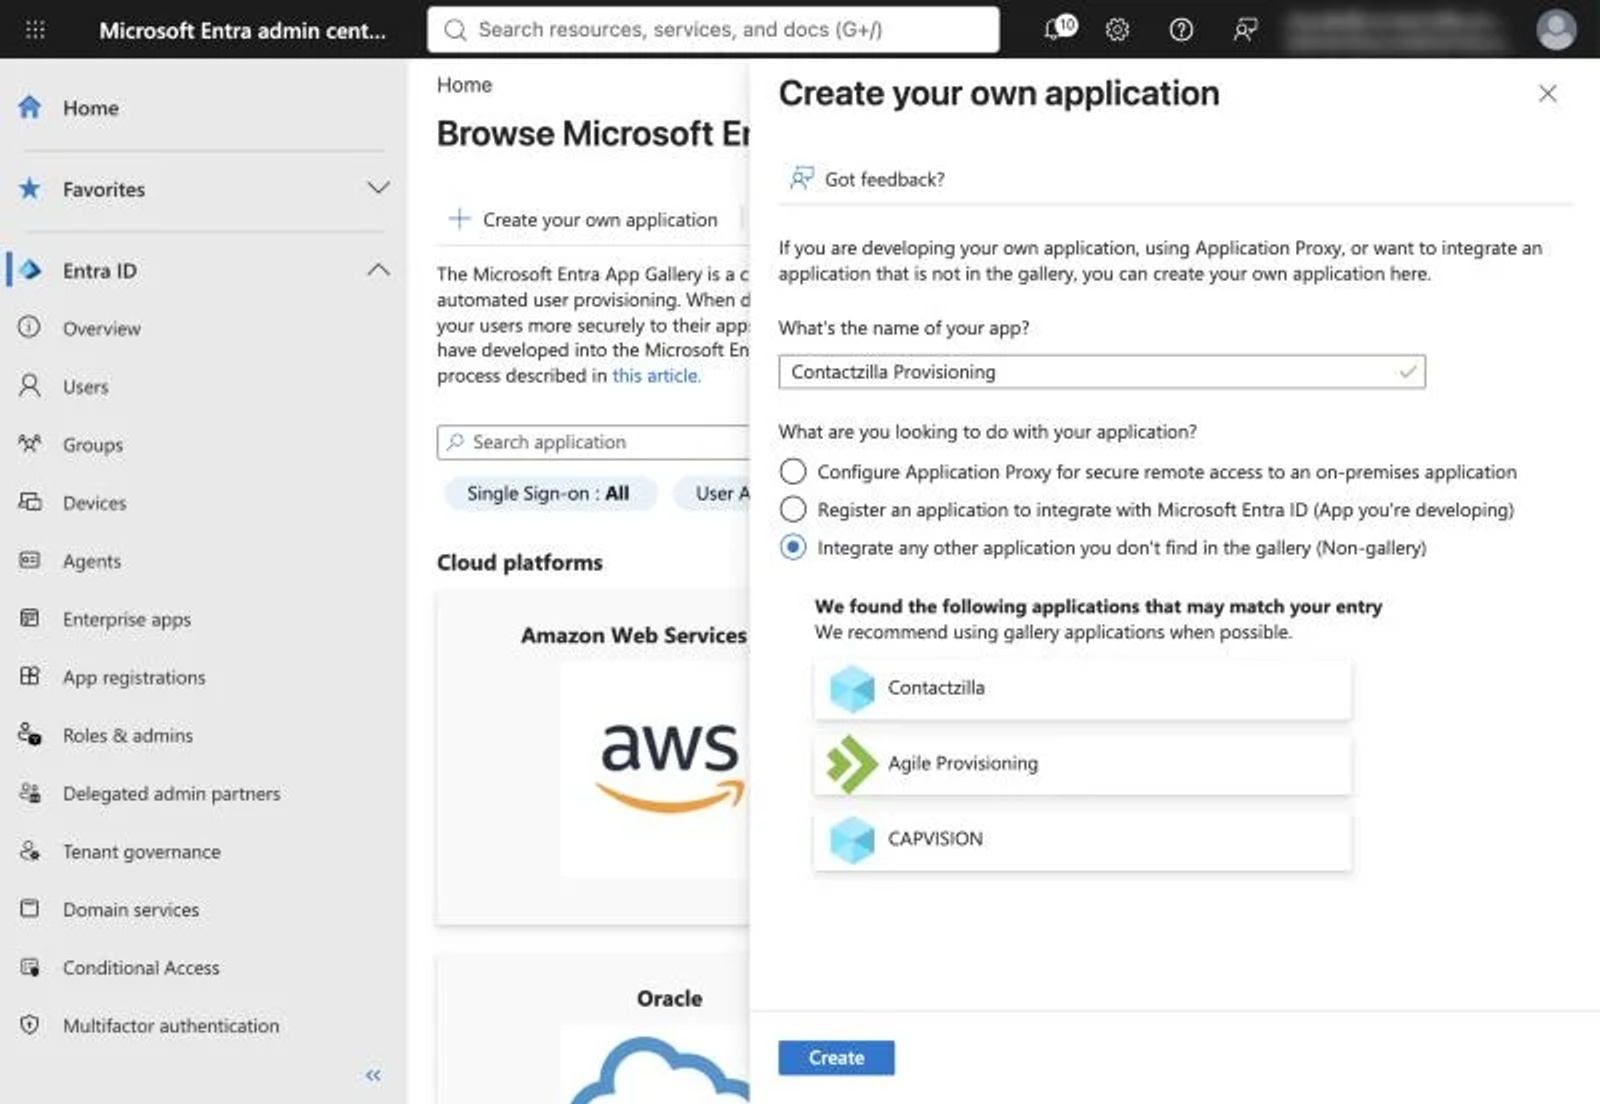
a) Enterprise apps > New application > Create your own application.
b) Name it, for example Contactzilla Provisioning.
c) Choose Integrate any other application you don't find in the gallery (Non-gallery), then click Create.
💡 Entra may suggest gallery apps with a similar name, including one called Contactzilla. Ignore them and keep the non-gallery option.
Step Six: Connect It to Contactzilla
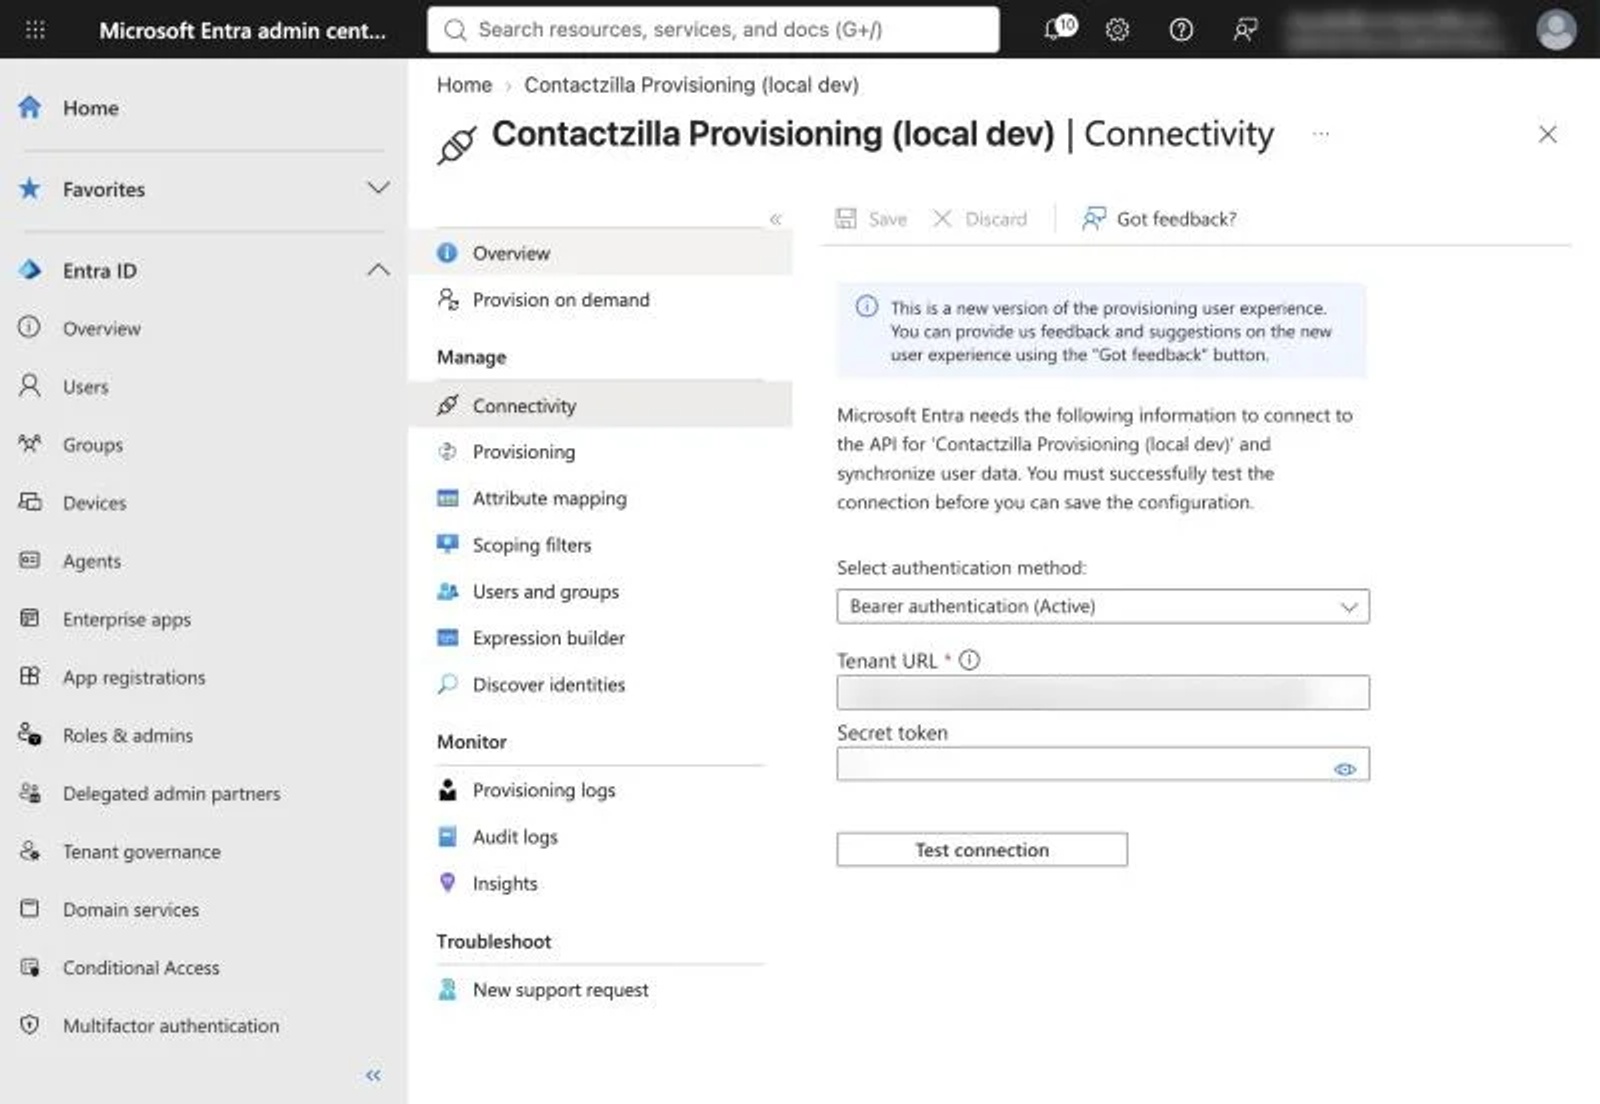
a) In the new app, open Provisioning and click Connect your application. Older portals call this Get started, with mode Automatic.
b) Set Select authentication method to Bearer authentication.
c) Paste the SCIM base URL from Step Four into Tenant URL, and the bearer token into Secret token.
d) Click Test connection. Success means the URL and token are right. A 401 error means the token is wrong.
e) Click Create. The settings are kept under Connectivity afterwards.
Step Seven: Check the Attribute Mappings
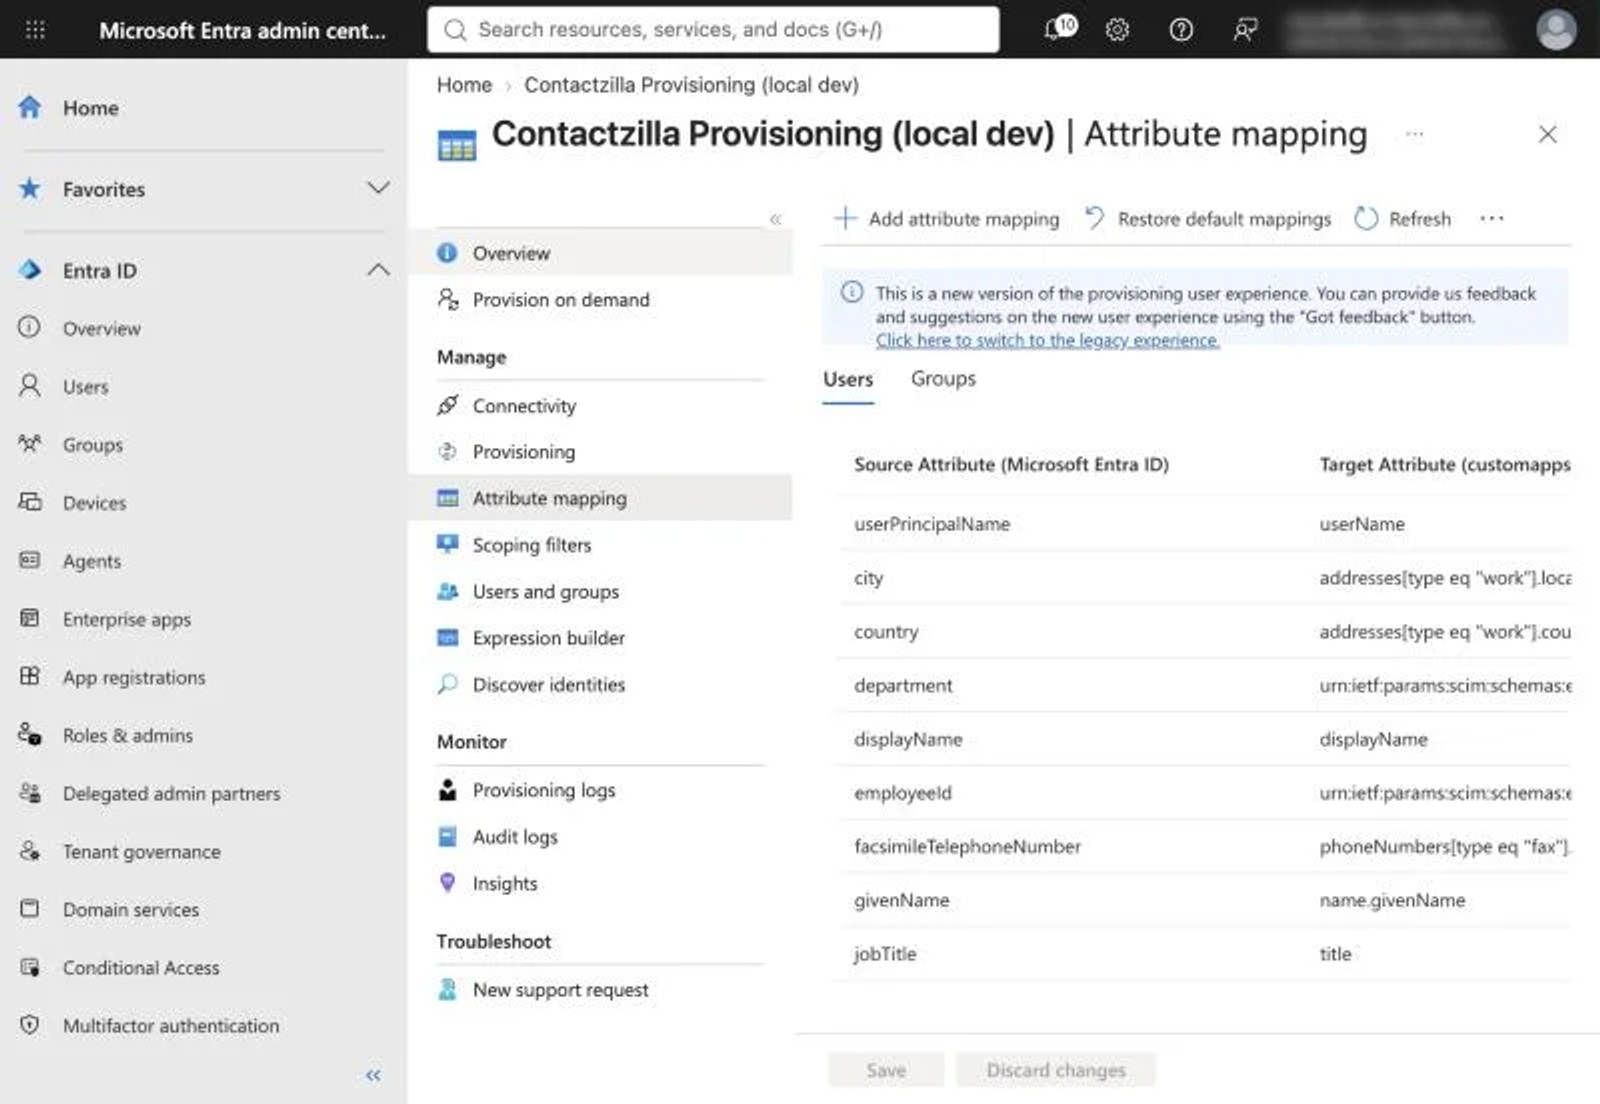
Open Attribute mapping. Entra's defaults work for both the Users and Groups tabs. Check two user mappings:
- userName ← userPrincipalName. Contactzilla treats
userNameas the person's email address. If your sign-in names are not your email addresses, change the source tomail. - externalId ← mailNickname.
objectIdis a better source, because it never changes.
Other attributes, such as job title and phone numbers, are accepted and ignored.
💡 To provision people only and no groups, click Click here to switch to the legacy experience, then Provisioning > Mappings > Provision Microsoft Entra ID Groups and set Enabled to No.
Step Eight: Assign Who Should Be in the Team
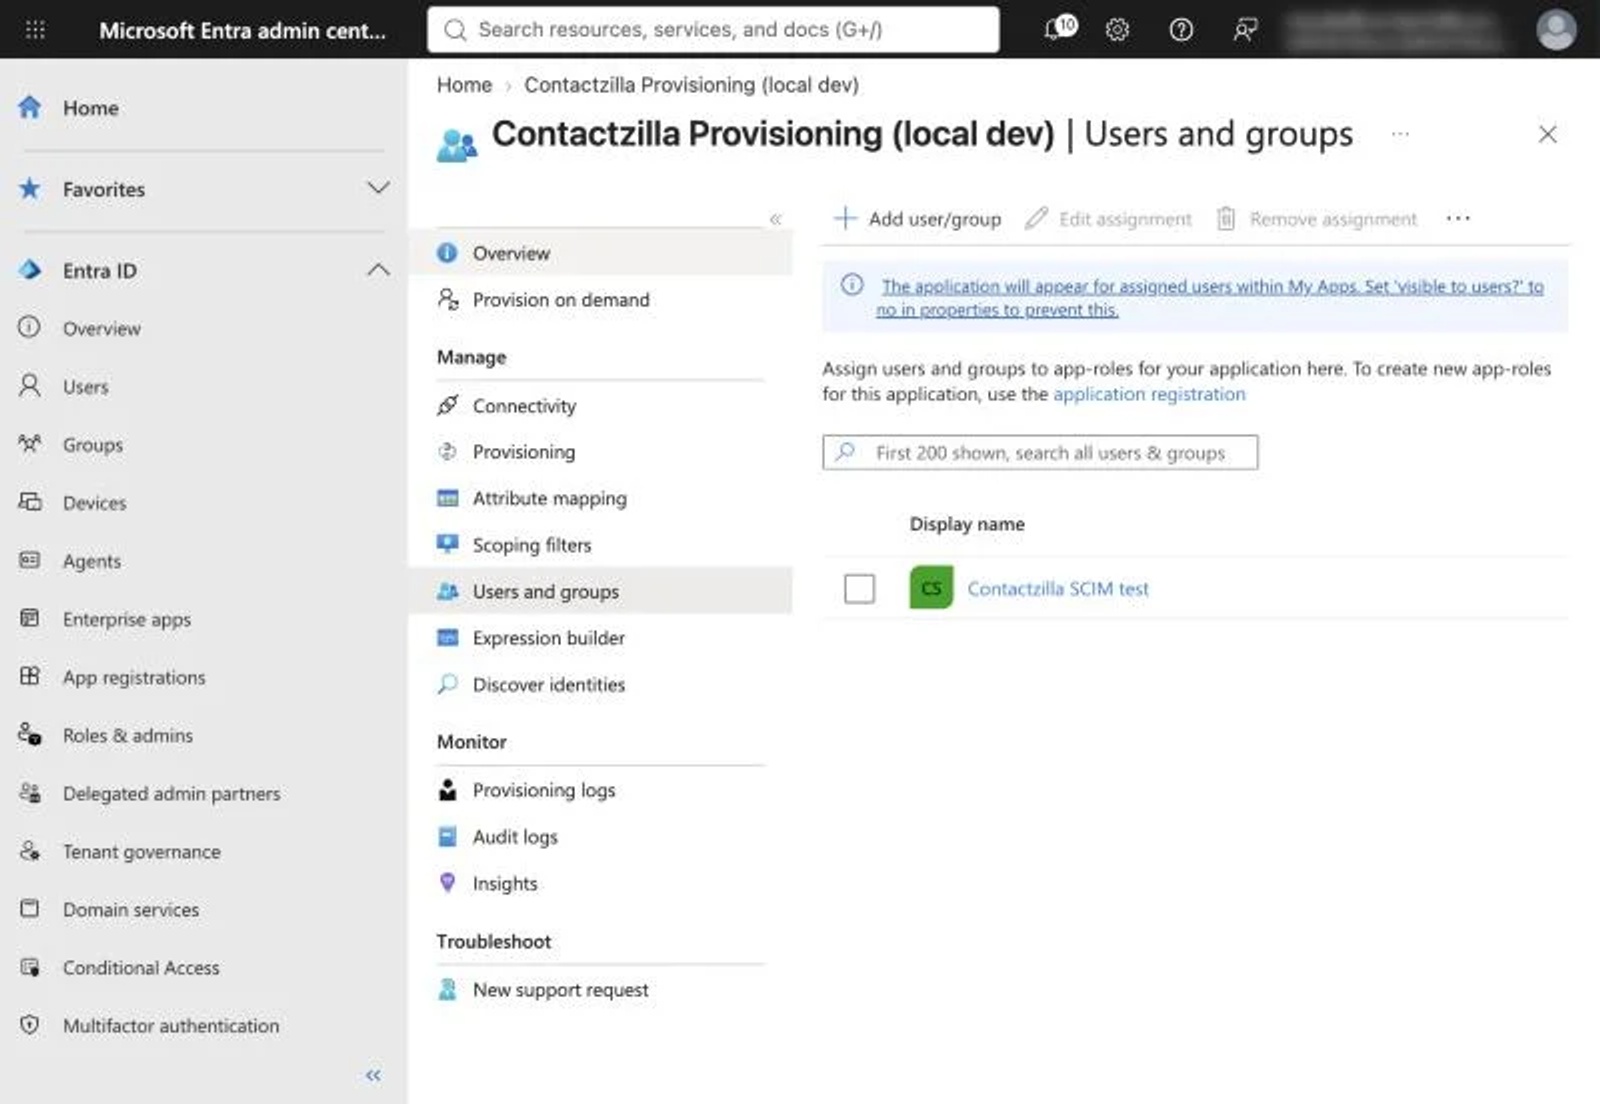
a) Users and groups > Add user/group.
b) Select the groups whose members should be in Contactzilla, then click Assign.
⚠️ Important: assigning groups needs Entra ID P1 or higher. On the free tier, assign people one by one. Entra does not flatten nested groups, so assign the groups that directly contain the people.
Step Nine: Start Provisioning
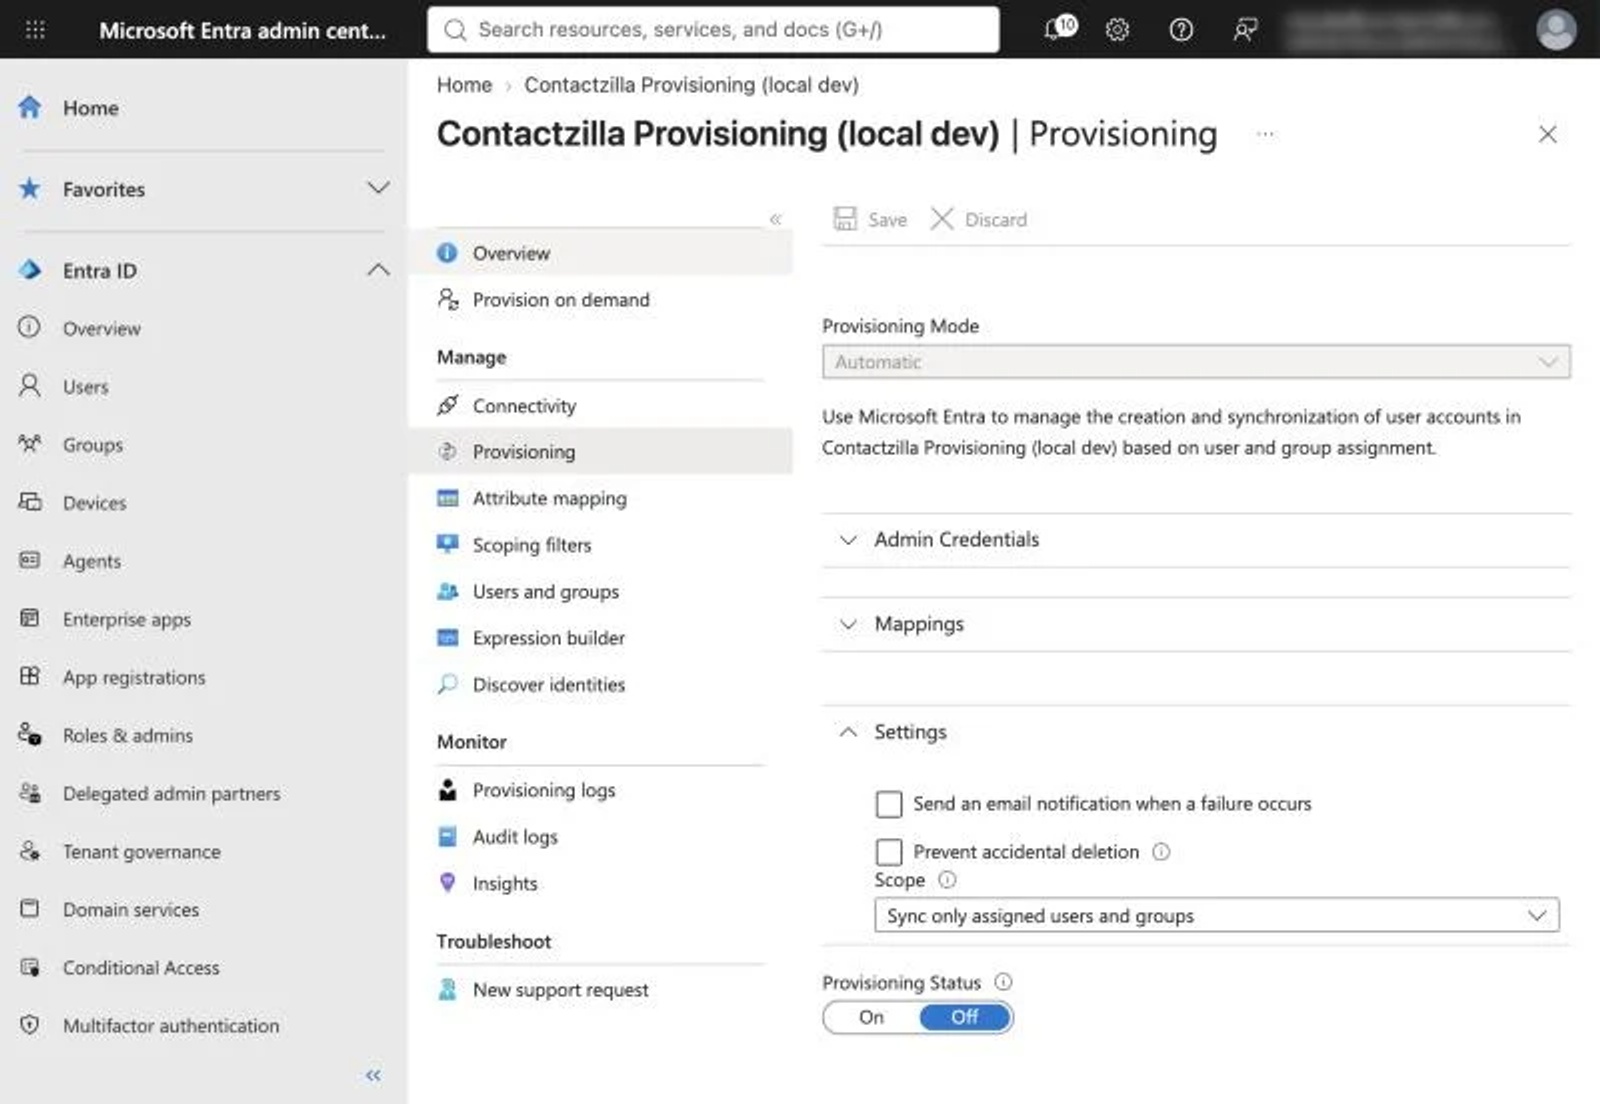
a) Provisioning > expand Settings.
b) Set Scope to Sync only assigned users and groups.
c) Switch Provisioning Status from Off to On, then click Save.
The first cycle starts within a few minutes. After that Entra syncs about every 40 minutes, and each run pushes new people, group memberships, changes and removals.
Step Ten: Try It Straight Away
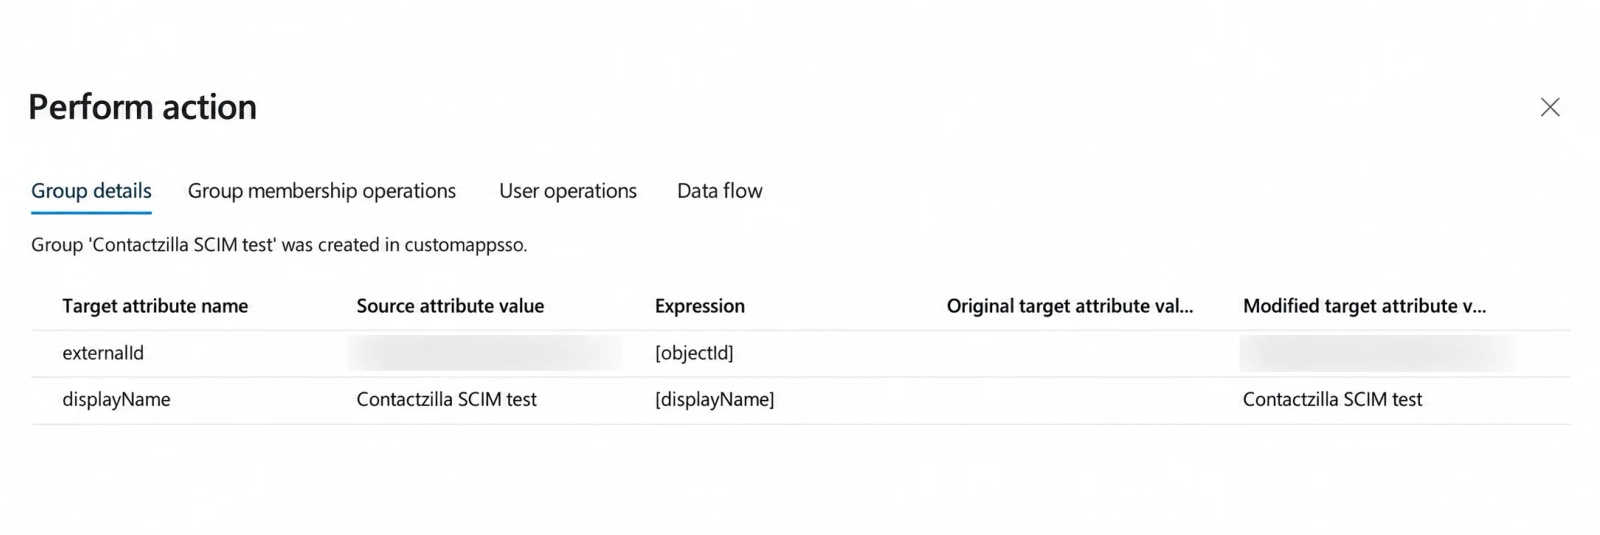
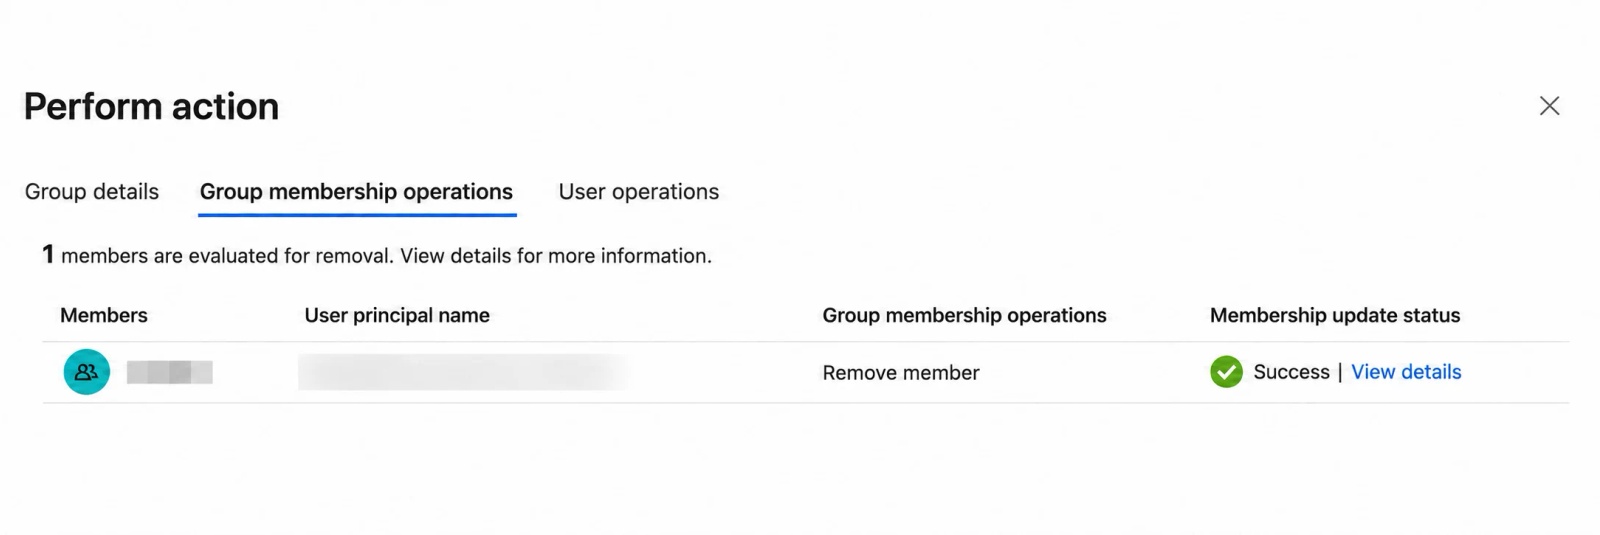
To test without waiting for a cycle, open Provision on demand, choose a group and up to five of its members (or a single user), and click Provision. The result lists each change Entra made in Contactzilla.
Mapping Groups to Roles in Contactzilla
Once Entra has pushed your groups, they appear by name under Team Members > Directory access, where you decide what each one grants. Groups grant nothing until you map them.
Step Eleven: Set the Default Access and Map Each Group
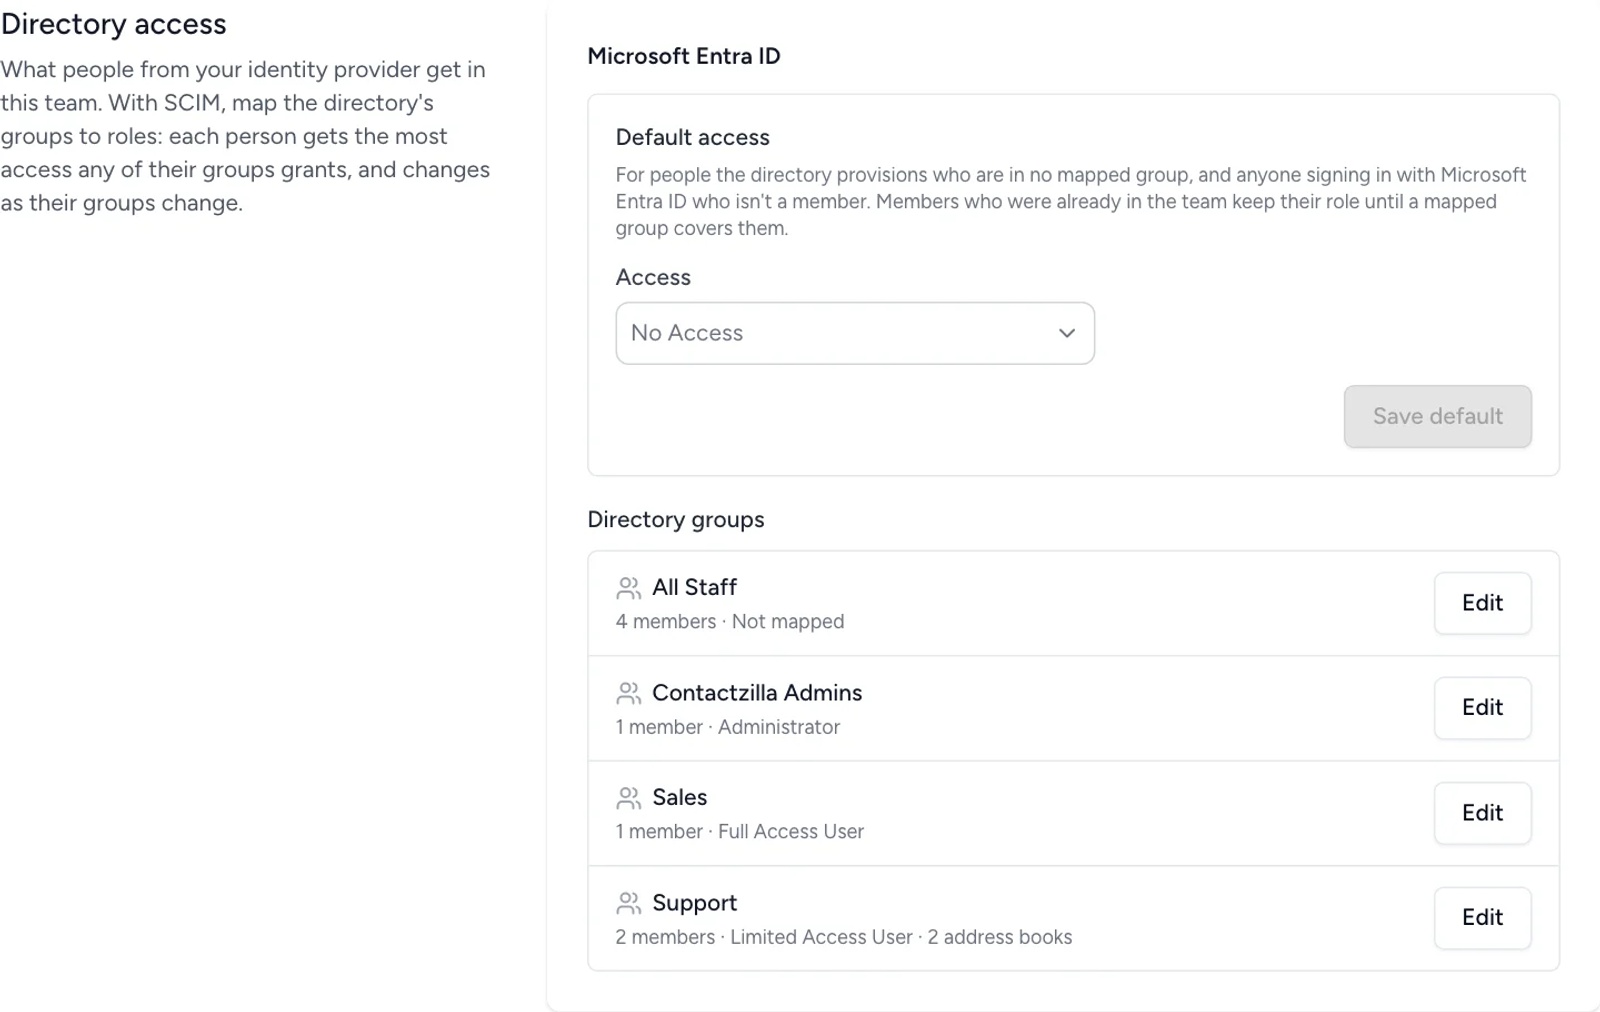
a) Team Members, then scroll to Directory access.
b) Set Default access: what people in no mapped group get, and what anyone who signs in without being a member gets. Choose No Access, Full Access User, or Limited Access User with chosen address books, then click Save default.
While SCIM is on, signing in never admits anyone Entra hasn't provisioned.
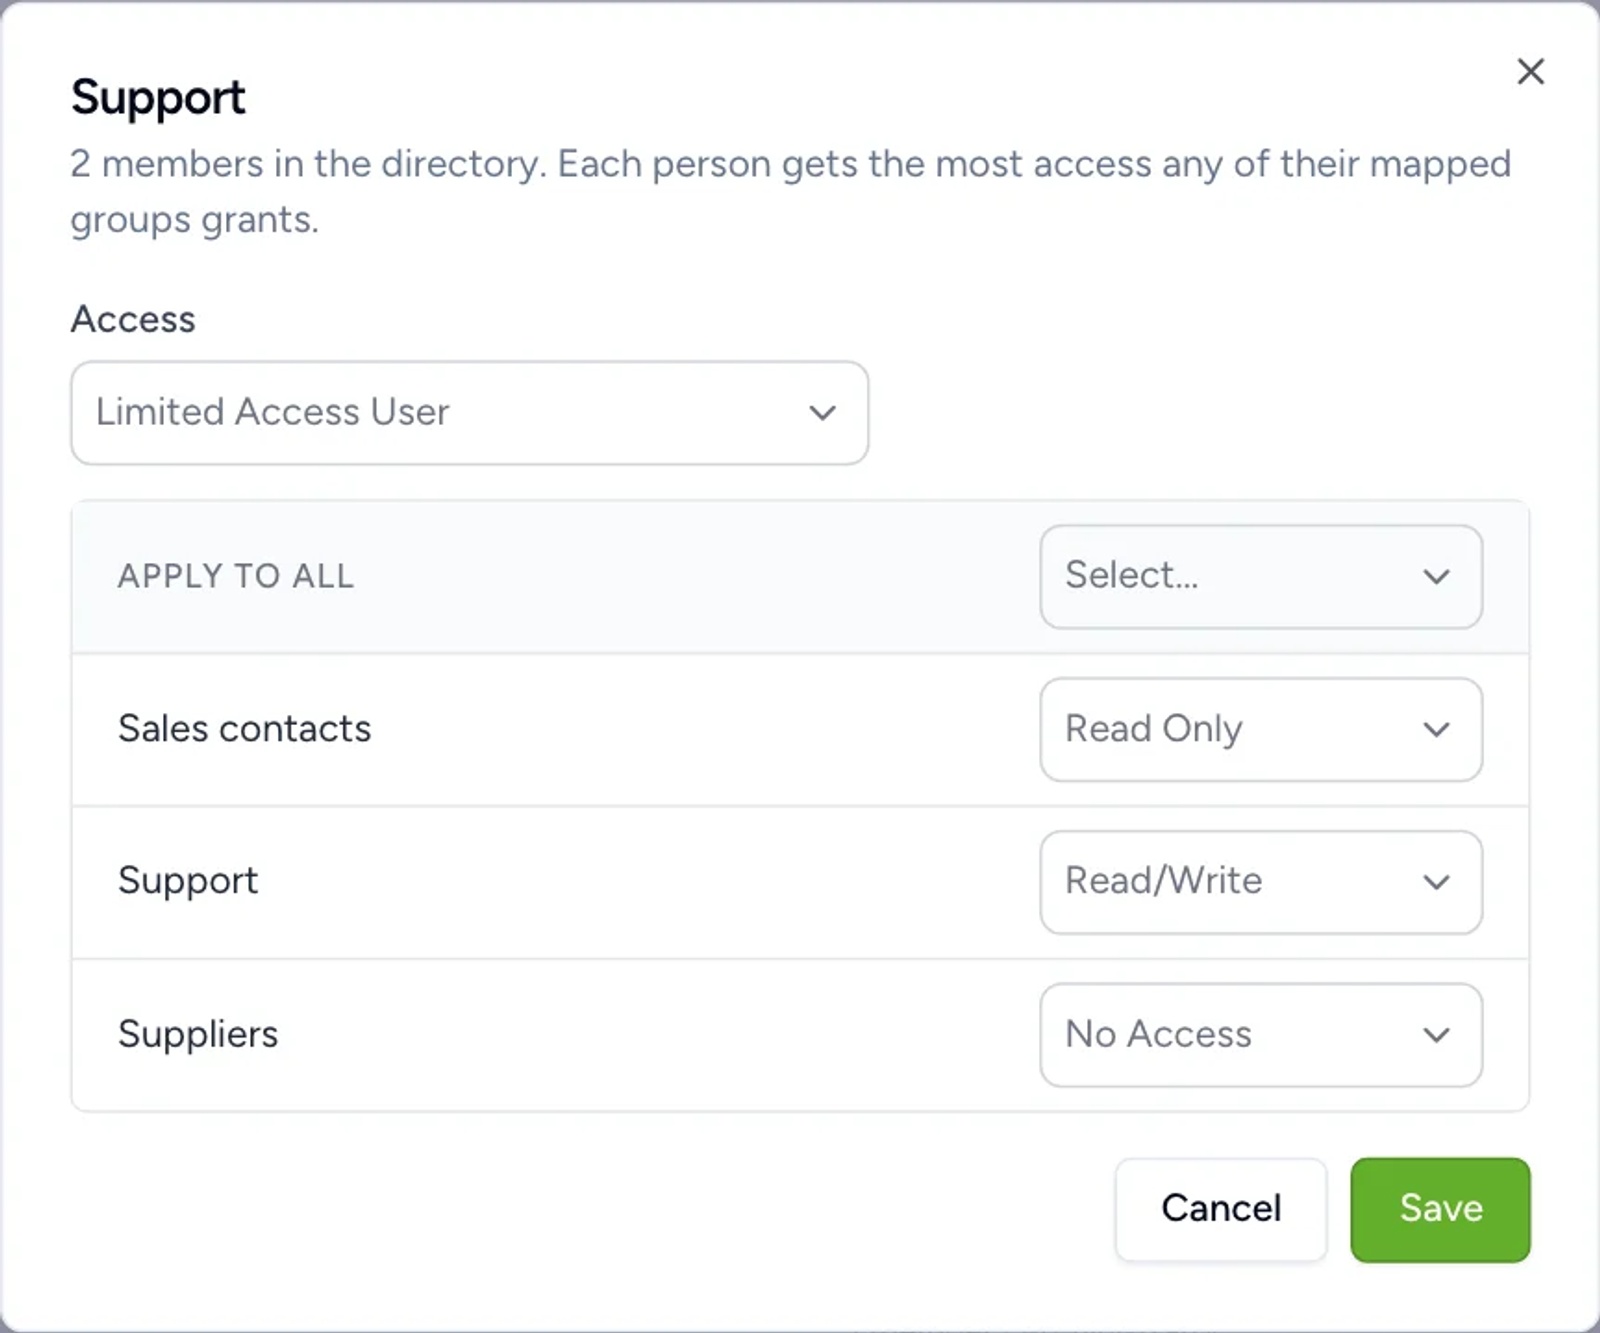
c) For each group, click Edit and choose Administrator, Full Access User, Limited Access User, or Not mapped.
d) For Limited Access User, set each address book to Read Only, Read/Write or No Access, then click Save.
Changes apply at once to everyone affected, with no wait for Entra. The member list marks people managed this way as Directory.
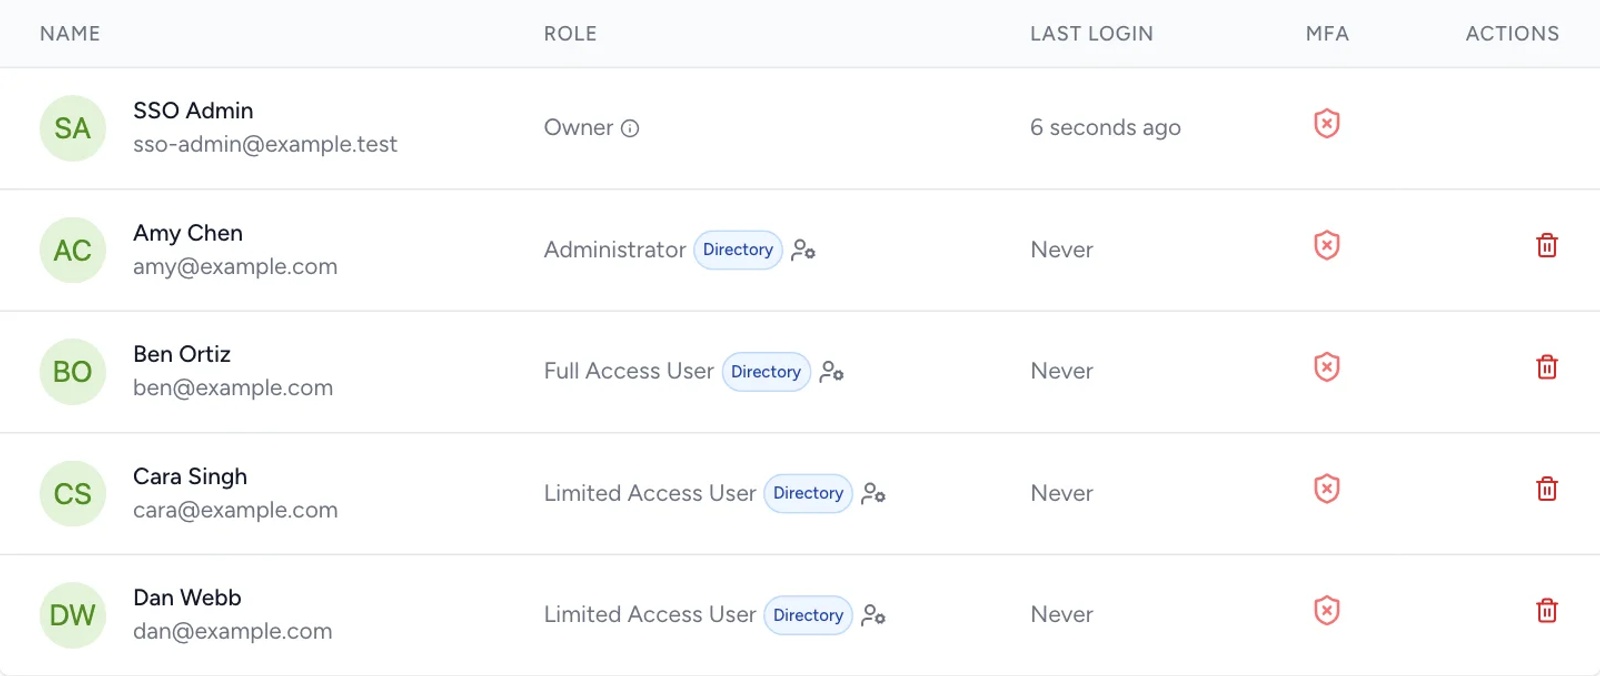
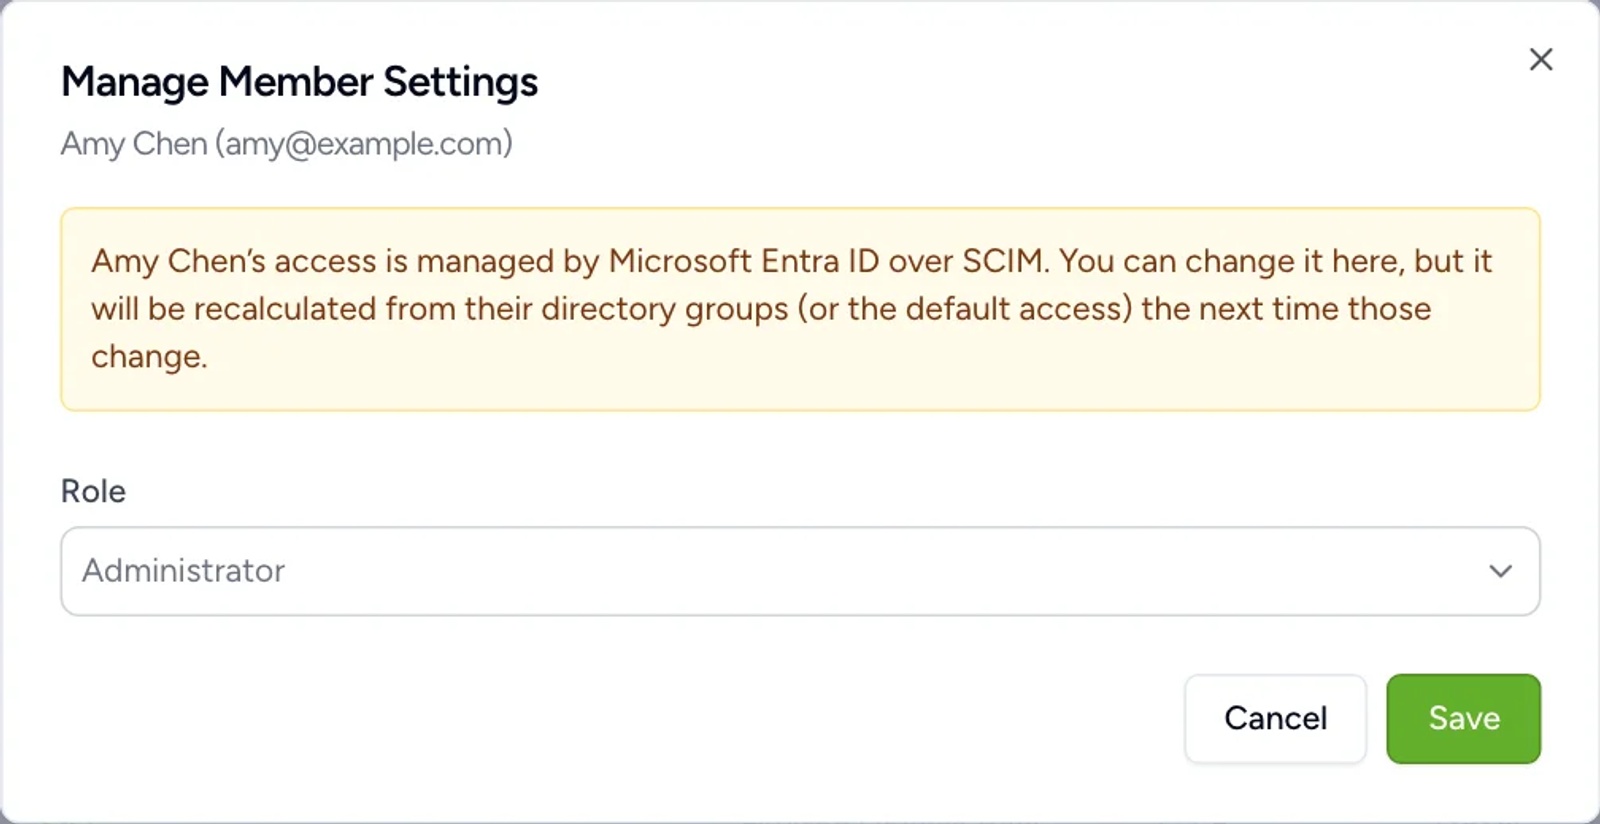
You can still change a Directory member's role by hand. Contactzilla warns you that the next change to their groups, or to the default access, will recalculate it.
You've now connected Microsoft sign-in to Contactzilla and set up Entra to manage who is in your team and what they can access. The sections below explain how access, sign-in and devices behave once it is running.
How Access Works
Signing in with Microsoft proves who someone is. It never on its own makes them a team member. Membership and role come from your invitations, your default access, or, with SCIM, your Entra groups.
Without SCIM
- Already a team member: signs in and keeps their role.
- Has a pending invitation (sent in the last 7 days): joins with the invited role and address books, and the invitation is used up.
- Anyone else: refused with "Your account has no access to <team>", unless an administrator sets a default access under Team Members > Directory access.
New connections start with No Access, so only members and invited people get in until you choose otherwise. Sign-ins are not remembered. A session ends with the normal session lifetime, and the next sign-in goes back through Microsoft, so someone disabled in Entra is cut off then.
With SCIM
Entra pushes people and groups to Contactzilla, and each person's access is worked out from them:
- In one or more mapped groups: the most access any of those groups grants. Administrator ranks highest, then Full Access User, then Limited Access User.
- In several groups mapped to Limited Access: the address books of all of them. Read/write wins over read-only for the same book.
- Assigned, but in no mapped group: your default access (No Access, Full Access User, or Limited Access User with chosen books).
- Removed from a group: recalculated straight away from the groups they are still in.
- Unassigned or disabled in Entra: removed from the team at the next sync and their devices wiped. Their Contactzilla account is kept.
A few rules protect you while you set this up:
- The team owner and MDM device users are never changed by SCIM.
- People already in the team when SCIM first links them keep their current role until a mapped group covers them, so turning SCIM on before you map an admin group never demotes your administrators.
- Invitations: turning SCIM on revokes pending invitations for your SSO domains, and while it is on, people on those domains can't be invited. Assign them in Entra instead. Invitations to other domains, such as contractors, are untouched.
- Manual changes to a SCIM-managed member are allowed on the Team Members page, which marks them Directory and warns you that their next group change recalculates the role.
Roles come from SCIM rather than from sign-in on purpose. Contactzilla checks a member's role on every request, including API tokens, MCP and CardDAV, so a role SCIM keeps up to date applies everywhere at once.
Several Teams in One Organisation
More than one of your teams can add the same Microsoft tenant and email domain. One sign-in then reaches every one of those teams, and each team applies its own rules above: members keep their role, invited people join, and newcomers get that team's default access or nothing. People land in the team they were last working in.
This works when each team uses Contactzilla's app. Teams using their own app registrations are kept separate, and a sign-in only reaches the team it went through.
How Your People Sign In
The Contactzilla login page asks for an email address first, then shows only the ways in that work for it:
- A member of your team, Require SSO off: Sign in with Microsoft and a password box.
- A member of your team, Require SSO on: Sign in with Microsoft only, with no password box. If they also have teams of their own, they see a password box too, for those.
- Someone new on your verified domain: Sign in with Microsoft, and a password box unless Require SSO is on.
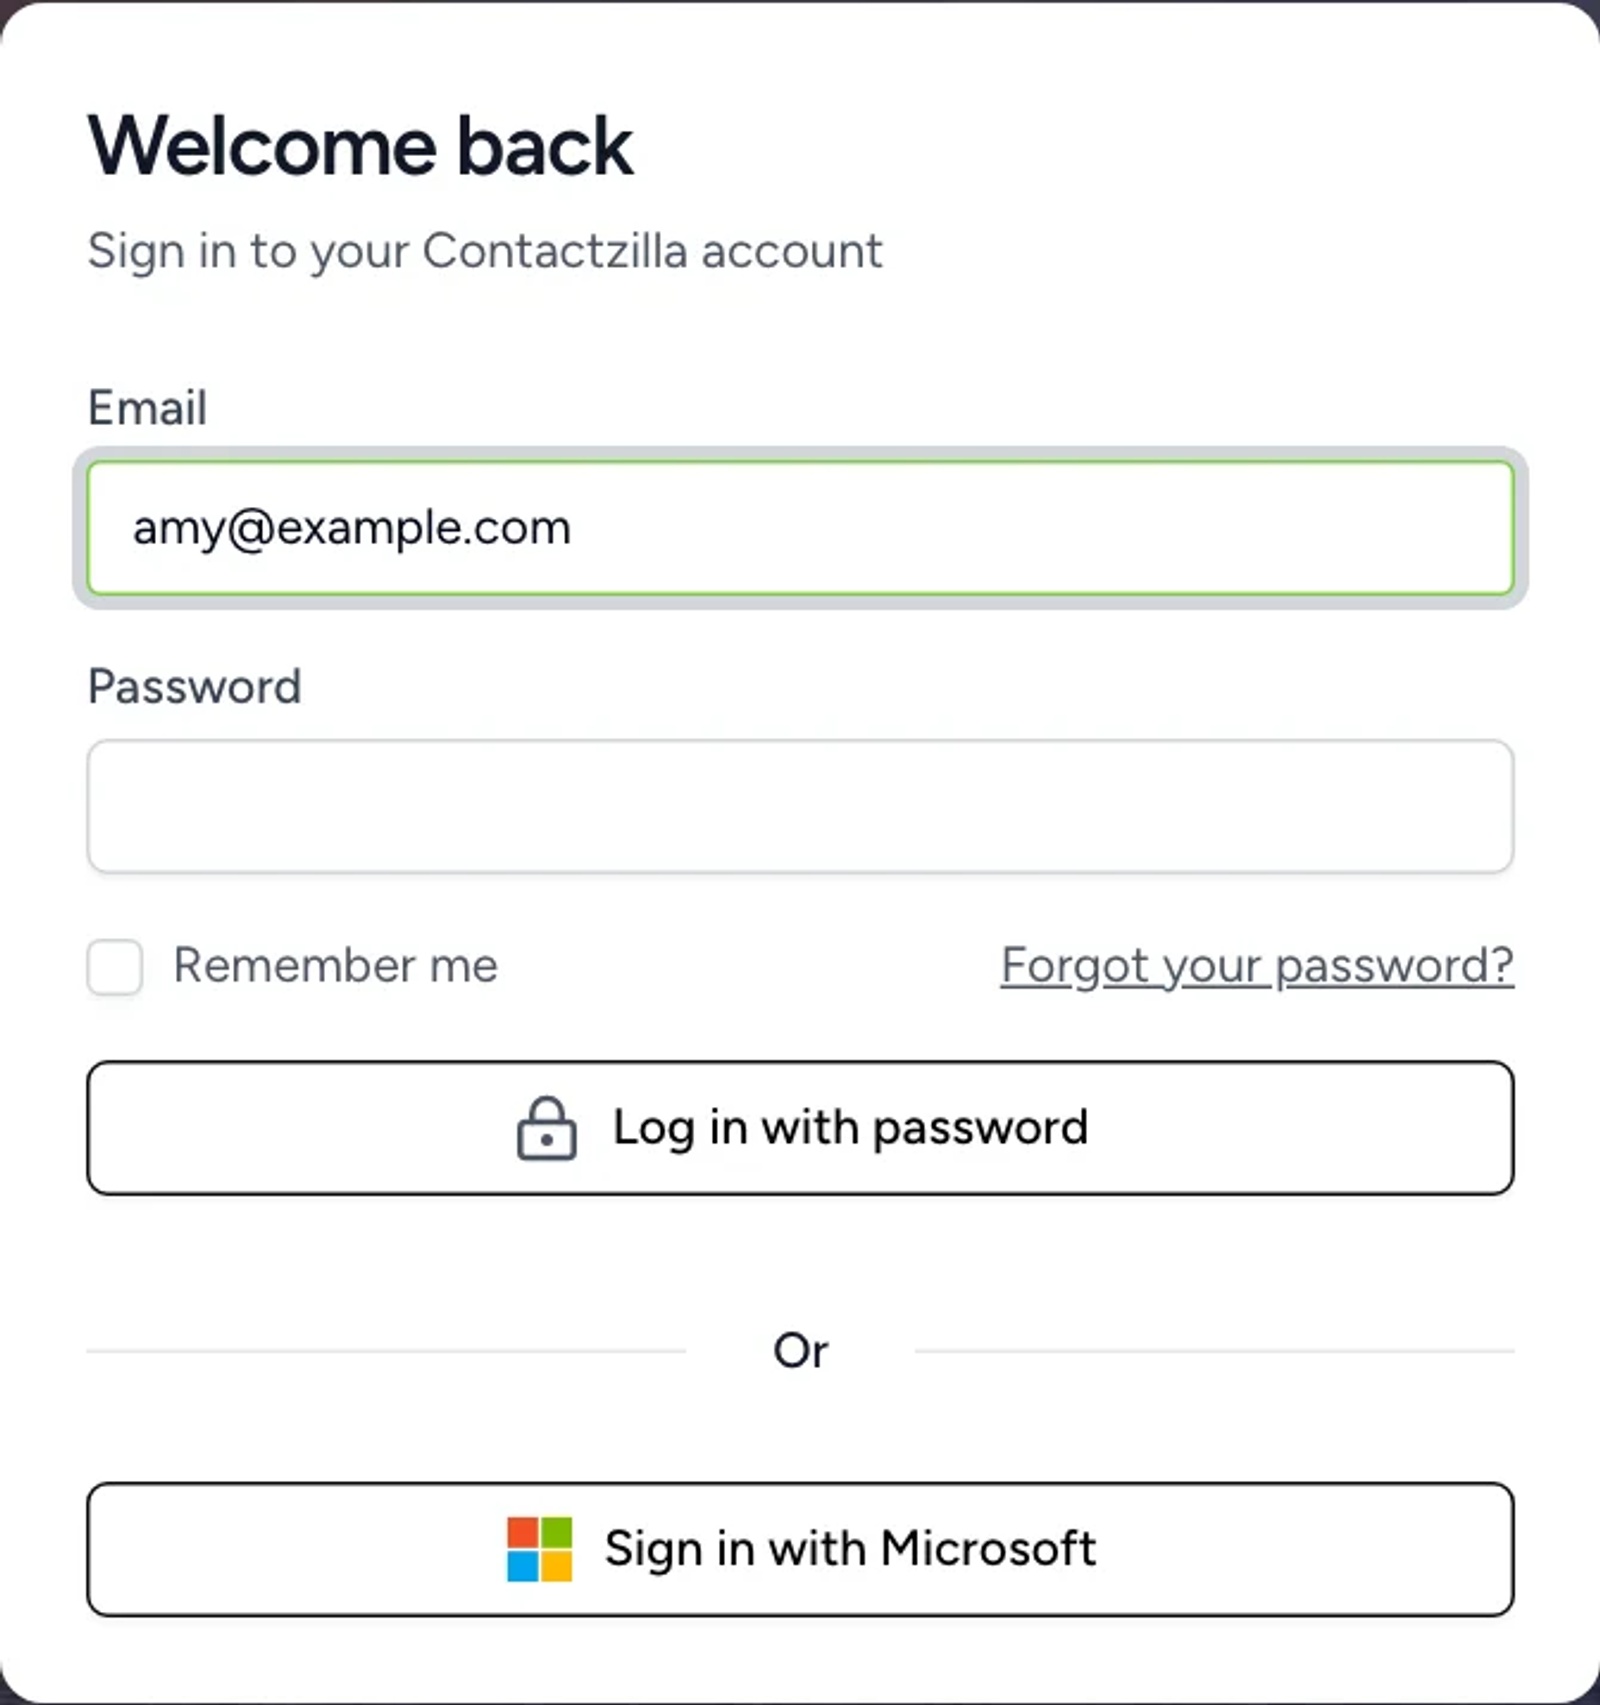
- People who have added a passkey, or linked Google, also see those buttons, unless every team they belong to requires SSO.
- Contactzilla remembers the last address used on each browser, so next time the right button is already there. Not you? clears it.
- Require SSO protects your team, not the person's whole account. Someone who signs in with a password to use a team of their own is sent to Microsoft as soon as they open your team, and brought back once they have signed in. Your team stays hidden until then, and they can't create API tokens or connect apps until they have.
- Someone whose only team is yours can't use a password, passkey or Google at all.
Who Can Be in the Team
Single sign-on only protects your team if your people come through it. Only people on your single sign-on domains, on the Single sign-on page, limits the team to email addresses on your providers' domains:
- It is on by default when you add a provider, as long as nobody in the team is on another domain.
- It can't be turned on while members are on other domains. The page lists them: remove them, or change their address, first.
- Turning it on cancels pending invitations to other domains. The page tells you how many before you switch it on.
- While it is on, invitations to other domains are refused, and members can't change their email to another domain.
- The team owner and MDM device users are exempt.

With Require SSO on as well, everyone else signs in through Microsoft.
Inviting People
When you invite someone at one of your verified domains, the invitation tells them to join by signing in with Microsoft:
- Require SSO on: the email says your team signs in with Microsoft, and the link opens a page with only Sign in with Microsoft. Signing in creates their account, using the name Microsoft provides, and joins them with the role you chose. They never set a Contactzilla password.
- Require SSO off: the email and page offer Sign in with Microsoft, or a password if they prefer.
- People on other domains get the usual invitation and register with a password.
If an invitation can't be delivered, or the recipient marks it as spam, the Team Members page shows it as Bounced or Marked as spam under Pending Team Invitations, and whoever sent it gets an email. Check the address, then invite them again.
💡 A team has one single sign-on provider. To change it, edit the provider, or remove it and add the new one.
What Each Change in Entra Does
- Assign a person, or add them to an assigned group: creates their account (or links the existing one on that email) and gives them their groups' access or the default.
- Change their name or email: updates their account, on verified domains only.
- Add them to, or remove them from, a mapped group: recalculates their role and address books.
- Unassign or disable them: removes them from the team, blocks their Microsoft sign-in and wipes their devices. The account is kept.
- Re-enable or reassign them: puts them back with the access their groups give.
- Delete them (after Entra's 30-day soft delete): removes them from the team and unlinks them. The account is kept.
- Assign a new group: lists it under Directory access, granting nothing until you map it.
- Rename a group: renames it, and its mapping is kept.
- Unassign or delete a group: removes it and recalculates its members.
Every change is recorded in the team's audit log (Logs), naming the group or default access that caused it. The connection card shows when Entra last called.
What Happens to Devices When Someone Leaves
When someone stops being a member of your team, their phones and other devices stop syncing your address books and remove your contacts. This applies whether they are disabled or unassigned in Entra, lose access through a group change, are removed on the Team Members page, or delete their Contactzilla account.
- Each of their device connections on your team's address books is deleted with Wipe on next connect, the same as deleting it on the Devices page with wipe ticked. At its next sync the device removes those contacts, and after that it is refused.
- This applies at every access level: Inherit, Full, Read only and Selective read only.
- Only your team's address books are affected. A device syncing another team's address book they still belong to carries on.
- Changing someone's role is not leaving: their devices keep syncing with the new access.
- Each wiped device is recorded in the team's audit log as Device connection deleted, with the reason.
Devices with no network connection keep their contacts until they next sync.
Troubleshooting
- "Your account has no access to <team>": the person is not a member, has no pending invitation, and default access is No Access. Invite them, set a default access, or assign them in Entra with SCIM.
- "Your identity provider hasn't given you access to <team> yet": SCIM is on and Entra hasn't provisioned this person (or has removed them). Assign them to the provisioning app in Entra, then use Provision on demand or wait for the next sync.
- "<domain> has not been verified": run Test sign-in with an account that has an email on that domain, or add the DNS TXT record from the card.
- Test sign-in works but the domain stays unverified: the account has no email in Entra, so Microsoft sent only its sign-in name. Set the user's Email property and test again.
- "The account belongs to a different Microsoft tenant": the person signed in from another tenant, or the connection has the wrong tenant ID.
- AADSTS65001 or "Need admin approval": your tenant blocks user consent. A tenant administrator clicks grant consent on the card.
- AADSTS700016 "application not found in the directory": wrong tenant ID, or consent was never granted in that tenant.
- Entra Test connection fails with 401: the token is wrong or was replaced. Click New token in Contactzilla and paste the new one.
- Provisioning error 400 "is not verified for this connection": verify the domain in Contactzilla first (Step Two).
- Provisioning error 400 "not covered by this connection's domains": the person's
userName(by default their sign-in name) is on a domain the connection doesn't list. Add the domain, or mapuserNamefrommail. - An invitation to someone on your domain is refused: SCIM is on for that domain. Assign them in Entra instead.
- A group shows but people get no access: the group is not mapped yet. Map it under Team Members > Directory access.
Still Need Help?
Our support team is available to assist you with any questions or issues you may have.
Still need help?
Our support team is available to assist you with any questions or issues you may have.