Contactzilla Logo
  • Features
  • Pricing
  • Blog
  • Contact Us
Login
Start FREE Trial
Contactzilla Logo
Contact management for teams

How to Sync Contactzilla with BusyContacts (CardDAV Two‑Way Setup)

Getting Started

2
  • Getting started: Setting up a team and address book
  • Managing Team Members and Permissions

Contact Organization

4
  • Using Labels to Organize and Filter Contacts
  • Understanding Group Labels
  • Custom Fields in Contactzilla
  • Color Coding Labels in Contactzilla

Deployment and Device Integration

6
  • Setting Up CardDAV Connections
  • Setting Up MDM Deployments in Contactzilla
  • How to Sync Your Contactzilla Address Book with Android Devices
  • Adding a Contactzilla address book to OSX Contacts: Using the provisioning Profile
  • Adding Contacts from Your iOS Device (or OSX contacts) to Contactzilla
  • Adding a Contactzilla address book on your iPhone: Using the provisioning Profile

Platform Specific

3
  • How to Deploy Contactzilla Address Books to iOS Devices using Microsoft Intune MDM
  • How to Sync Contactzilla with BusyContacts (CardDAV Two‑Way Setup)
  • Setting up Outlook with CalDAV Synchronizer
Laptop showing different contacts that have been imported.

Importing contacts

2
  • Importing Contacts from Salesforce into Contactzilla
  • Import contacts from a CSV to a Contactzilla address book

Exporting Contacts

1
  • How to setup Google oAuth/OIDC for Google Shared Contacts Export
View Categories
  • Home
  • Help
  • Platform Specific

How to Sync Contactzilla with BusyContacts (CardDAV Two‑Way Setup)

3 min read

What You’ll Need

1) A Contactzilla account with an existing address book
2) BusyContacts installed on macOS (10.13+)

Step One: Add Contactzilla Account in BusyContacts

The first step is to add your Contactzilla address book as a synced account in BusyContacts.

1) Open BusyContacts and click the ‘BusyContacts’ menu followed by ‘Settings’.
2) Select the accounts pane and click the + button in the bottom left
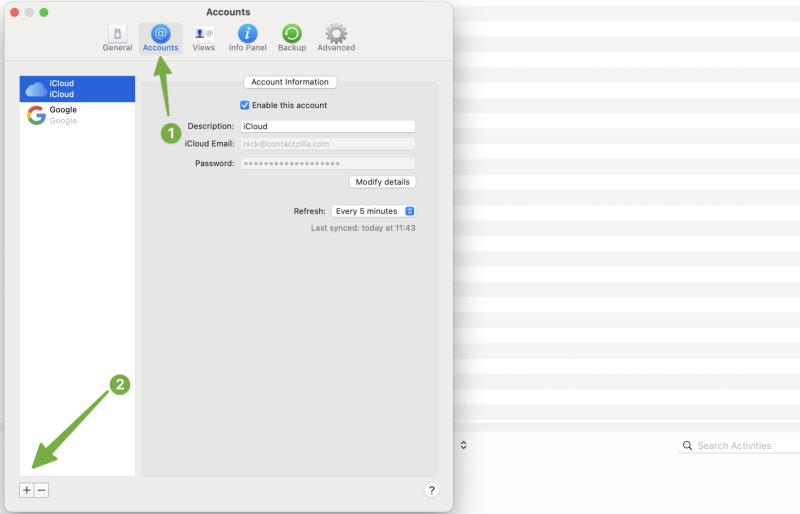
BusyContacts “Accounts” preferences window on macOS. The sidebar shows two existing accounts — ‘iCloud’ (purple dot) and ‘Google’ (black dot). A green arrow labeled “1” points to the highlighted “Accounts” tab at the top. A second green arrow labeled “2” points to the “+” button in the bottom-left corner of the sidebar, which is used to add a new account.


3) From the pop-up that follows choose ‘Contactzilla’.
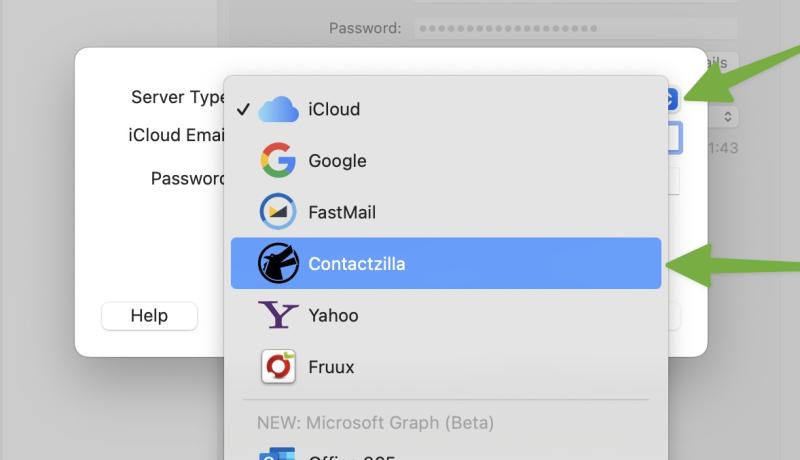
A screenshot of the account setup dialog in BusyContacts on macOS. Two green arrows indicate steps: the top arrow points to the server type dropdown, and the lower arrow highlights “ContactZilla” selected from the list of account types, which includes options like iCloud, Google, FastMail, Yahoo, and Fruux.


4) You’ll now see fields for Username and Password. Keep this window open. We will return once we have generated the the login details from Contactzilla
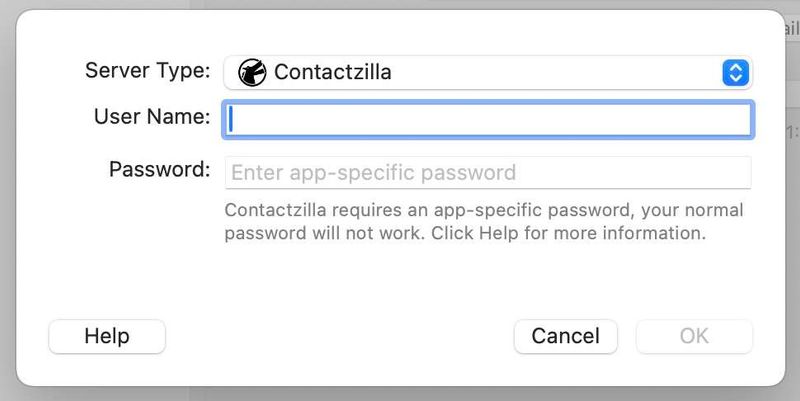
BusyContacts login dialog with ‘Server Type’ set to ContactZilla. The form includes fields for ‘User Name’ and ‘Password’ with a note explaining that an app-specific password is required. Buttons for ‘Help’, ‘Cancel’, and ‘OK’ appear along the bottom.

Step Two: Get CardDAV Credentials from Contactzilla

1) Login to Contactzilla and select the address book that you wish to synchronize with Busy Contacts. In this example it is ‘Shared staff contacts’.
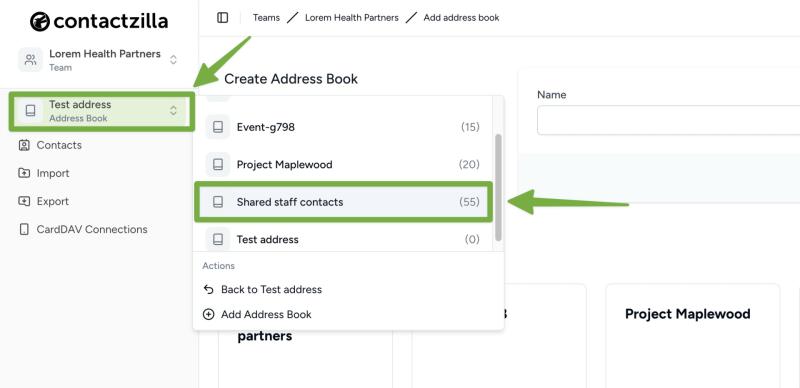
The ContactZilla web interface showing the ‘Create Address Book’ screen. A dropdown list of address books is open, with ‘Shared staff contacts’ highlighted in green. Green arrows point to the address book selector and the currently active address book titled ‘Test address’.


Tip 💡: If you havn’t yet set up an address book, our Getting Started Guide walks you through setting up your team and adding your first address book.

2) Click on ‘CardDAV Connections’. From here we will create a CardDAV connection for this particular address book. From the drop down menus on this screen select the following and then hit the ‘Create’ button:

  • Connection Type: ‘Other’.
  • Assign a team member: Assign the relevant Contactzilla team member.
  • Label Sync Method: LEave as default which in this case is ‘As Group VCards
  • Access Type: Full Read/Write – This will create a 2 way sync meaning we can read from and write to the address book.
  • Number of Device Connections: This can be left at 1 to be used with 1 workstation however you could raise this number if you are synchronizing this address book with more than 1 instance of Busy contacts.
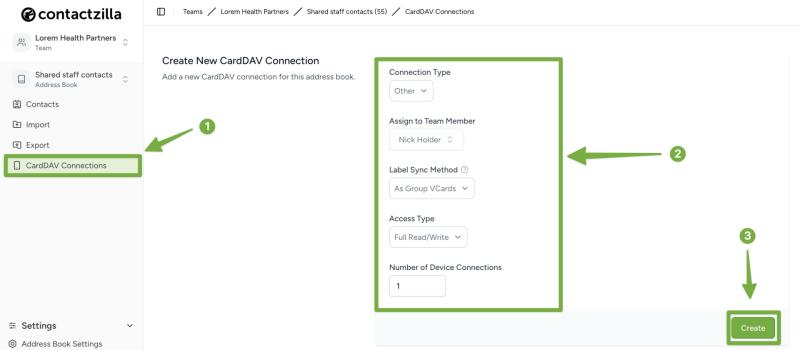
The CardDAV setup screen in the ContactZilla web dashboard. The user is creating a new CardDAV connection for the 'Shared staff contacts' address book. Green arrows and labels highlight: (1) the 'CardDAV Connections' tab in the left-hand menu, (2) the connection settings form with fields for connection type, assigned team member, label sync method, access type, and number of device connections, and (3) the green 'Create' button in the bottom right corner.

3) After clicking Create, you’ll see your new CardDAV connection listed below—click its Setup button and choose ‘View Setup Details’
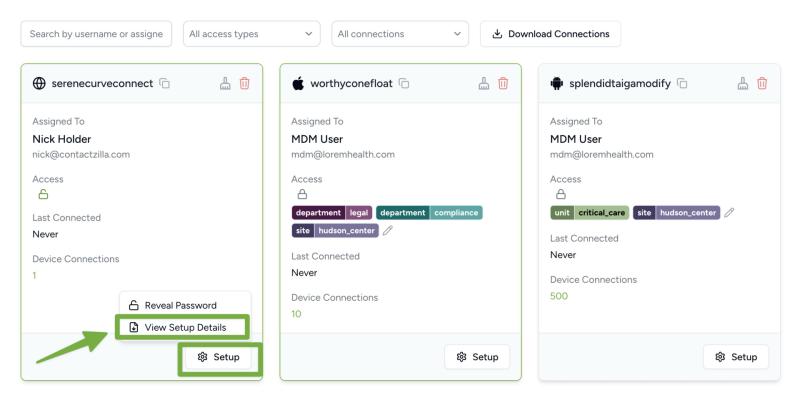
The CardDAV Connections overview in ContactZilla showing three connection cards. The leftmost card has the “Setup” button clicked, revealing options including “Reveal Password” and “View Setup Details,” which is highlighted. A green arrow points to the selected “View Setup Details” option.


4) In the Connection Details pane that appears you’ll find the Username and Password fields that we need to enter into Busy Contacts — click the clipboard icon next to each one to copy them.

Tip 💡 : Please keep the password backed up as for security reasons Contactzilla will remove it from the dashboard after your first connection.

Step Three: Authenticate the connection in Busy Contacts

The next step is adding the CardDAV credentials you just generated into the BusyContacts setup window you left open in Step One.

1) Return to BusyContacts (still showing the add‑account dialog) and paste the Username and password you copied from Contactzilla into the relevant fields and click OK.
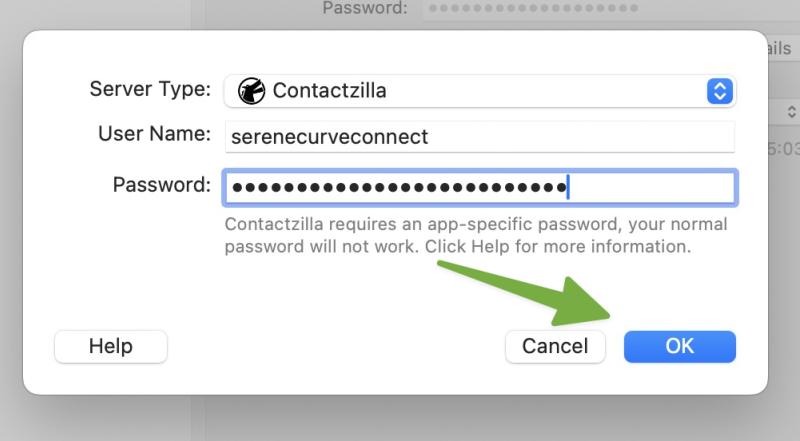
BusyContacts login dialog with the 'Server Type' set to ContactZilla. The 'User Name' field is filled with “serenecurveconnect” and a masked password is entered. A green arrow points to the ‘Cancel’ button, next to the blue ‘OK’ button. A message below the password field notes that an app-specific password is required for ContactZilla.


2) You will now see your Contactzilla address book alongside any other accounts you have setup. In this example an iCloud and Google Contacts accounts are also setup. The contactzilla adress book will be named according to how it is named in Contactzilla, such as ‘Shared Staff Contacts’ in this example.
3) A 2-way sync is now setup between Contactzilla and Busy Contacts. You can select individual or multiple contacts from any other address book and drag them into your Contactzilla address book and vice versa.
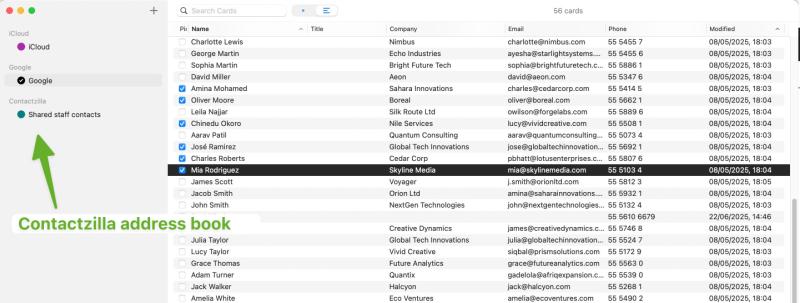
A screenshot of BusyContacts showing three address books in the left sidebar: iCloud (purple dot), Google (black dot), and Contactzilla with a “Shared staff contacts” address book (green dot). On the right, several contacts from the Google book are selected and ready to be dragged into the Contactzilla address book. The window header shows “56 cards” synced.
In this example contacts are selected in the Google address book and can be dragged into the Contactzilla “Shared staff contacts” list on the left. This is a 2 way sync so you can drag from—demonstrating seamless two-way sync between these address books in BusyContacts.

Tip 💡: You can add as many Contactzilla address books in Busy Contacts by repeating this process. Each one will have it’s own CardDAV connection.

Updated on July 10, 2025
How to Deploy Contactzilla Address Books to iOS Devices using Microsoft Intune MDM

Get your contacts in order today. Sync across devices.

Start FREE Trial
Get in touch
  • hello@contactzilla.com
  • Live Chat
  • Help
Follow us on socials

© Contactzilla. All Rights Reserved. 2025.

  • Trust Site
  • Terms & Conditions
  • Privacy Policy
  • Cookie Policy
Close
Contactzilla Logo
  • Features
  • Pricing
  • Blog
  • Contact Us
  • Features
  • Pricing
  • Blog
  • Contact Us
Login
Start FREE Trial
We use cookies to ensure that we give you the best experience on our website. If you continue to use this site we will assume that you are happy with it.