How can we help you?
Browse Categories
JAMF: How to Deploy Contactzilla Address Books to iOS Devices using Jamf Pro MDM
This guide assumes you already have Jamf Pro configured and iOS devices enrolled in your MDM system. We’ll walk you through creating the mobile configuration file in Contactzilla and deploying it via Jamf Pro
What You’ll Need
- A Contactzilla account with an existing address book. Please see our getting started guide here
- An MDM team member created in your Contactzilla account (required prerequisite – see setup below)
- Jamf Pro (Cloud or on-prem) configured with enrolled iOS devices (Admin access to your Jamf Pro dashboard)
Note: These steps are written for Jamf Pro (Cloud or on-prem).
Jamf School and Jamf Now can also deploy Contactzilla via a custom.mobileconfigupload.
Per Jamf’s current documentation, Jamf Now no longer requires the ‘Plus’ plan for custom profiles.
Prerequisites – MDM Team Member Setup
⚠️ Important: Before you can create mobile configuration files for MDM deployment, you must first set up an MDM team member in your Contactzilla account. This creates the specialized user account needed for device deployments and generating the .mobileconfig file.
If you haven’t created one yet, follow the steps for creating an MDM team member in our detailed setup guide:
Setting Up MDM Deployments in Contactzilla
Prefer a walkthrough? Watch the video below — it covers the same steps shown in this guide.
Creating the MDM Device Connection in Contactzilla
Step One: Set Up Your MDM Connection
1) Login to Contactzilla and select the address book that you wish to deploy to your iOS devices.

2) Click on ‘Device Connections’. From here we will create a CardDAV connection specifically designed for MDM deployment.

3) From the ‘Create New Device Connection’ screen that follows configure the following settings from the dropdown menus:
Connection Type: ‘iOS’
Assign to Team Member: Select your MDM team member (created in the prerequisite setup above)
Label Sync Method: Leave as default ‘As Group VCards’
Access Type: Choose based on your needs
- ‘Full Read Only’ (recommended for managed devices to prevent accidental changes)
- ‘Selective Read Only’ (if you only want specific labeled contacts)
- ‘Full Read/Write’ (if devices need to add/edit contacts)
Tip 💡: For Read only deployments you have an option to append a lock emoji to each contact in the native contacts app to make it clear to a user that any changes will not be written to the server.
Number of Device Connections: Set to the number of devices you plan to deploy to
Click the ‘Create’ button to generate your new Device connection.

Step Two: Download the Mobile Configuration File
1) After clicking Create, you’ll see your new CardDAV connection listed in the connections panel. Click the ‘Setup’ button on your new connection and choose ‘Download Profile’.
Save the .mobileconfig file to your computer – you’ll need this file for the Jamf deployment.

Step Three: Deploying the Configuration via Jamf Pro
1) From your Jamf Pro dashboard, go to Devices > Configuration Profiles > Upload and select the Contactzilla .mobileconfig file you created in the previous step.

2) You are then moved to the General tab within Configuration Profiles.
The profile is given the name of the Contactzilla CardDAV device connection, in this case: ‘Contactzilla CardDAV : Project Cascade Tower – structuredboardivulge’
Optional – add a short description if you’d like to clarify the purpose of this profile for other administrators (for example: ‘Deploys Contactzilla address book to iOS devices’).
Within the General tab you’ll also see the following options:
Category: Optional. This is purely for organisation within Jamf Pro e.g. create a ‘Contacts / CardDAV’ category to keep profiles neatly grouped. Can be left as ‘None’
Level: Choose Device Level. This applies the profile to the entire device, which is required for iPhones and iPads. (User Level is only used for Shared iPad setups.)
Distribution Method: Select Install Automatically so the profile is deployed to devices without user action.
Click Save when complete.

Step Four: Scope the Profile (target the devices)
Before a configuration profile can deploy to devices, you need to define its scope. This tells Jamf which devices or groups of devices should receive it.
1) After hitting ‘Save’ in the previous step you will now see that you have a new payload configured in the ‘Contacts’ tab.
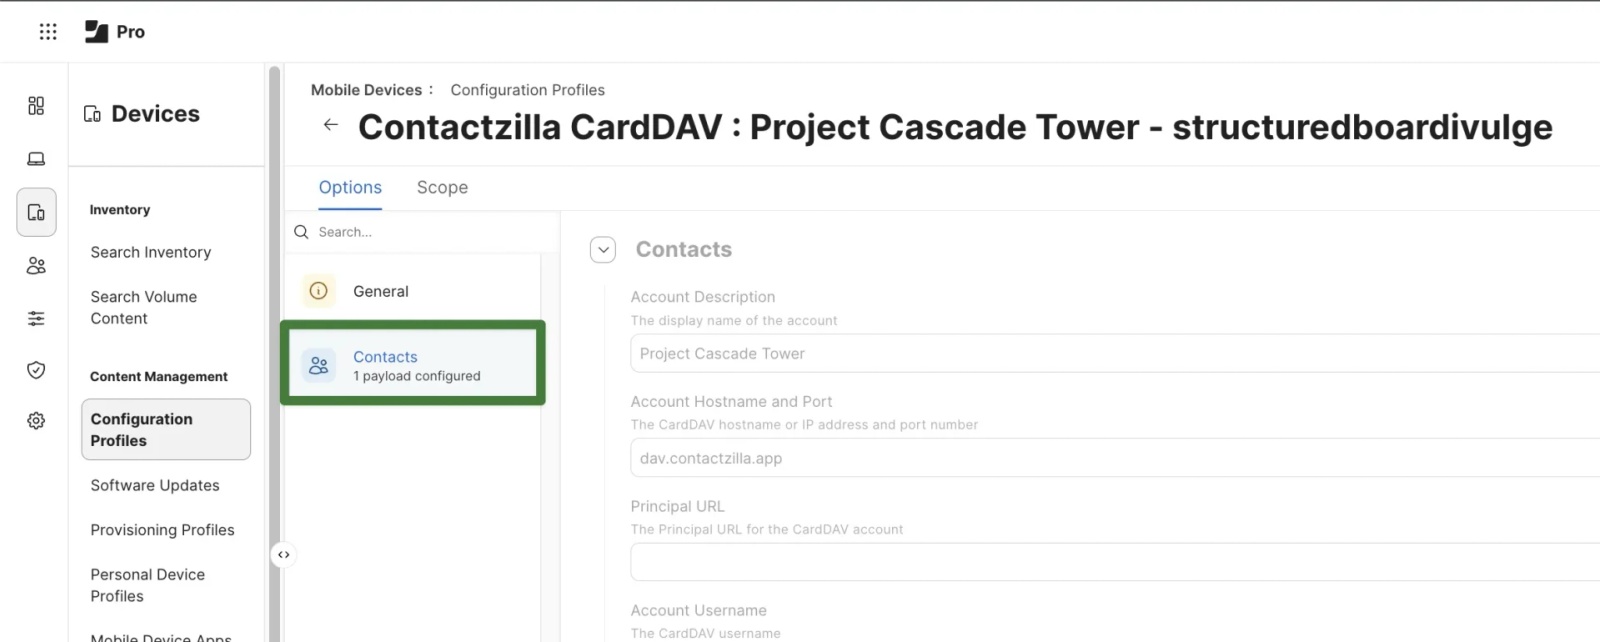
Within the ‘Contacts’ tab move to the ‘Scope’ tab and hit ‘Edit’ in the bottom right

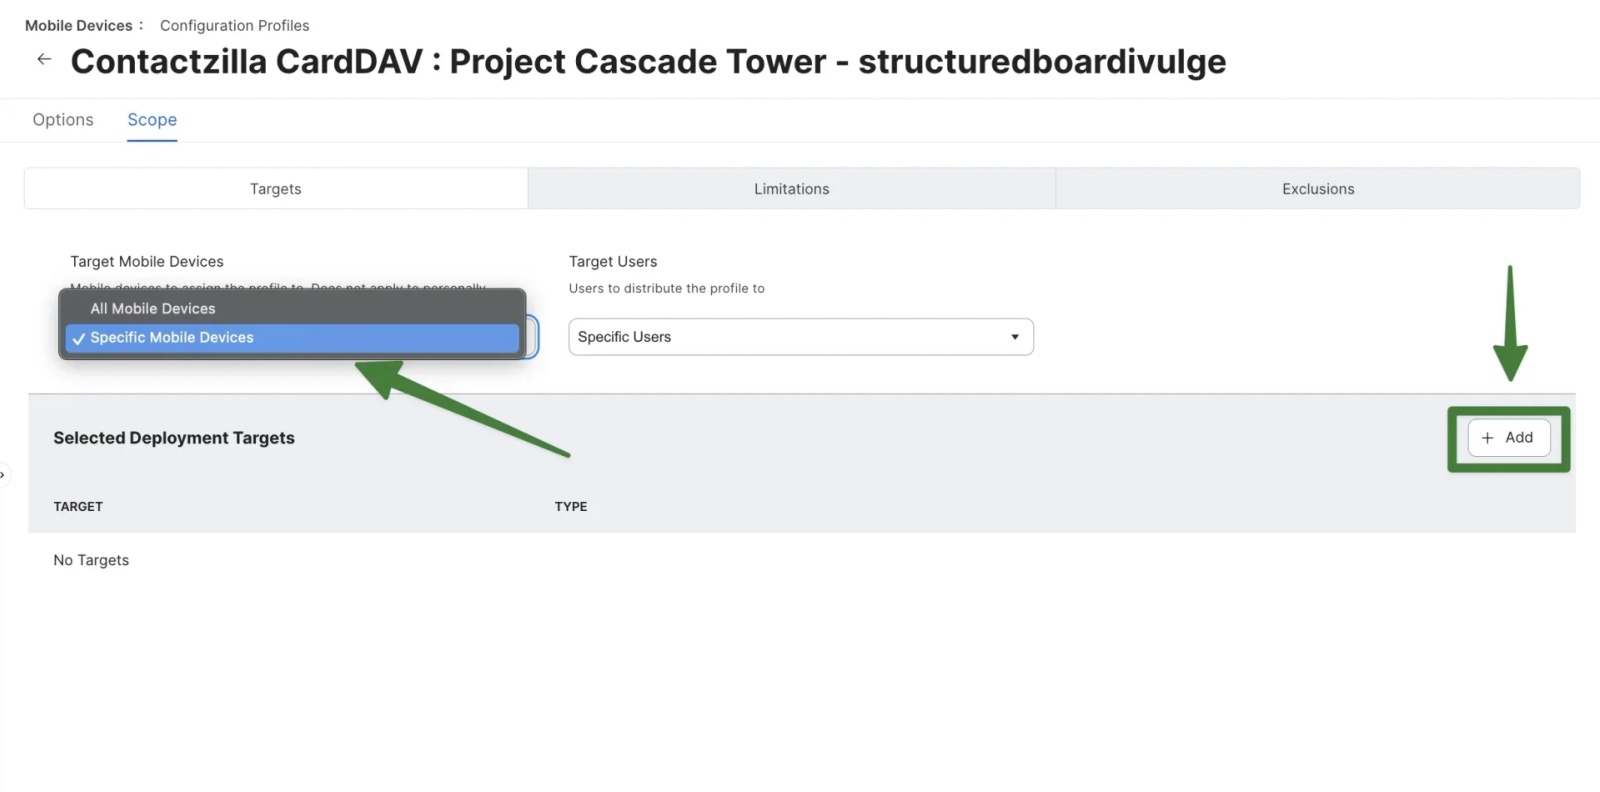
2) Under ‘Target Mobile Devices‘ > choose ‘Specific Mobile Devices‘ from the dropdown > Click the ‘+ Add’ button.
This option lets you target either individual iPhones or Mobile Device Groups, which is the most common setup for Contactzilla deployments.
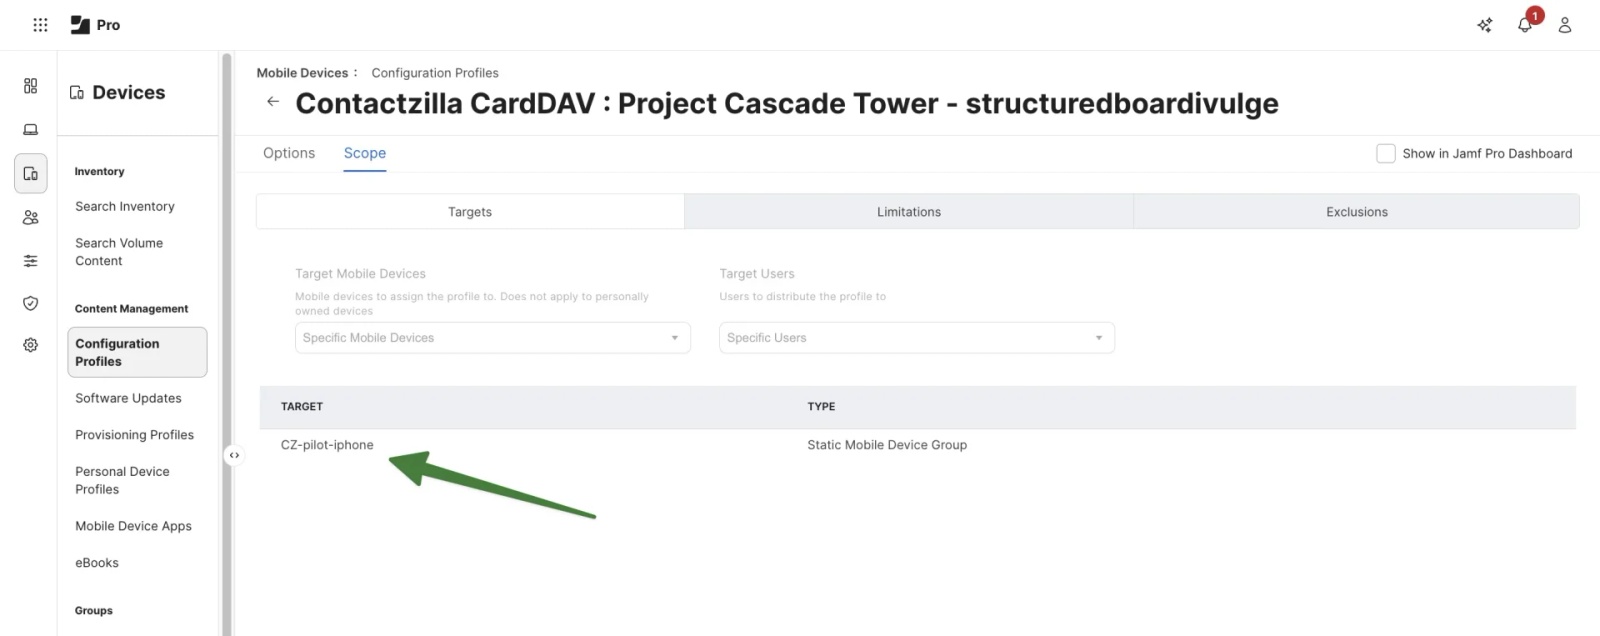
3) The ‘Add Deployment Targets’ pane opens. Stay on the Mobile Devices tab to select individual devices and then select Add or select the ‘Mobile Device Groups’ tab to select a pre-made Jamf Mobile Device Group that can contain multiple devices followed by Add. In my example I am adding a group ‘CZ-pilot-iphone’ > Hit Save

4) After saving the profile is now scoped. Your devices and/or device groups will show up in the list of ‘Targets‘ that will receive the Contactzilla configuration profile on their next check-in, or immediately if you send a Blank Push from the device record.
Step Five: Deliver the Profile Immediately (Send Blank Push)
By default, configuration profiles deploy the next time a device checks in with Jamf Pro. To speed up testing, you can push the profile to your iPhone straight away.
1) In Jamf Pro, go to Devices > Search Inventory > Search for a Device and select it > Select the ‘Management‘ tab
Click ‘Send Blank Push.’

This tells the device to check in with Jamf immediately and install any pending configuration profiles.
(‘Update Inventory’ simply refreshes device data in Jamf and isn’t needed to trigger the install.)
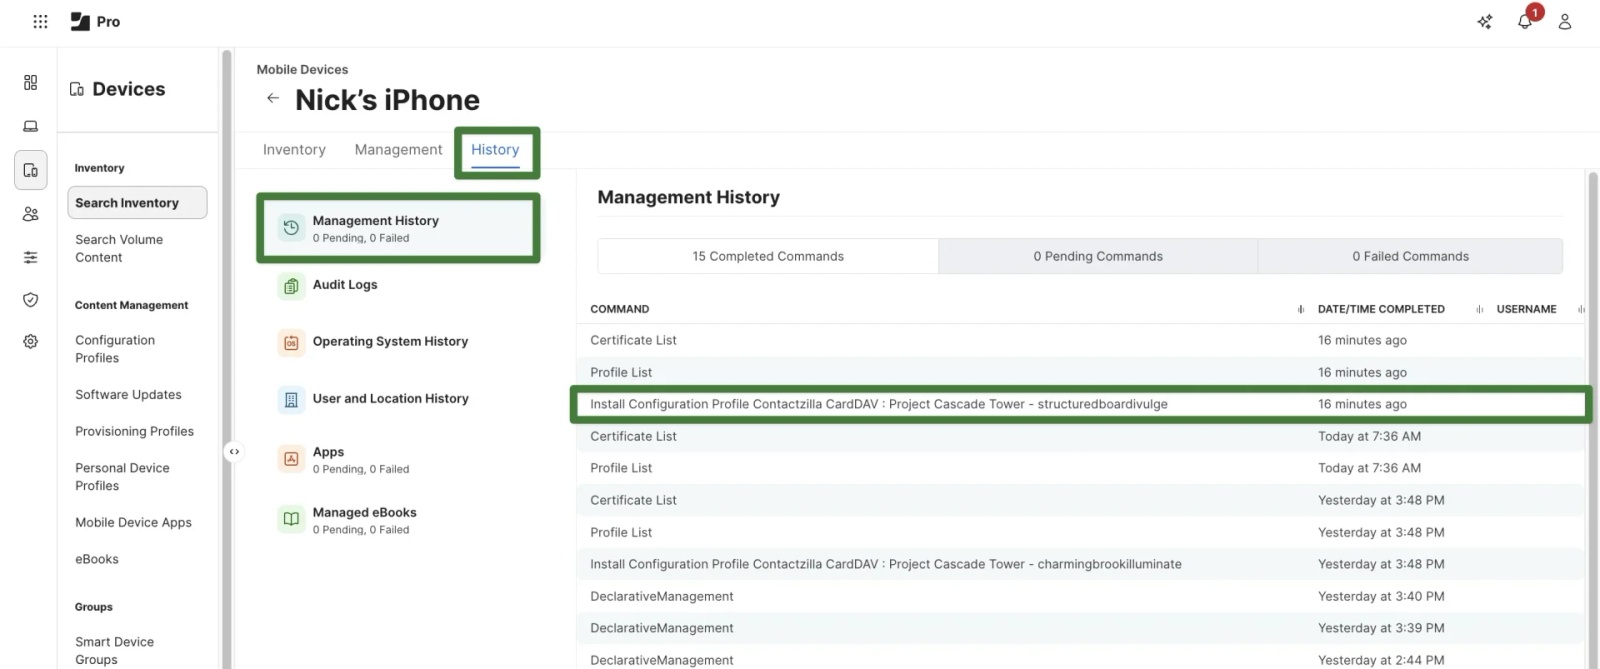
You can confirm delivery under History > Management Commands where the Install Configuration Profile command should show as Completed.
Step Six: Verify the Deployment on iPhone
Once the profile has been sent, you can confirm the Contactzilla address book has been successfully installed in a couple of ways.
1) Open the Contacts app. Your shared contacts should now appear within the native Contacts app.

2) On the iPhone choose Settings > Contacts > Contacts Accounts.
You should see your Contactzilla address book listed there. If you click through you can see a detailed look at the CardDAV connection and make sure the Account toggle switch is on

You’ve now successfully deployed Contactzilla address books to your iOS devices using Jamf Pro.
Managed users will see the contacts automatically appear in their native Contacts app, with ongoing sync handled silently in the background.
Still need help?
Our support team is available to assist you with any questions or issues you may have.

