How can we help you?
Browse Categories
How to Connect Contactzilla to AI Tools Using MCP

Help Center > Integrations > MCP Setup
MCP: Connect Contactzilla to Claude, OpenAI or Any MCP-Compatible AI Tool
⚠️ Important: this is not an AI feature, and it can expose contact data to third-party AI services. Enabling MCP does not change how Contactzilla stores or handles your data, and Contactzilla does not operate any AI itself. Turning this on allows your chosen AI client (such as Claude or OpenAI) to connect to your Contactzilla account. Once connected, that client can read — and, depending on the permissions you grant, write — your contact data, and may copy that data into its own service. Decide whether and how to use this feature based on your organization's own AI usage policy before enabling it.
This guide covers how an administrator enables MCP access in Contactzilla, and how to connect an AI client — using Claude as the example — so you can query and manage contacts using natural-language requests.
What You'll Need
- A Contactzilla account with administrator access
- An MCP-compatible AI client (e.g. Claude, OpenAI, or any other tool that supports the Model Context Protocol)
Enabling MCP Access in Contactzilla
Step One: Turn On MCP Access
The API/MCP settings page controls two separate things side by side: API Access (plain API access tokens — not covered in this guide) and MCP Access (AI assistant connections, which this guide is about). Make sure you're configuring the MCP Access section, not API Access.
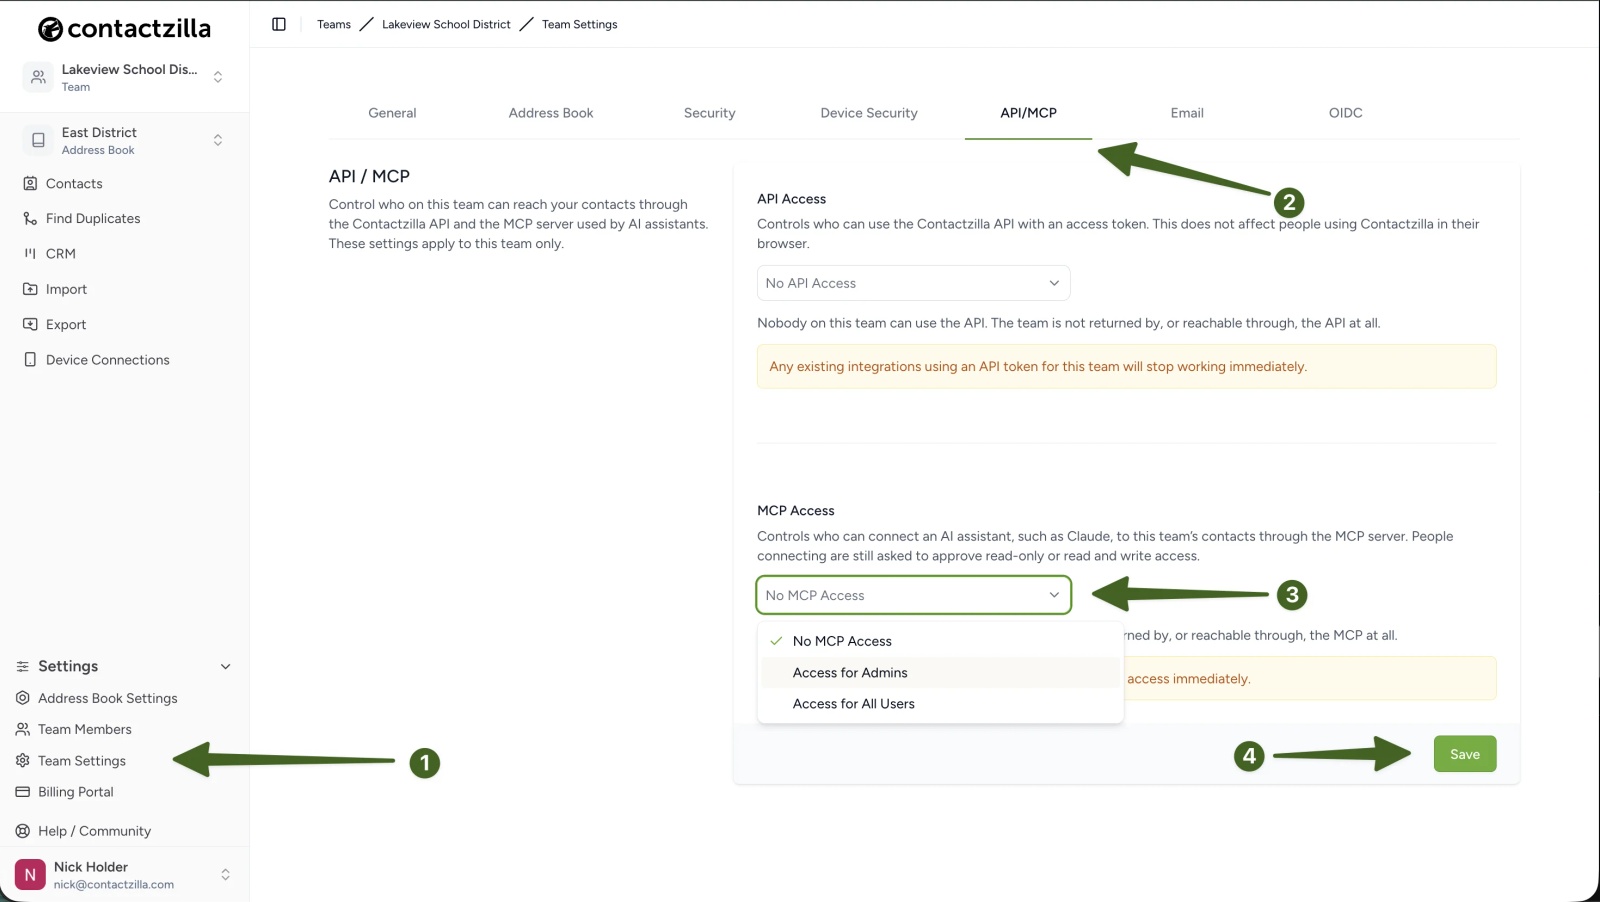
a) Team Settings > API/MCP.
b) Under MCP Access, open the dropdown and choose who should be able to connect an AI assistant to this team's contacts:
- Access for Admins — only team administrators can connect an AI assistant.
- Access for All Users — any team member can connect their own AI assistant. Individual members are still bound by their own existing address book permissions once connected.
c) Click Save. This takes effect immediately — if you're narrowing access, Contactzilla warns that "Any AI assistant currently connected to this team will lose access immediately."
💡 MCP is turned off by default for every team. If you don't see contacts when connecting an AI client later in this guide, check back here first to confirm MCP access has been enabled and that your account has the right permission level.
Step Two: Connect Your AI Client
The steps below use Claude as an example. The general pattern (add a custom connector, provide the Contactzilla MCP URL, authenticate, choose permissions) should be similar for other MCP-compatible tools, though menu names will differ.
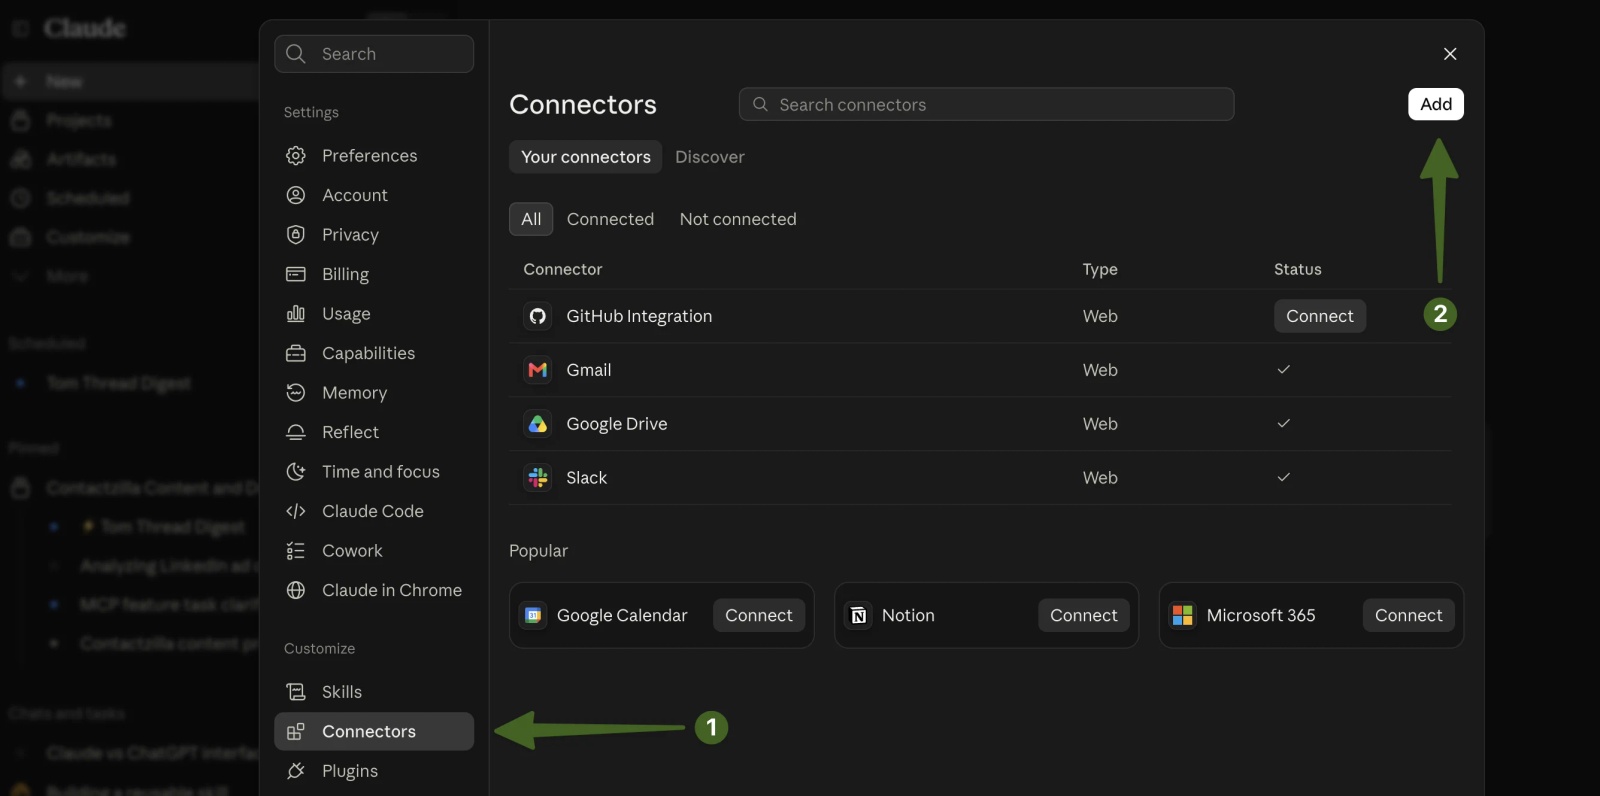
a) Settings > Connectors > Add.
b) In the Add custom connector dialog, give it a Name (e.g. Contactzilla — this is what shows up in your connectors list), then enter the MCP server URL: https://contactzilla.app/mcp (the two fields sit right on top of each other, so double-check the URL has gone into the MCP server URL field and not the Name field)
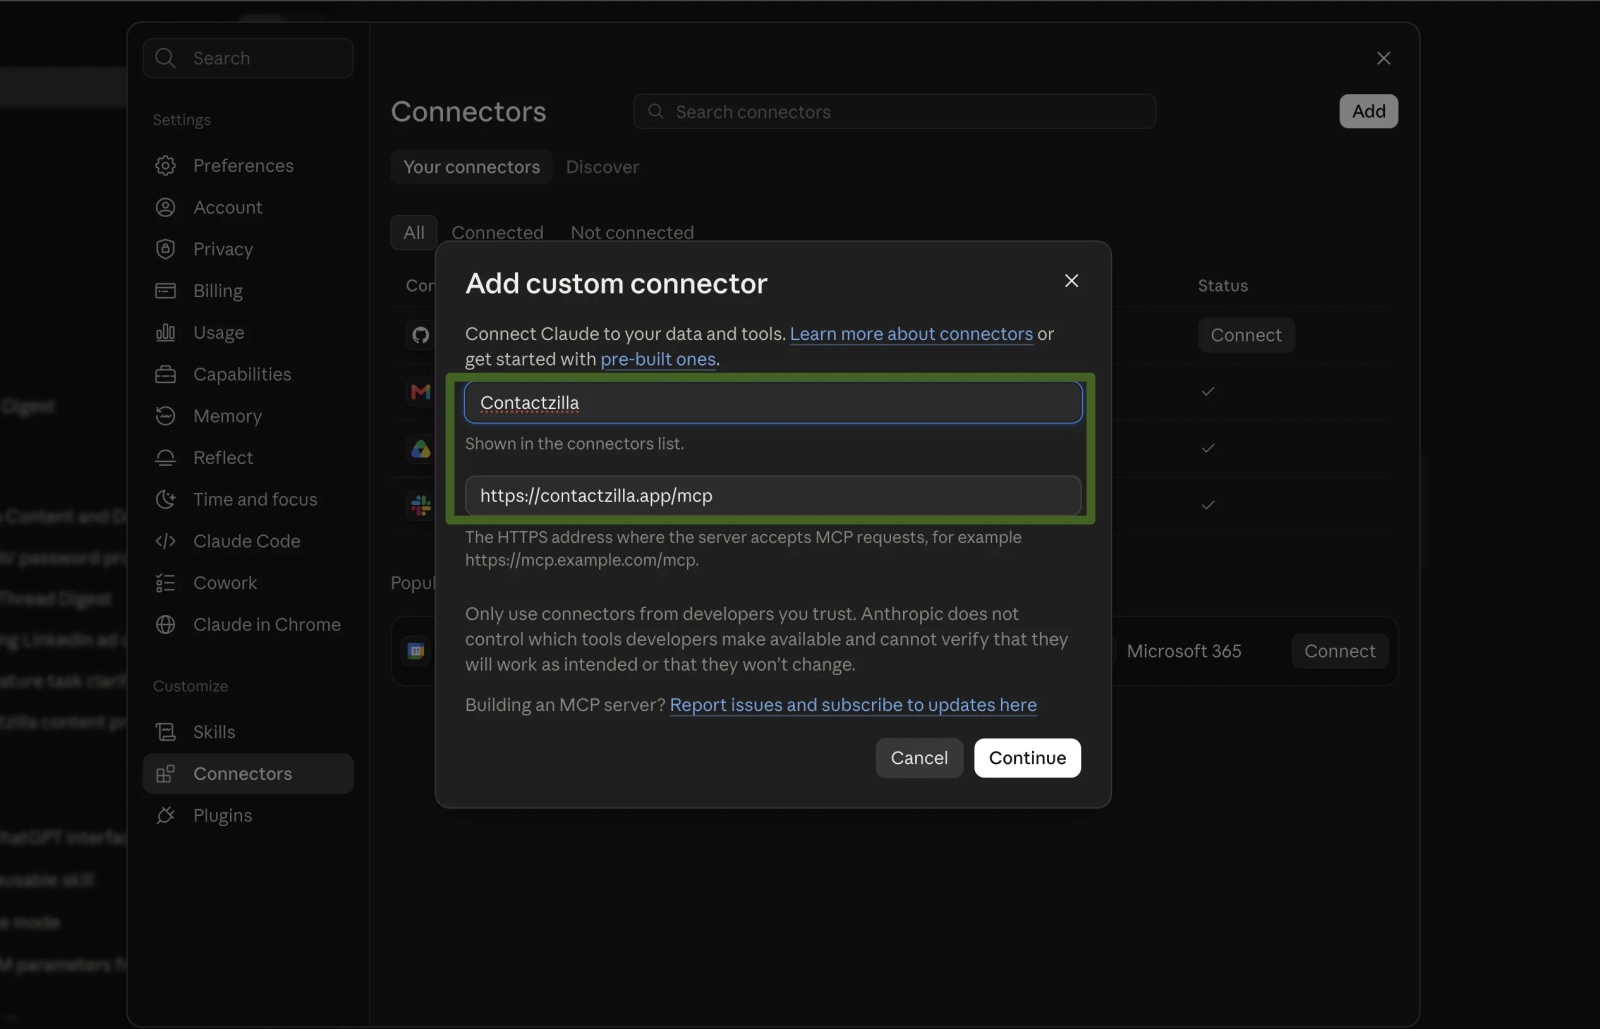
c) Leave the Authentication and OAuth client settings on their defaults (Sign in now and Register automatically are detected and pre-selected), then click Add.
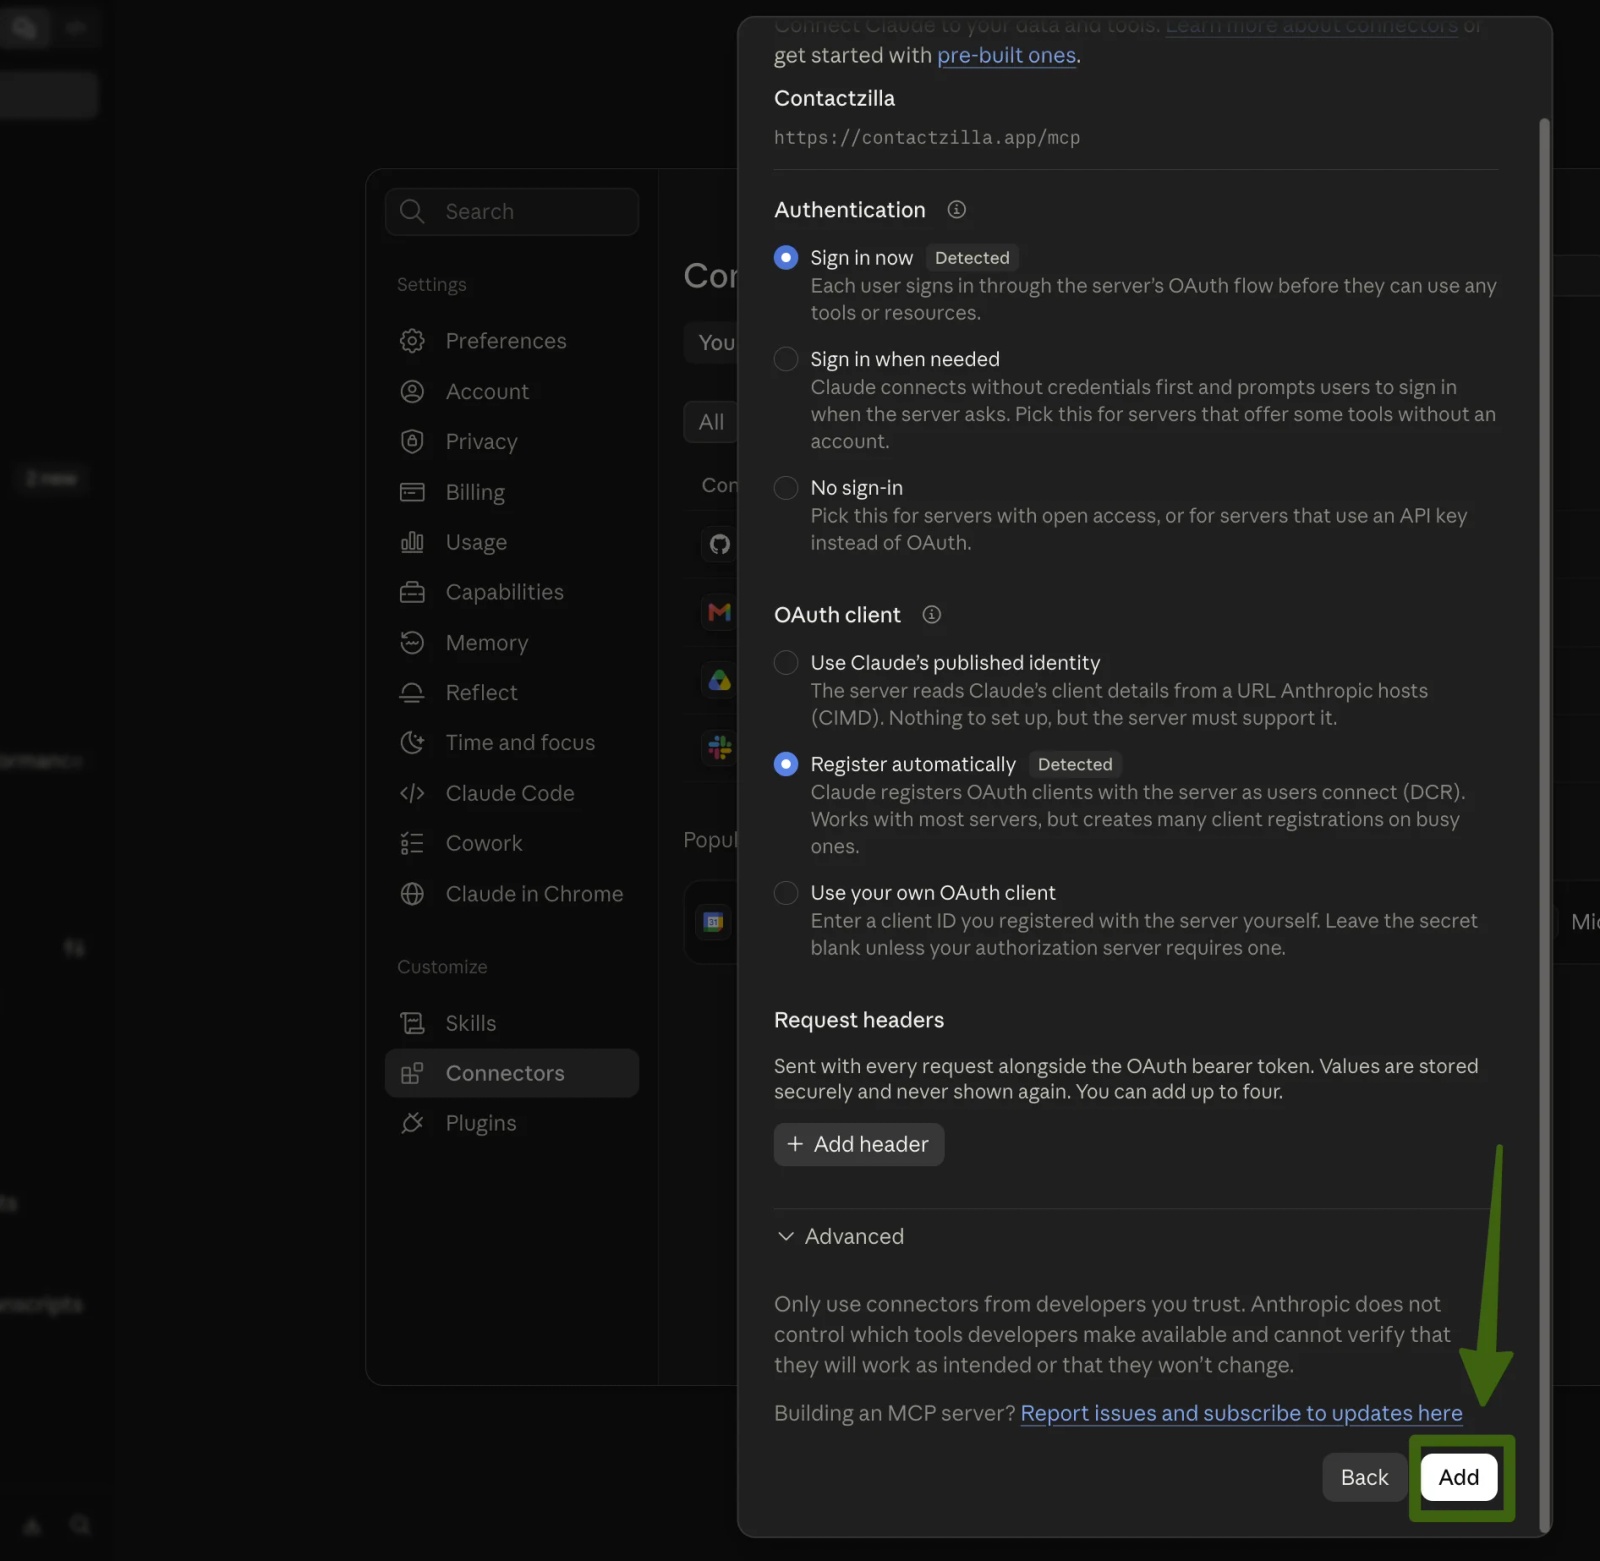
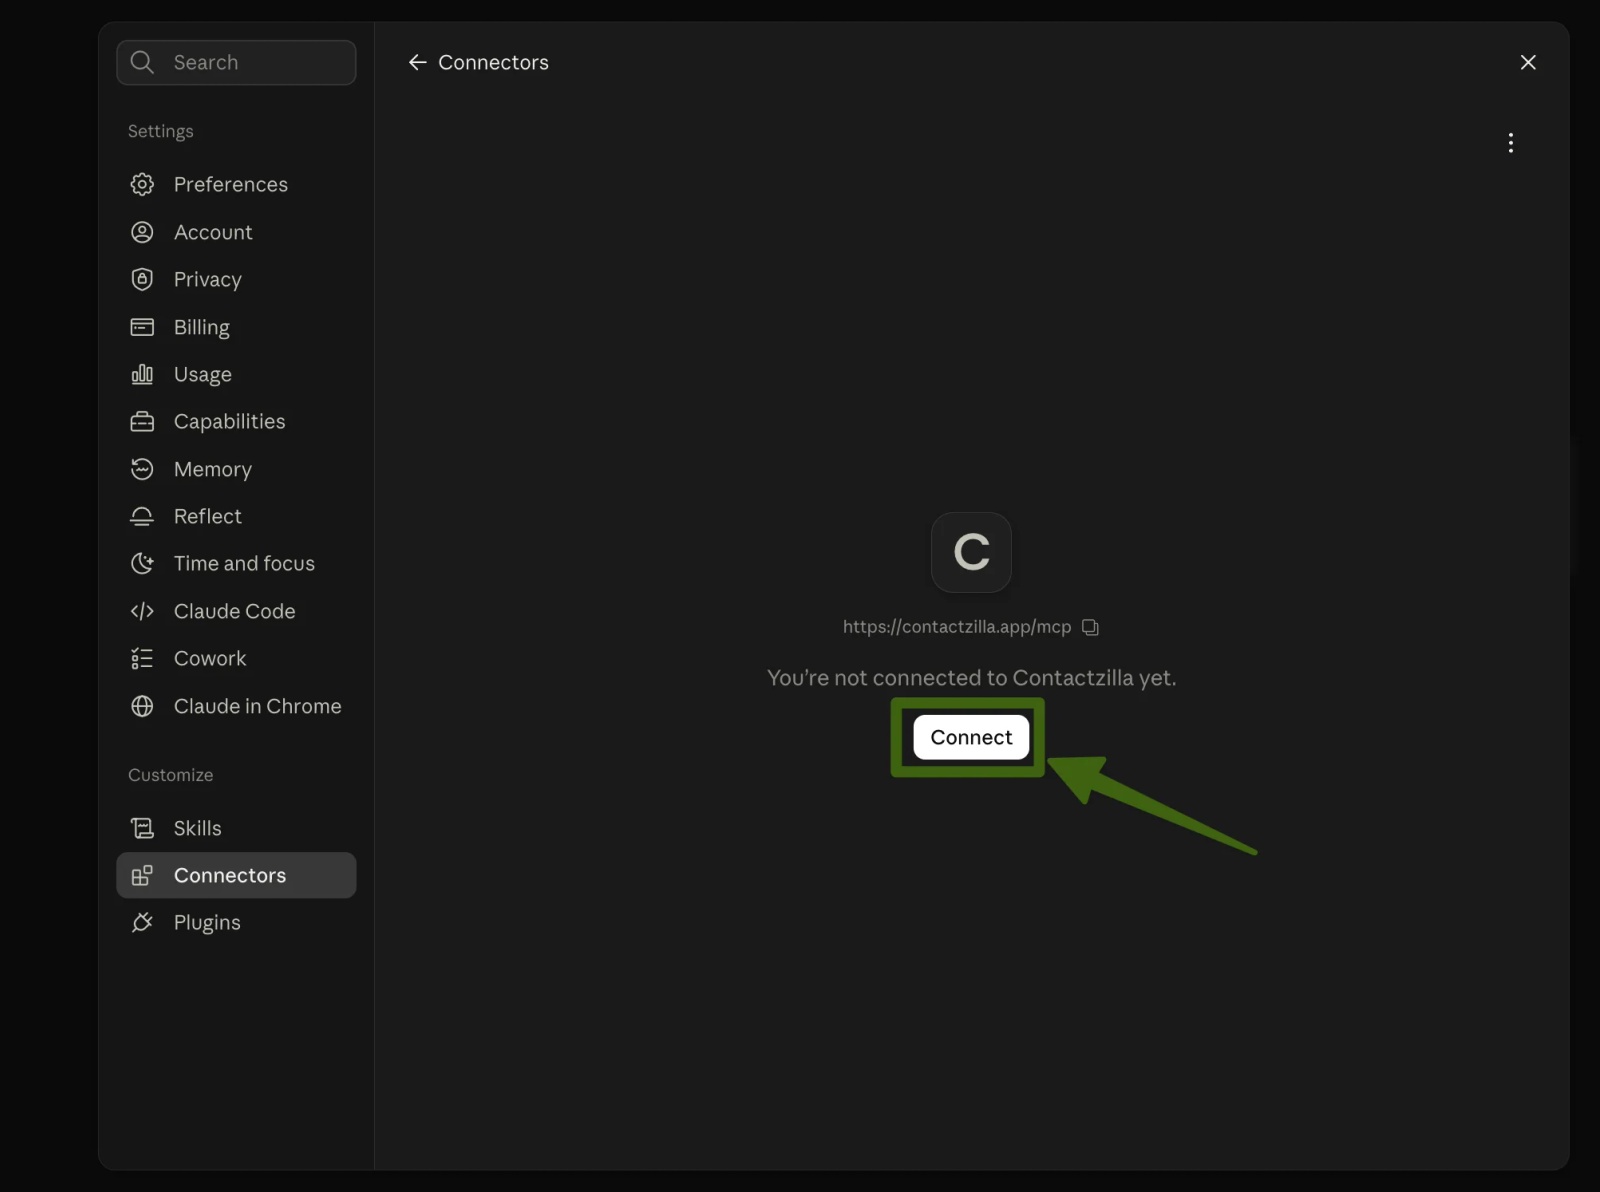
d) Contactzilla is added to your connectors list but not yet connected. Click Connect to start authenticating.
e) You're taken to Contactzilla's own authorization screen. Choose which permissions to grant — Read contacts and/or Add, update and delete contacts — then click Authorize.
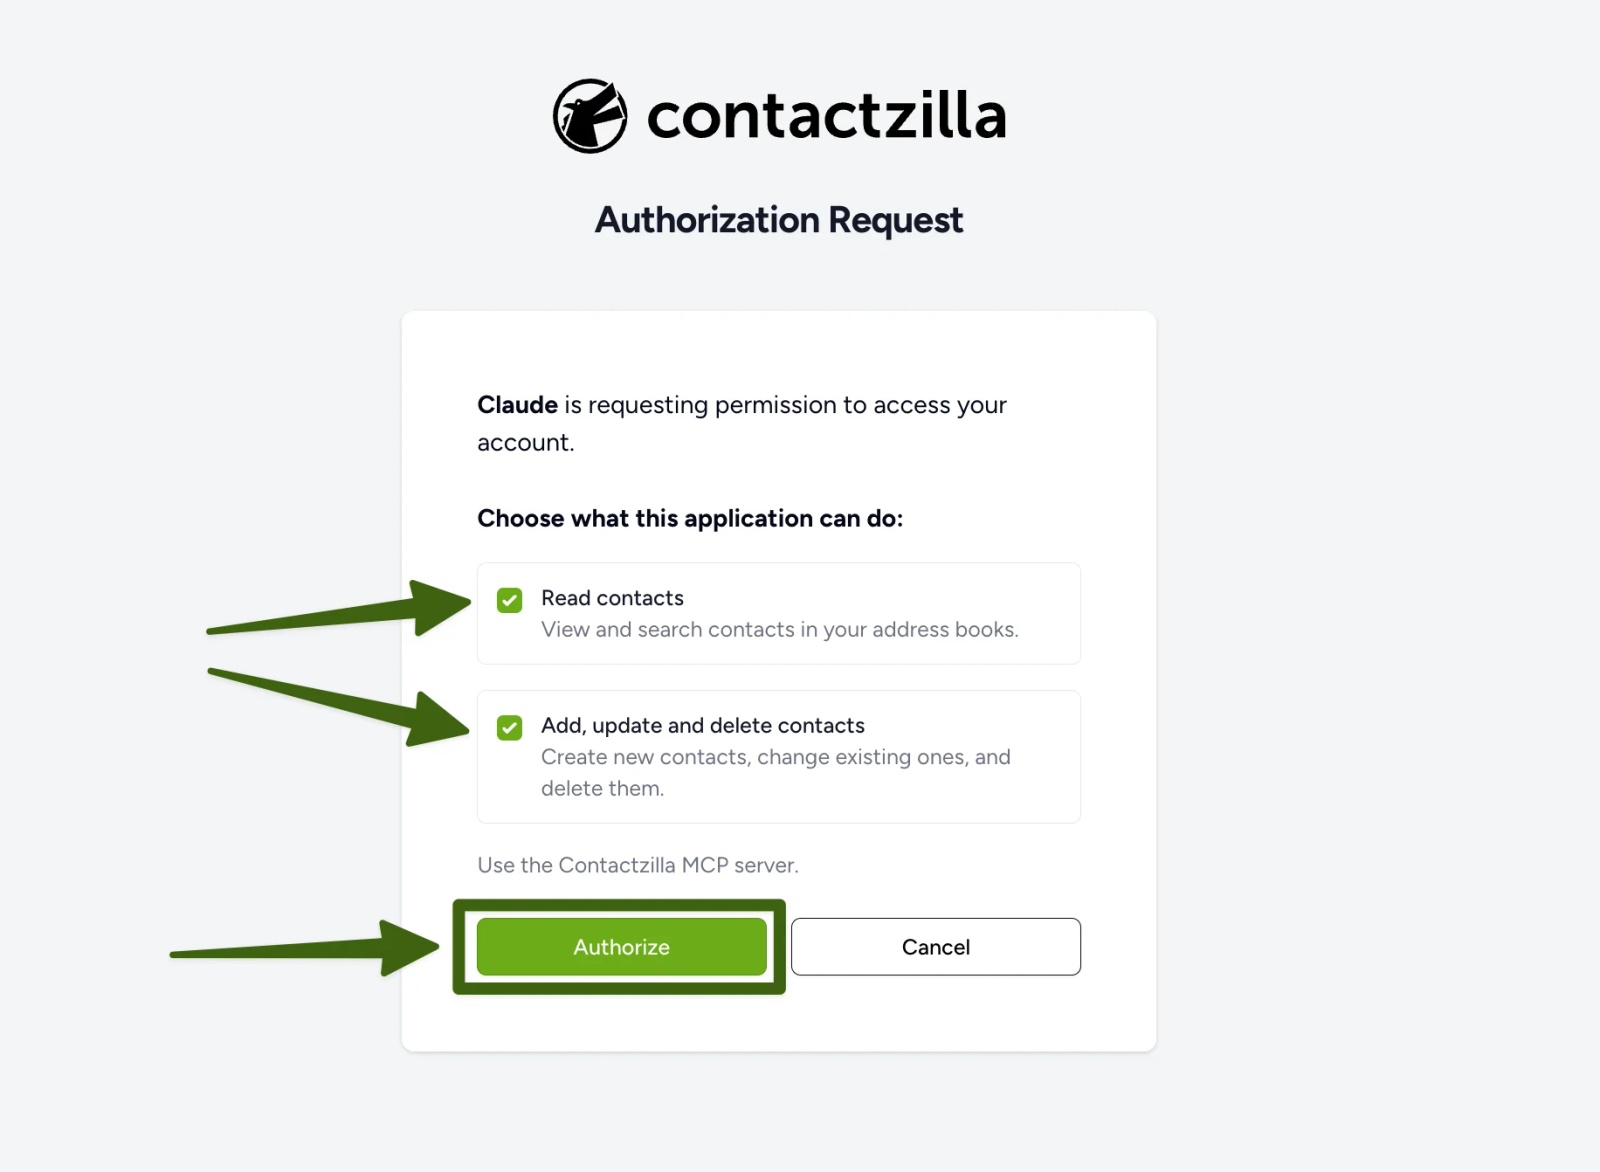
💡 Both permissions are checked by default. If you only want your AI assistant to look up contacts — not create, edit, delete, move, copy or merge them — untick Add, update and delete contacts before authorizing. You can change this later too (see "Reviewing or Revoking Access" below). If you're already logged in to Contactzilla, this screen appears straight away — otherwise you'll be asked to log in first.
f) Once authorized, your AI client is connected. You should now be able to ask it questions about your Contactzilla contacts directly in a conversation.
What You Can Ask
Once connected, you can ask your AI client natural-language questions about your contacts, for example:
"Show me my Contactzilla address books""Show me my latest contacts""Find a contact with custom field employee ID 1234"
If you've granted write access, the same connection can also add, edit, delete, move, copy and merge contacts on request.
💡 If you have other tools connected to the same AI client, you can combine them with Contactzilla for import/export-style workflows. For example, with a spreadsheet tool connected: "Build me an Excel sheet of my contacts from the Clients address book." With an email tool connected: "Create draft emails to contacts in my Clients address book labeled Xmas, wishing them a happy Christmas."
Reviewing or Revoking Access
There are two places to manage this: from Claude's side (this specific connection), and from Contactzilla's side (the team-wide MCP Access setting from Step One).
In Claude, open Settings > Connectors > Contactzilla to see per-tool permissions and disconnect entirely:
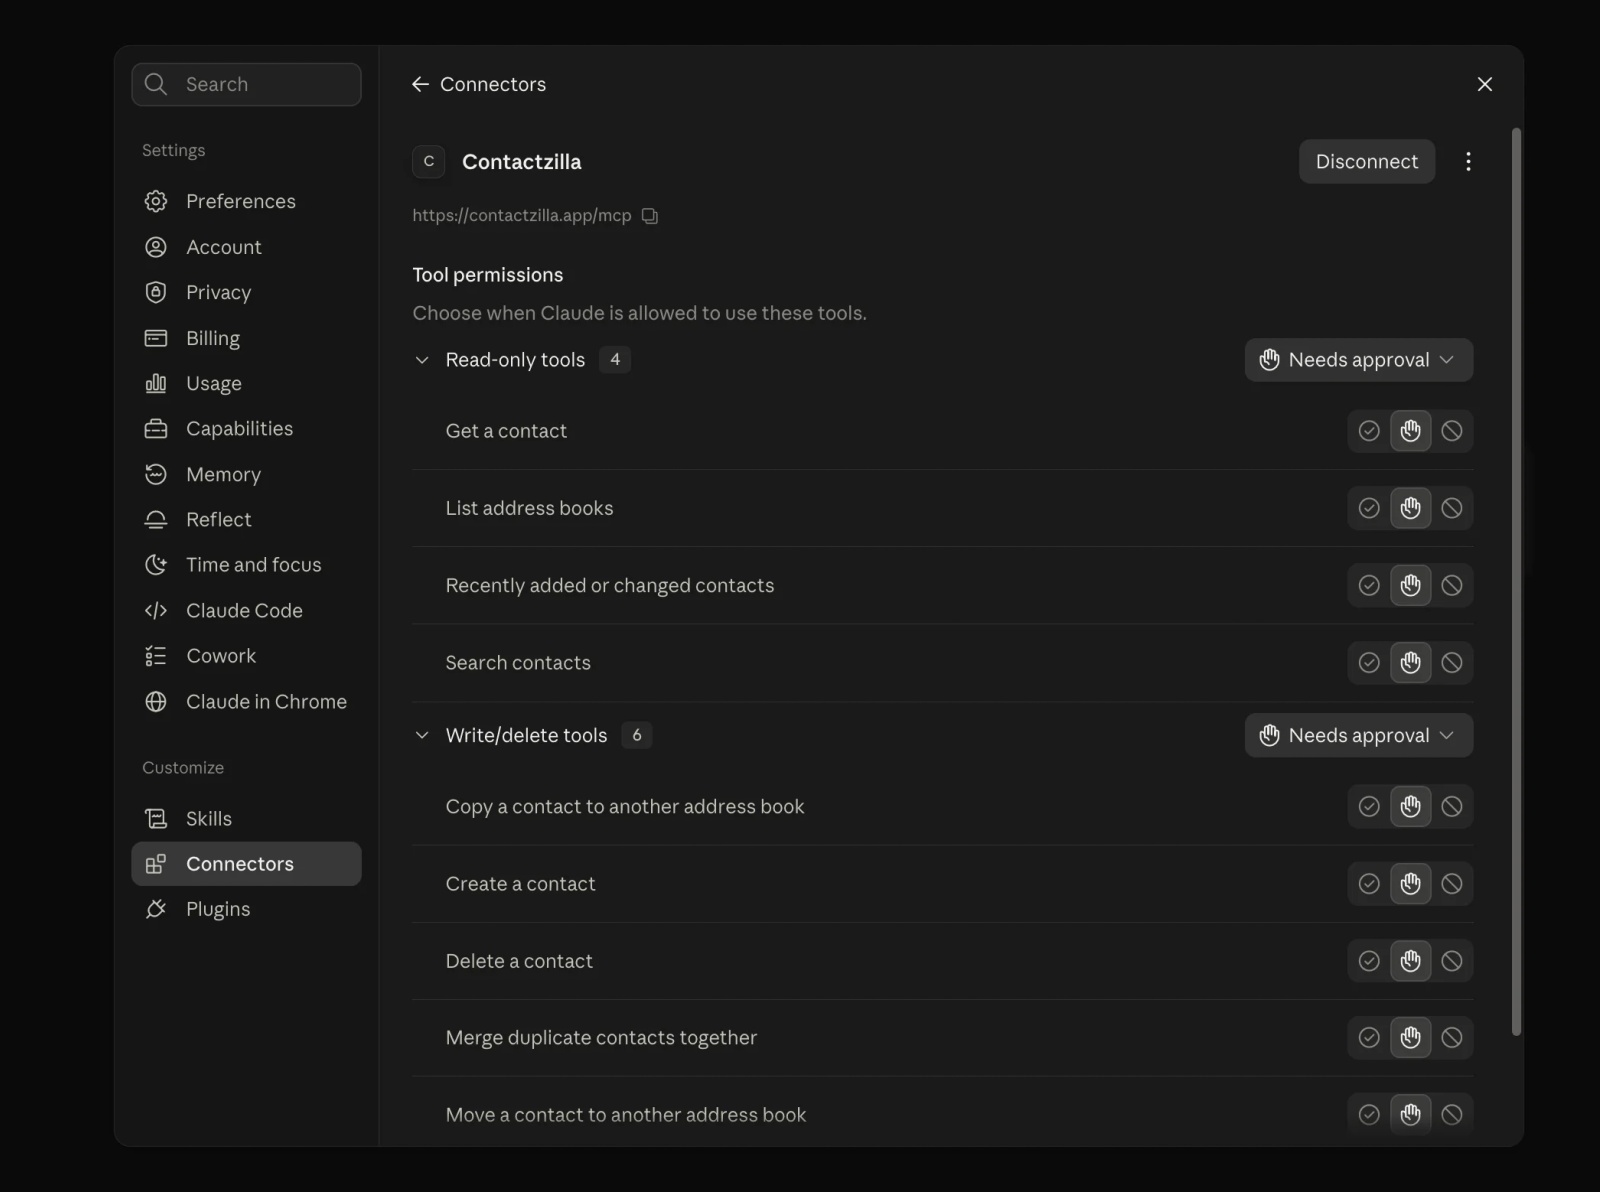
Click Disconnect here to remove this AI client's access entirely, or adjust individual tool permissions without disconnecting.
From the Contactzilla side, you can return to Team Settings > API/MCP at any time to review who has access, change permission levels, or turn MCP off entirely for the whole team. Worth noting: setting MCP Access back to No MCP Access takes effect immediately, and Contactzilla will warn you that any AI assistant currently connected to the team loses access right away — good to flag for readers before they turn it off casually.
Still need help?
Our support team is available to assist you with any questions or issues you may have.