How can we help you?
Browse Categories
OUTLOOK: How to Import Contacts from a Microsoft 365 Shared Mailbox into Contactzilla

This guide shows you how to import the contacts stored in a Microsoft 365 mailbox, such as a shared mailbox, into a Contactzilla address book, so the same contacts can be kept up to date and delivered to your staff's phones. It covers the one-off Microsoft connection as well as the import itself, and assumes you already have a Contactzilla address book and the Microsoft Outlook Contacts premium importer available on your account.
What You'll Need
- A Contactzilla account with the Microsoft Outlook Contacts premium importer available
- A Contactzilla address book to import into. Its name is what your staff see on their phones, so name it for them (for example Skyline Contacts)
- A Microsoft 365 mailbox, such as a shared mailbox, with the contacts you want saved in its default Contacts folder
- A Microsoft 365 account that can sign in to your tenant to authorise the connection. It does not have to be the owner of the mailbox
- A Microsoft 365 administrator who can grant admin consent in Microsoft Entra. This is a one-off step the first time you connect (see below)
💡 Each importer reads one mailbox, and only that mailbox's default Contacts folder. To import from three mailboxes, set up three importers.
Connect Contactzilla to Microsoft 365 (First Time Only)
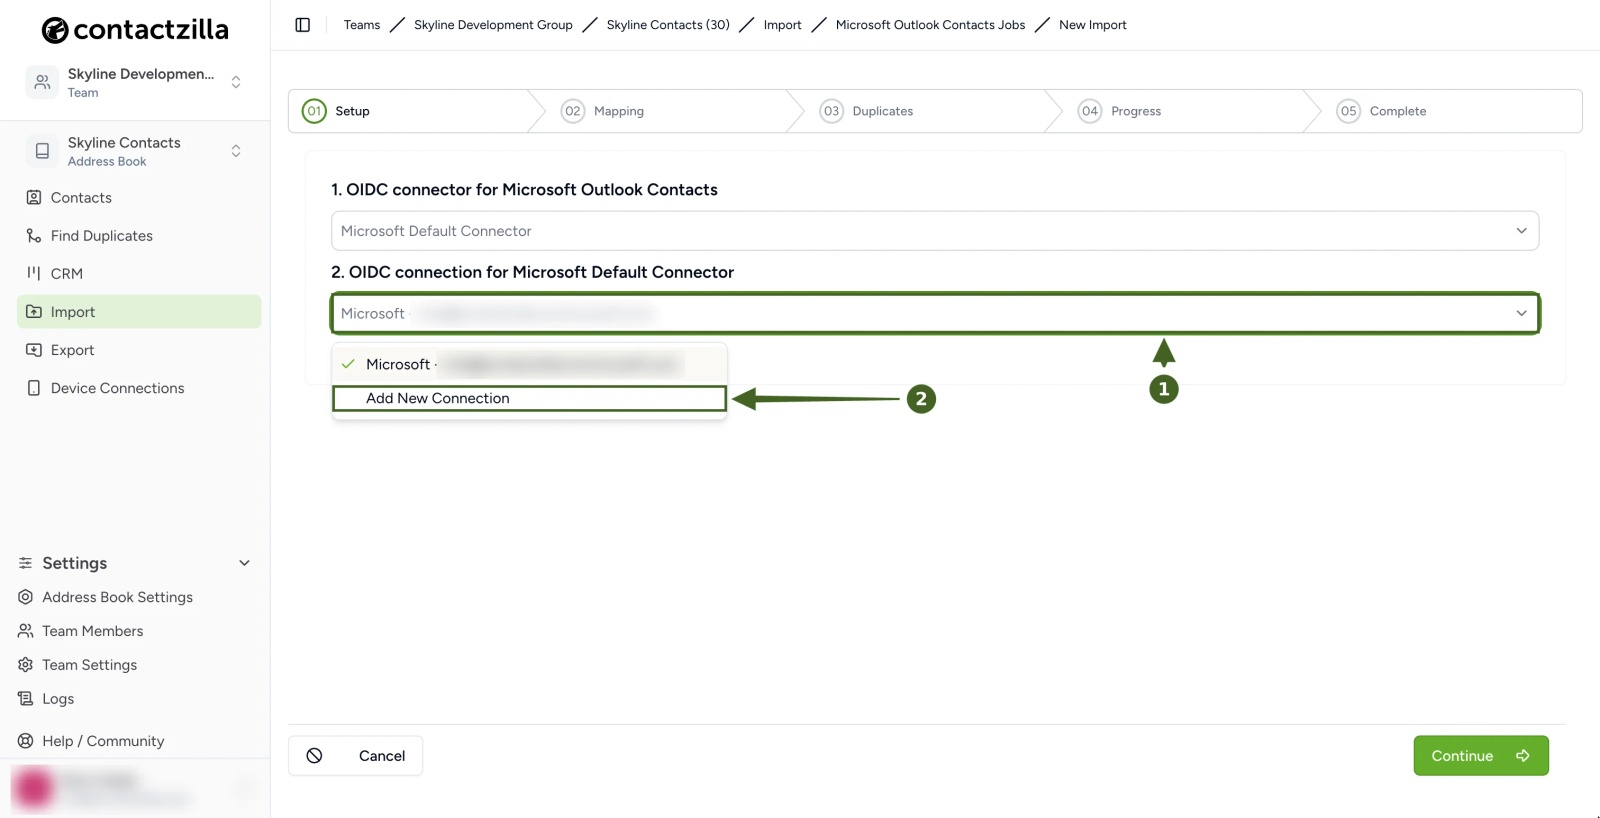
The importer reads the mailbox through the Microsoft Default Connector, which needs a Microsoft 365 account connection authorised for your team. If the connection dropdown in Step Two already lists your Microsoft account, skip this section. If not, do this once first. You can also add the connection from inside the import with Add New Connection (Step Two).
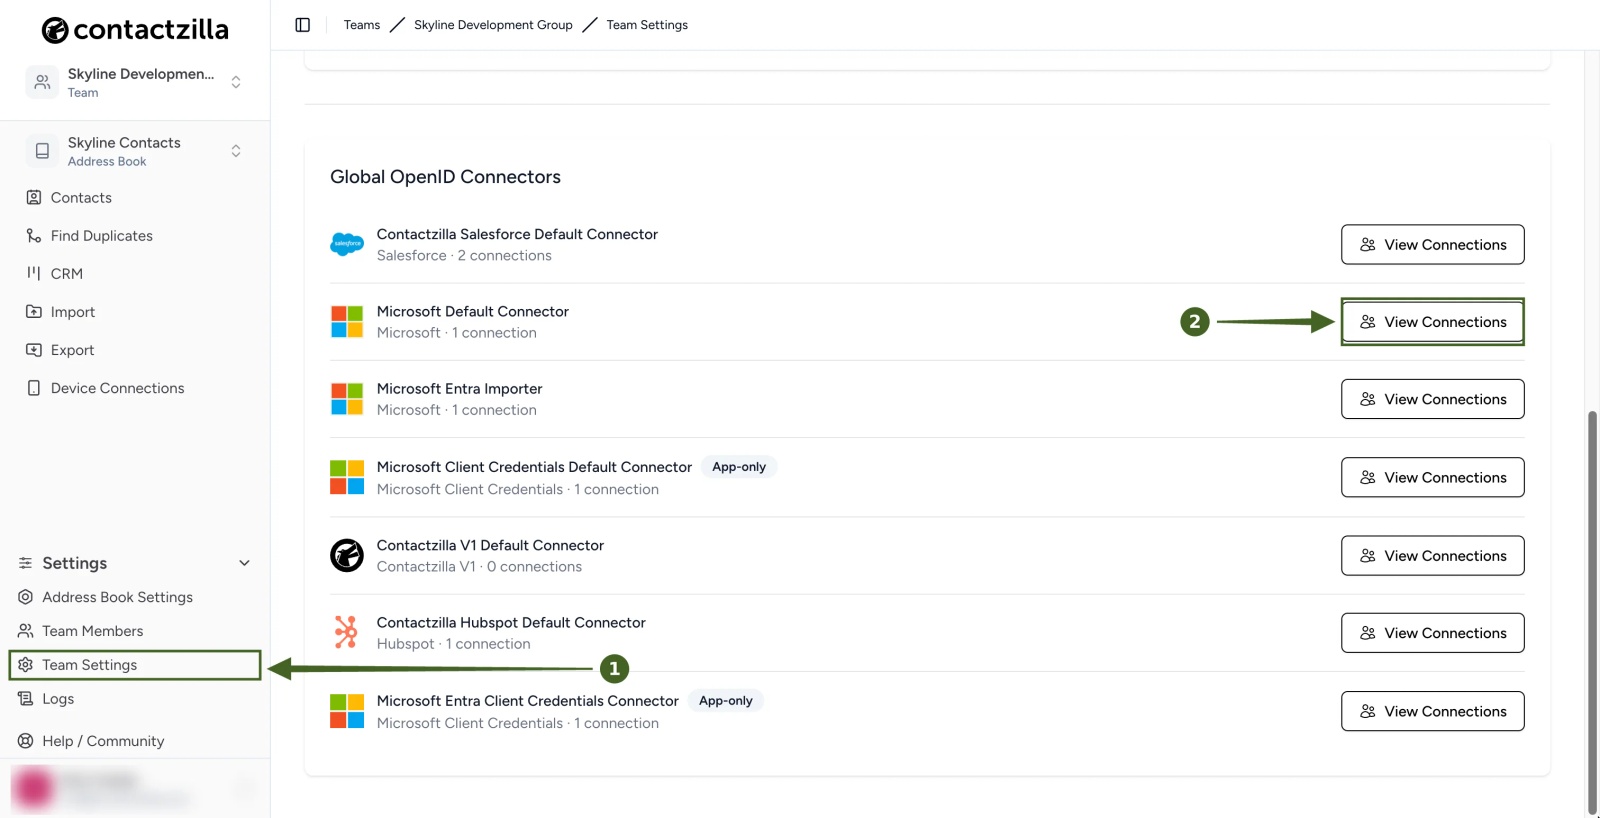
a) Go to Team Settings > OIDC.
b) Scroll to Global OpenID Connectors and click View Connections next to Microsoft Default Connector.
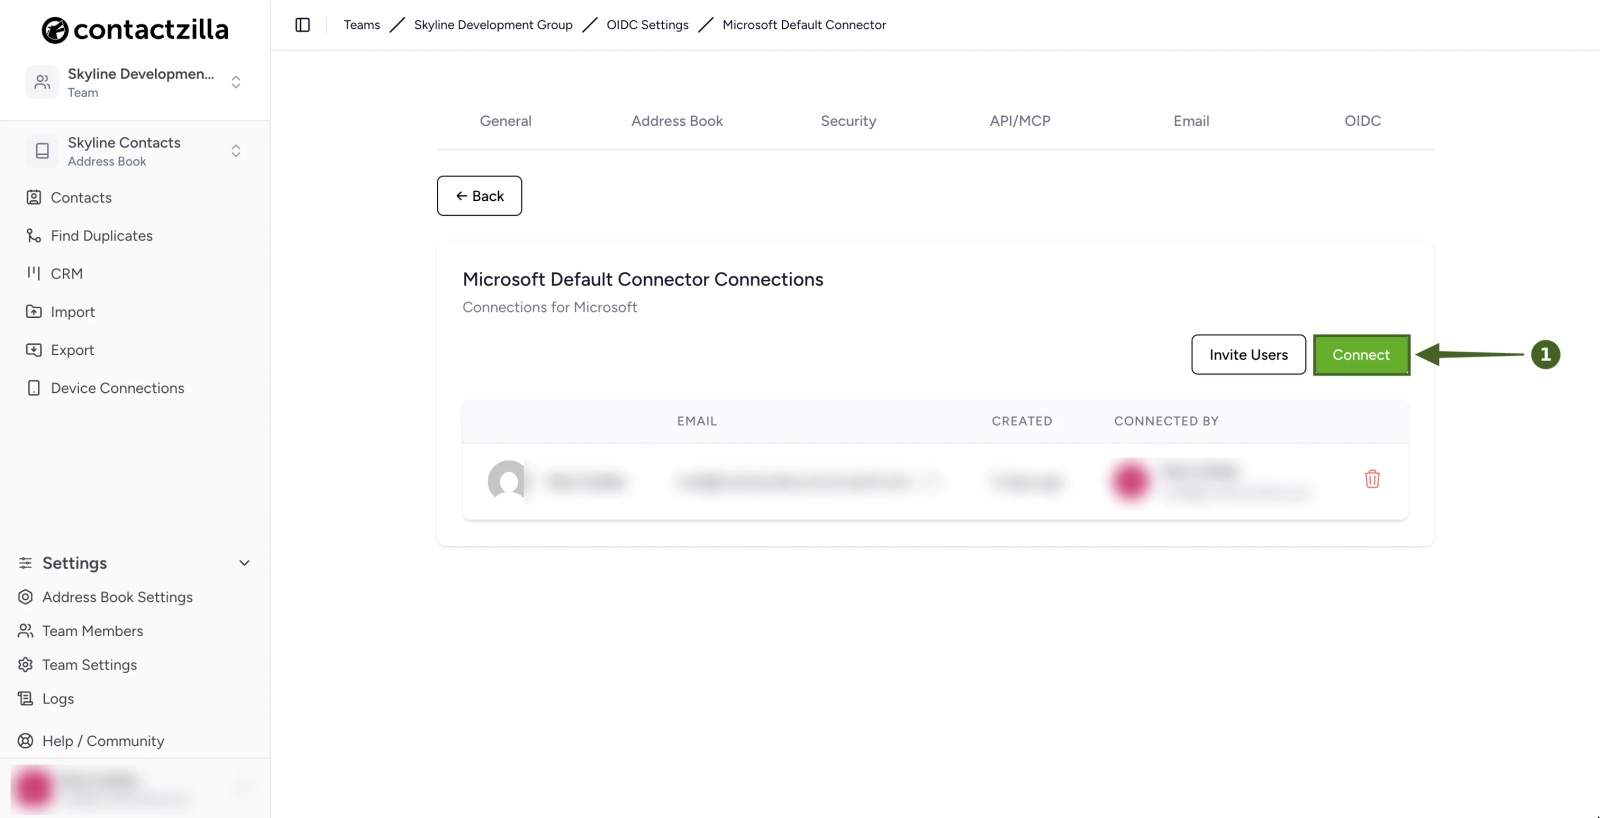
c) Click Connect. You are taken to Microsoft's sign-in.
d) Sign in with the Microsoft 365 account that will authorise the import, confirm the permissions requested, tick Consent on behalf of your organisation if Microsoft offers it, and click Accept.
Contactzilla also needs admin consent in Microsoft Entra before it can read mailboxes. A Microsoft 365 administrator does this once. In Entra, the Microsoft Default Connector's application is called Contactzilla.
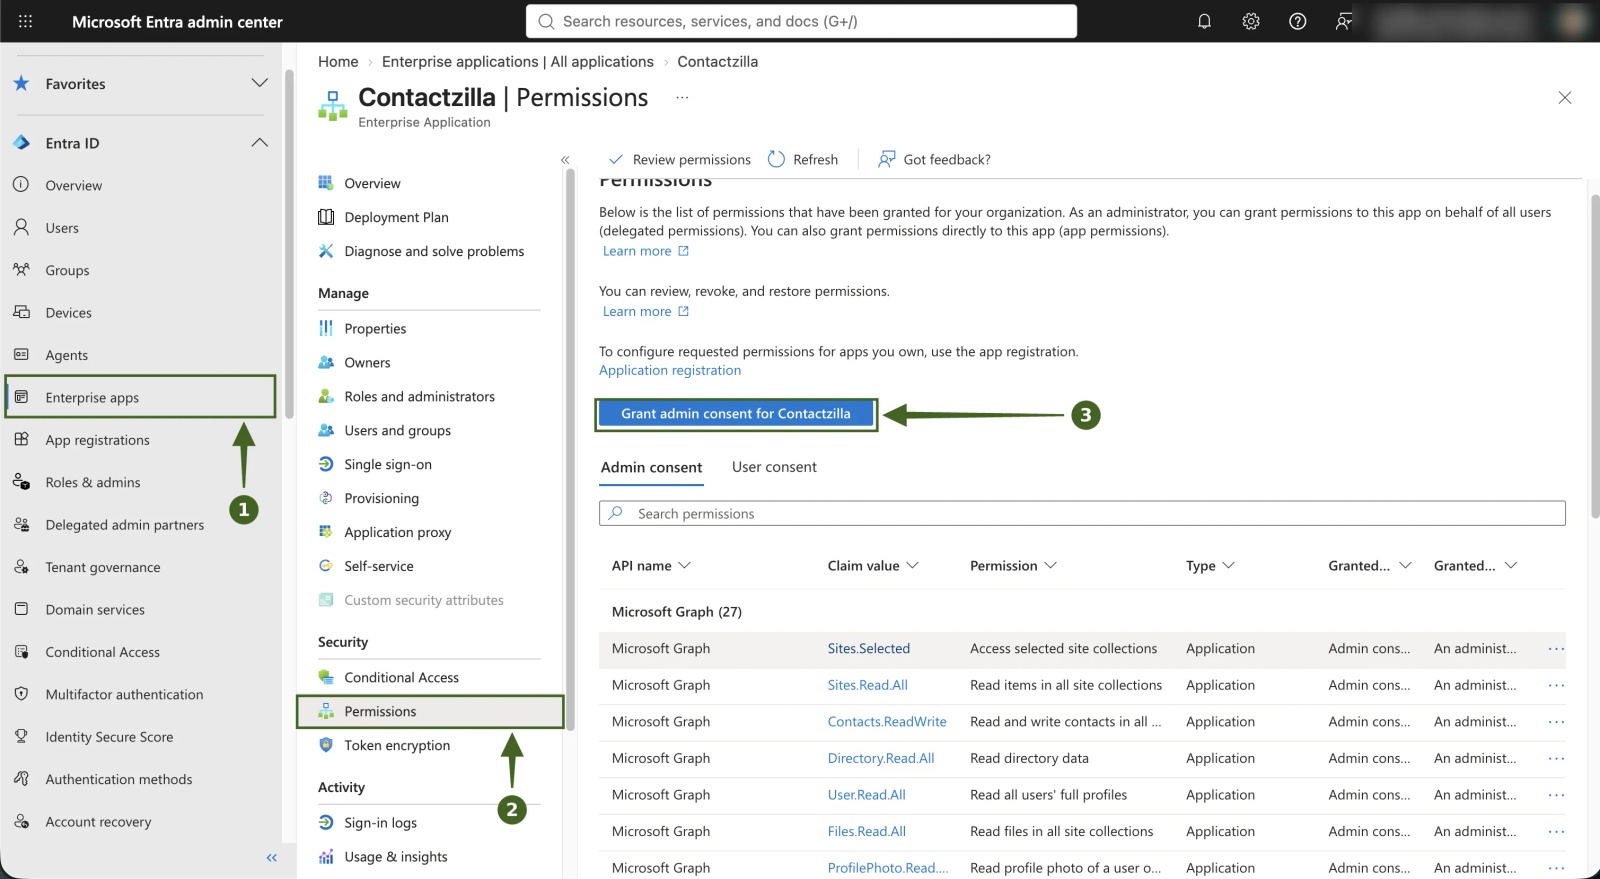
e) Sign in to the Microsoft Entra admin center and select Enterprise apps in the left-hand menu.
f) Open the application named Contactzilla.
g) In the application's menu, select Permissions.
h) Click Grant admin consent for your organisation and confirm when prompted.
💡 The same Entra steps, with screenshots, are in our guide Import contacts from Microsoft Entra ID to Contactzilla (see "Possible required step on Entra"). That guide uses a different Contactzilla application, called Contactzilla Entra Import, so the name you open in step f) is not the same.
Your Microsoft account now appears as a connection for the Microsoft Default Connector, and Contactzilla has permission to read mailboxes in your tenant.
Start the Microsoft Outlook Contacts Import in Contactzilla
Step One: Open the Importer
1) Open the address book you want the contacts to go into, then go to Import and find the Microsoft Outlook Contacts card under the premium importers.
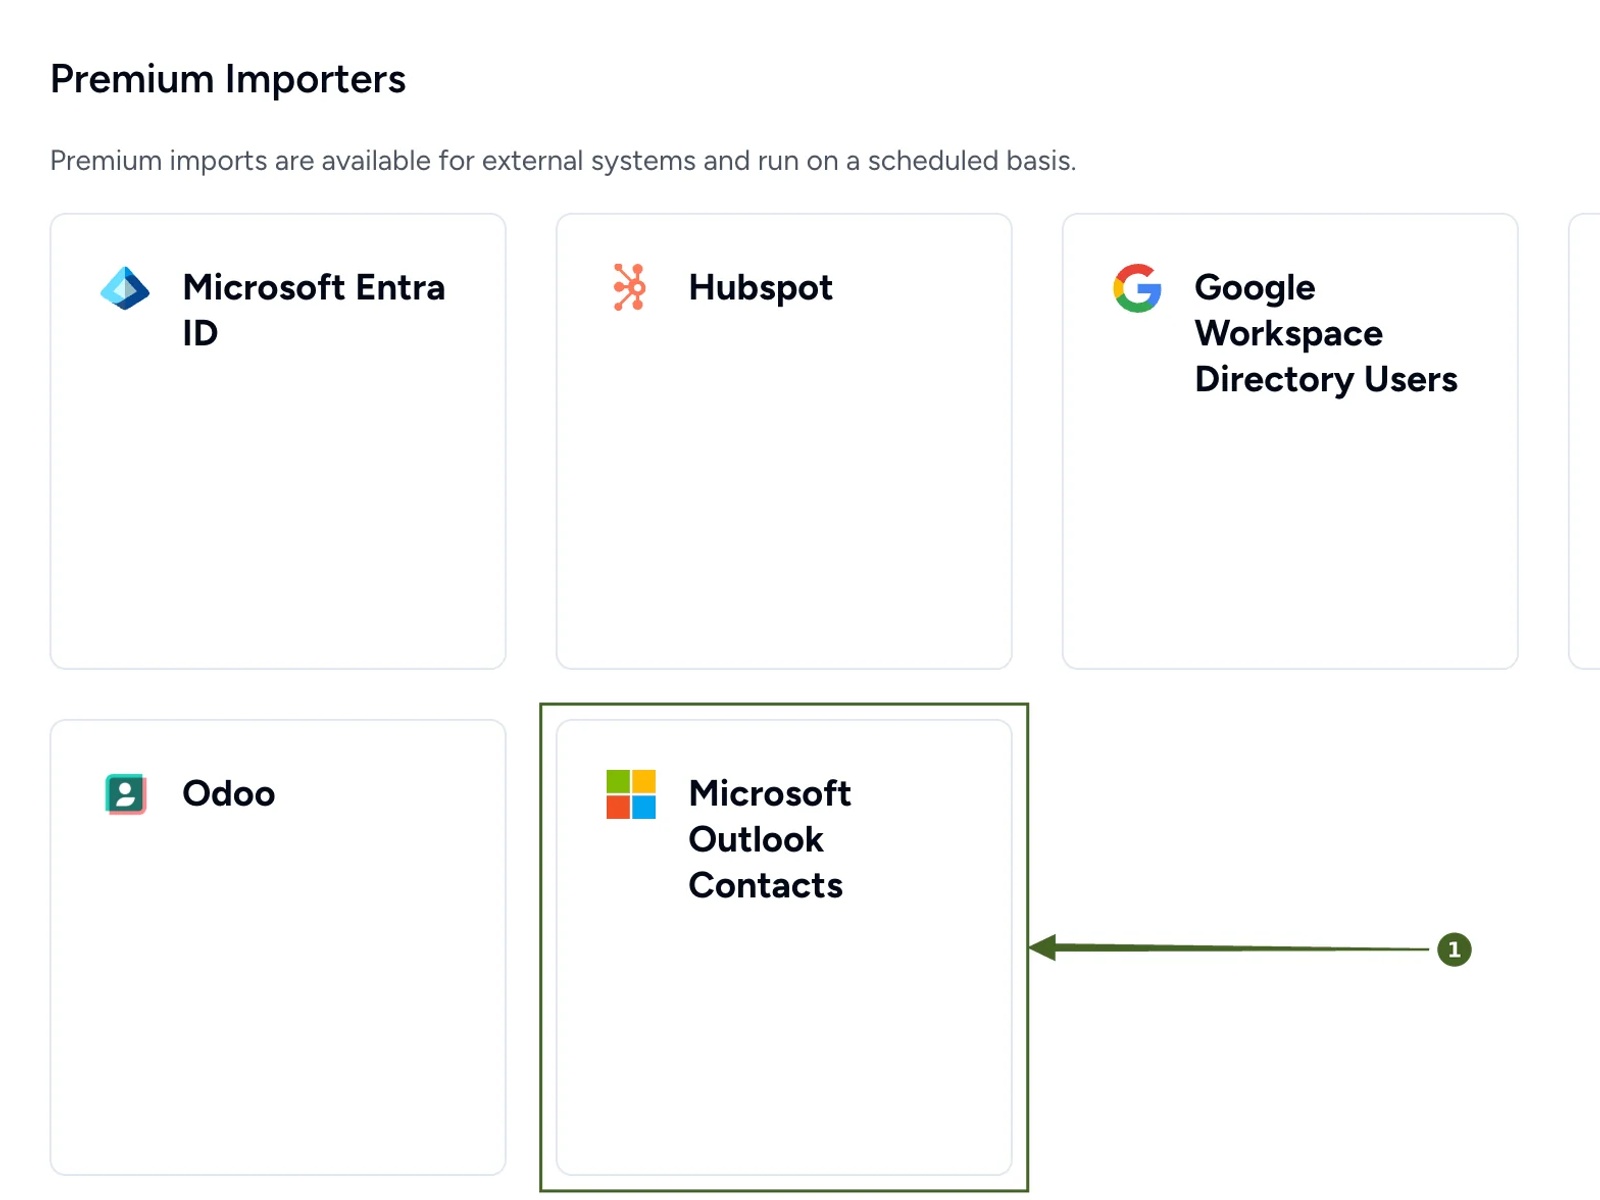
2) Click + Import Microsoft Outlook Contacts to start a new import. The first time, the page says "Your imports will be listed here". Later imports are listed as cards.

The import setup screen opens, starting with the Microsoft connection.
Connect Contactzilla to Microsoft 365 and Choose the Mailbox
Step Two: Choose the Microsoft Connection
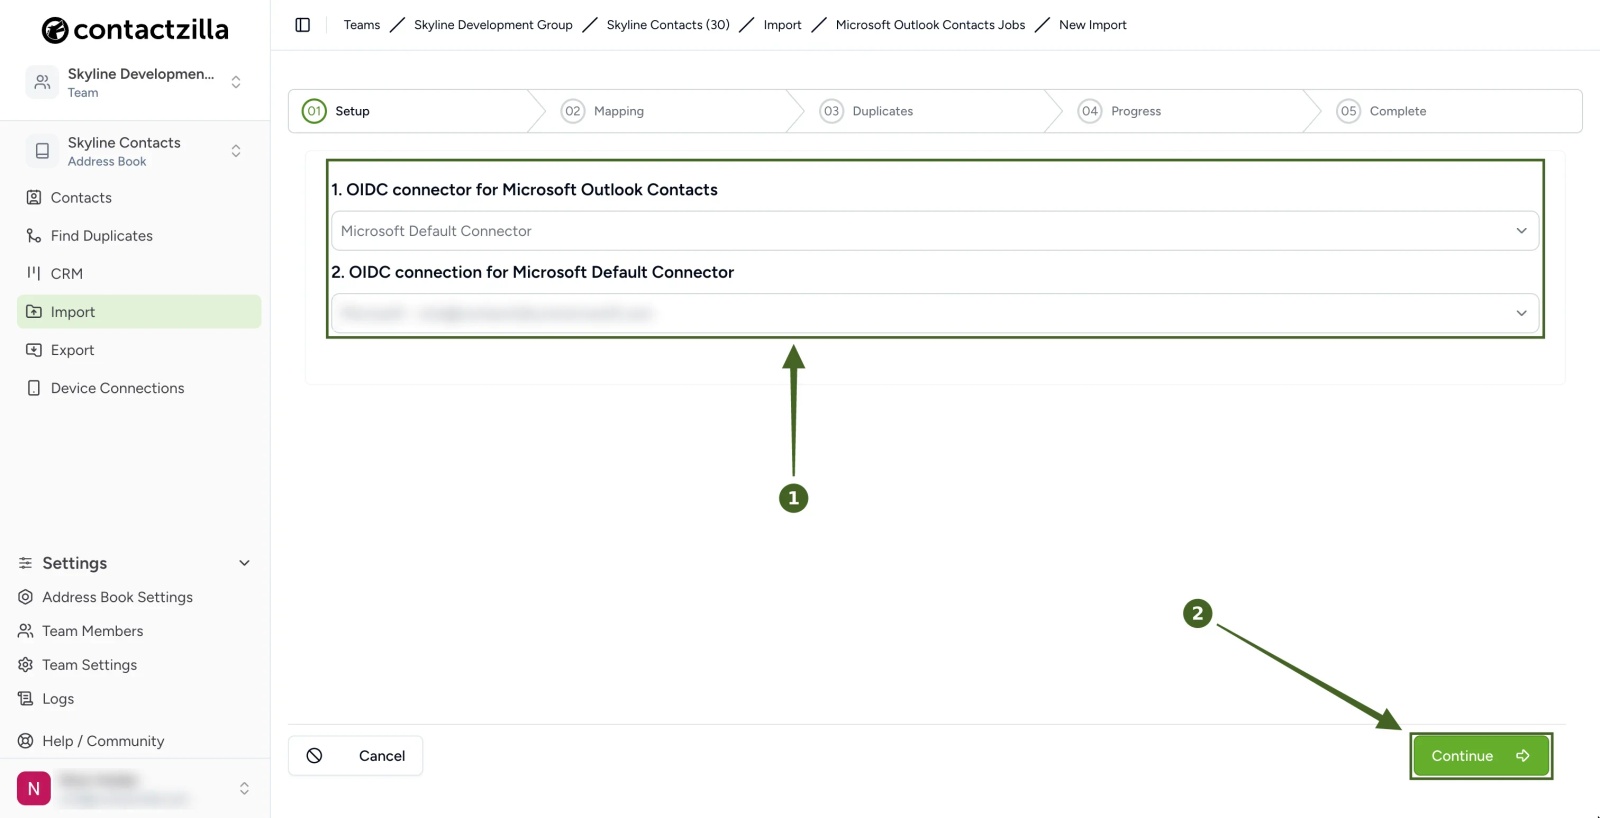
a) Check that Microsoft Default Connector is selected under 1. OIDC connector. Contactzilla usually fills this in for you.
b) Under 2. OIDC connection, choose the Microsoft account you connected. It is ticked when selected.
c) Click Continue.
💡 If your Microsoft account is not in the list, open the dropdown and choose Add New Connection. Then click Connect and follow the Microsoft sign-in described in "Connect Contactzilla to Microsoft 365" above.
Step Three: Pick the Mailbox, Schedule and Label
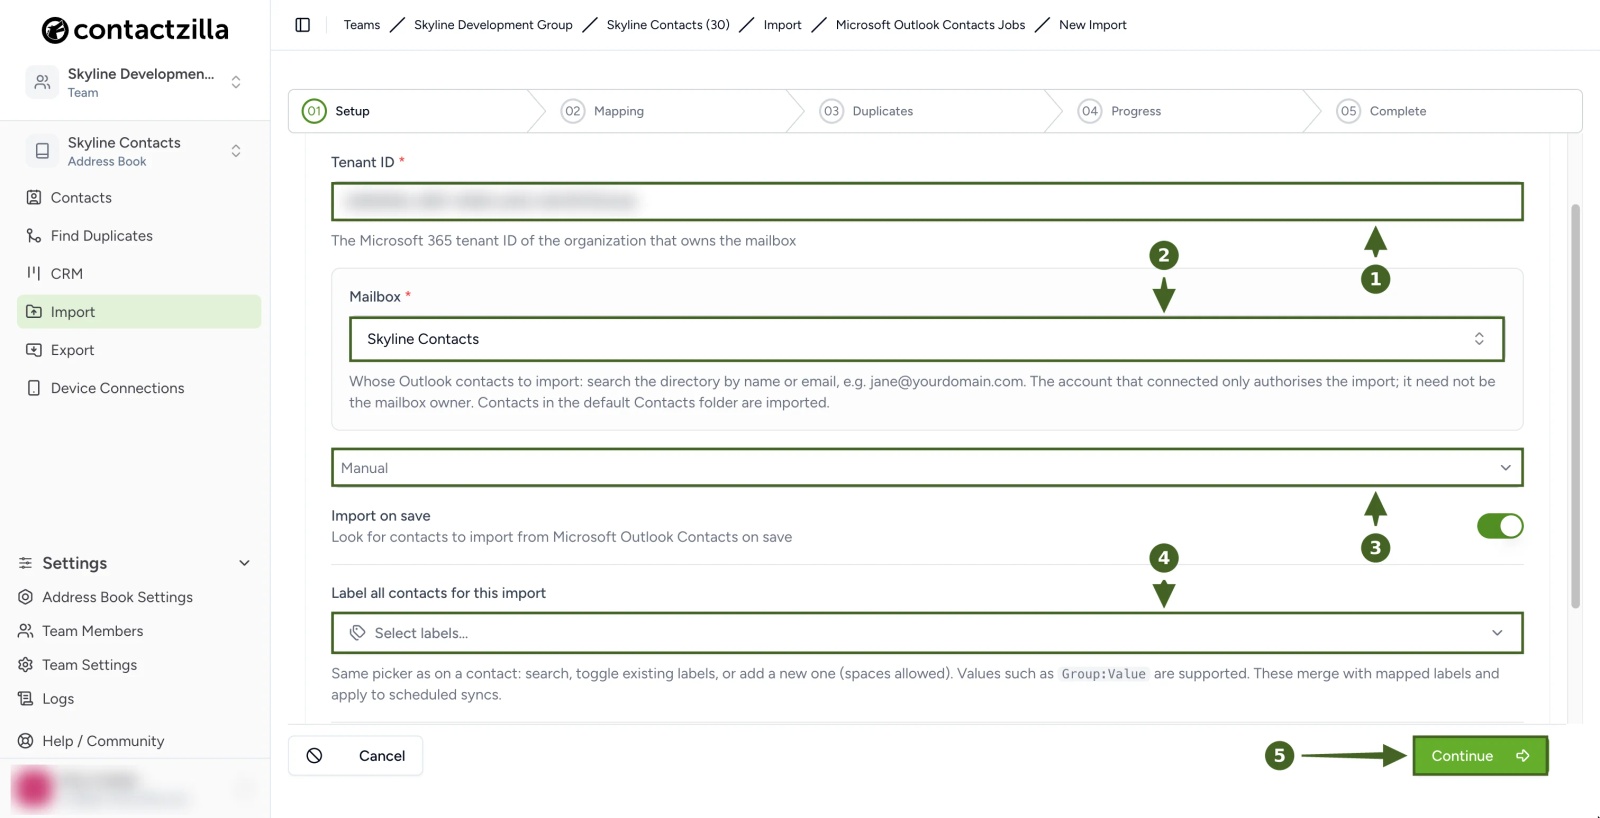
a) Enter your Tenant ID. This is the Microsoft 365 tenant ID of the organisation that owns the mailbox. You can copy it from the Overview page of the Microsoft Entra admin center. The field starts empty.
b) Under Mailbox, start typing the name or email address of the mailbox and choose it from the list. This works for shared mailboxes as well as personal ones.
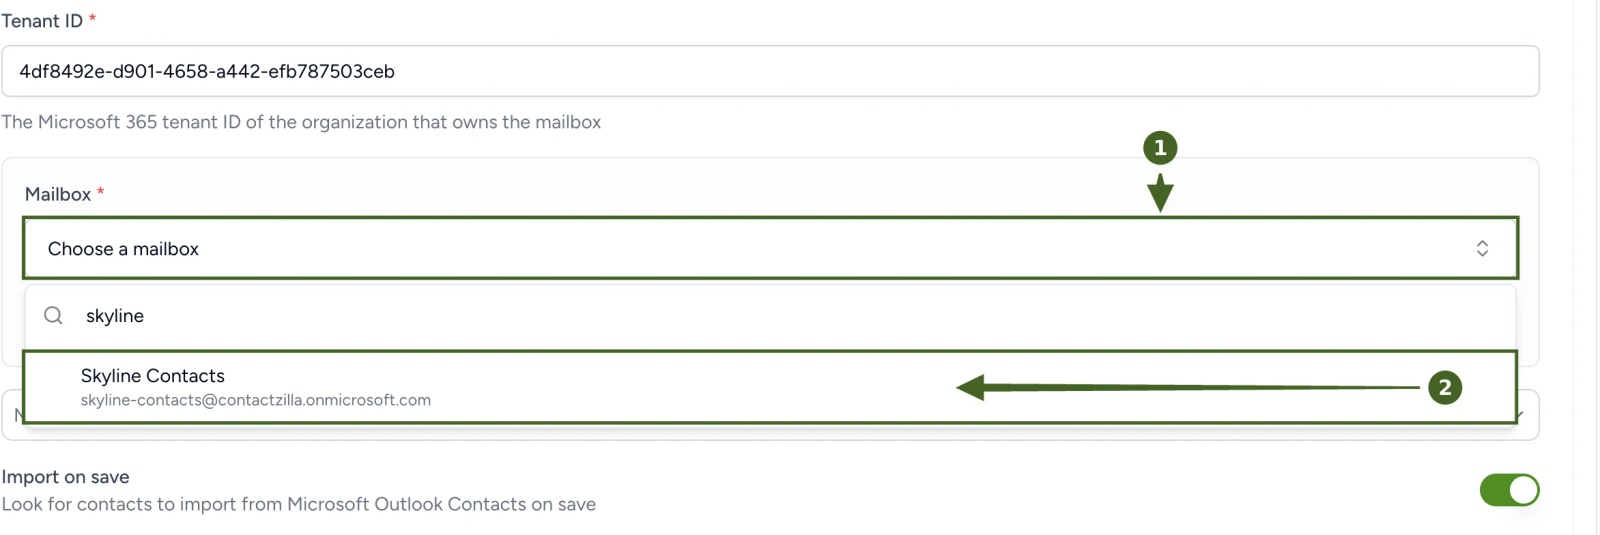
c) Leave the schedule on Manual, which is the default. Don't pick a timed schedule yet. With Manual you stay in control: the import only runs when you start it, so you can check the first results before anything runs on its own. Once you are happy with the address book, you set the schedule in the import's settings (Step Nine). Import on save is switched on by default, so the first import still starts as soon as you finish the wizard.
d) Under Label all contacts for this import, decide whether you need a label:
- Leave it empty if this address book is only for this mailbox.
- Add a label, such as
source:outlook, if you will also add contacts to this address book from other sources, for example another importer or a CSV file. The label marks which contacts came from this mailbox, which keeps the delete option in Step Five from touching the others.
Every imported contact gets the label, added alongside any labels from the mapping (such as Outlook categories). Labels in the Group:Value form are supported.
e) Click Continue. Contactzilla creates the connection, which can take up to a minute, and then waits for the mailbox data. The first time this can take a minute or two more, then the Mapping screen opens.
⚠️ Important: These settings cannot be edited after the import is created, except the schedule. Contactzilla says: "To use different values, delete this import and create a new one." Check the Tenant ID, mailbox and label before you continue.
The Mapping screen opens, ready for you to review.
Review How Outlook Fields Map to Contactzilla
Step Four: Check the Field Mapping
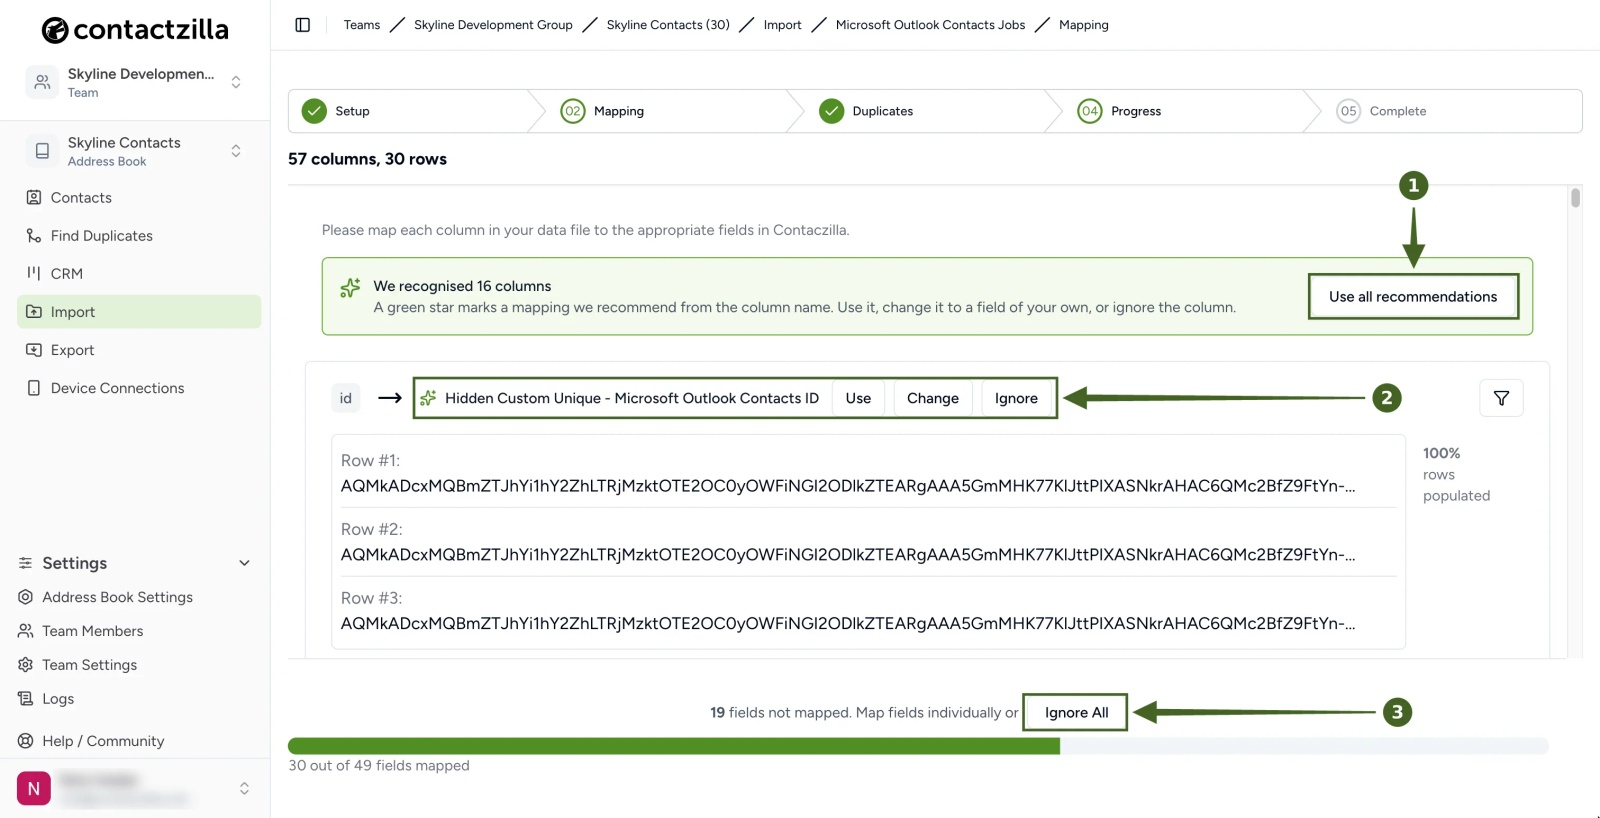
a) Look at the green box at the top of the screen. Contactzilla has read the Outlook column names and recognised some of them, and the box tells you how many. A green star marks each mapping it recommends. Click Use all recommendations to accept them all at once.
b) If you would rather go column by column, each recognised column has its own Use, Change and Ignore buttons. Use accepts the suggestion, Change lets you pick a different field, and Ignore leaves that column out of the import.
c) Check that id is mapped to Hidden Custom Unique and named Microsoft Outlook Contacts ID. Contactzilla uses this field to recognise each Outlook contact on later runs, so leave it as it is.
d) Note the Outlook categories column. Contactzilla recommends mapping it to Label, which turns each Outlook category into a Contactzilla label. Those labels create lists of contacts that you can use later, for example to choose which contacts go to which phones. You don't have to use it: click Ignore on that column if you would rather not bring categories across. photoUrl is recommended as Avatar, so contact photos come across too.
e) Some columns are not recognised, such as phone_mobile, phone_business and personalNotes. The message at the bottom of the screen counts how many fields are not mapped. Choose a Contactzilla field for each one you want to keep, or click Ignore All to leave out any you do not need.
f) When every column is mapped or ignored, click Continue. From the next run on, Contactzilla remembers your choices and opens this screen already filled in.
The Duplicates screen opens.
Choose How the Import Handles Existing Contacts
Step Five: Set the Duplicates Option
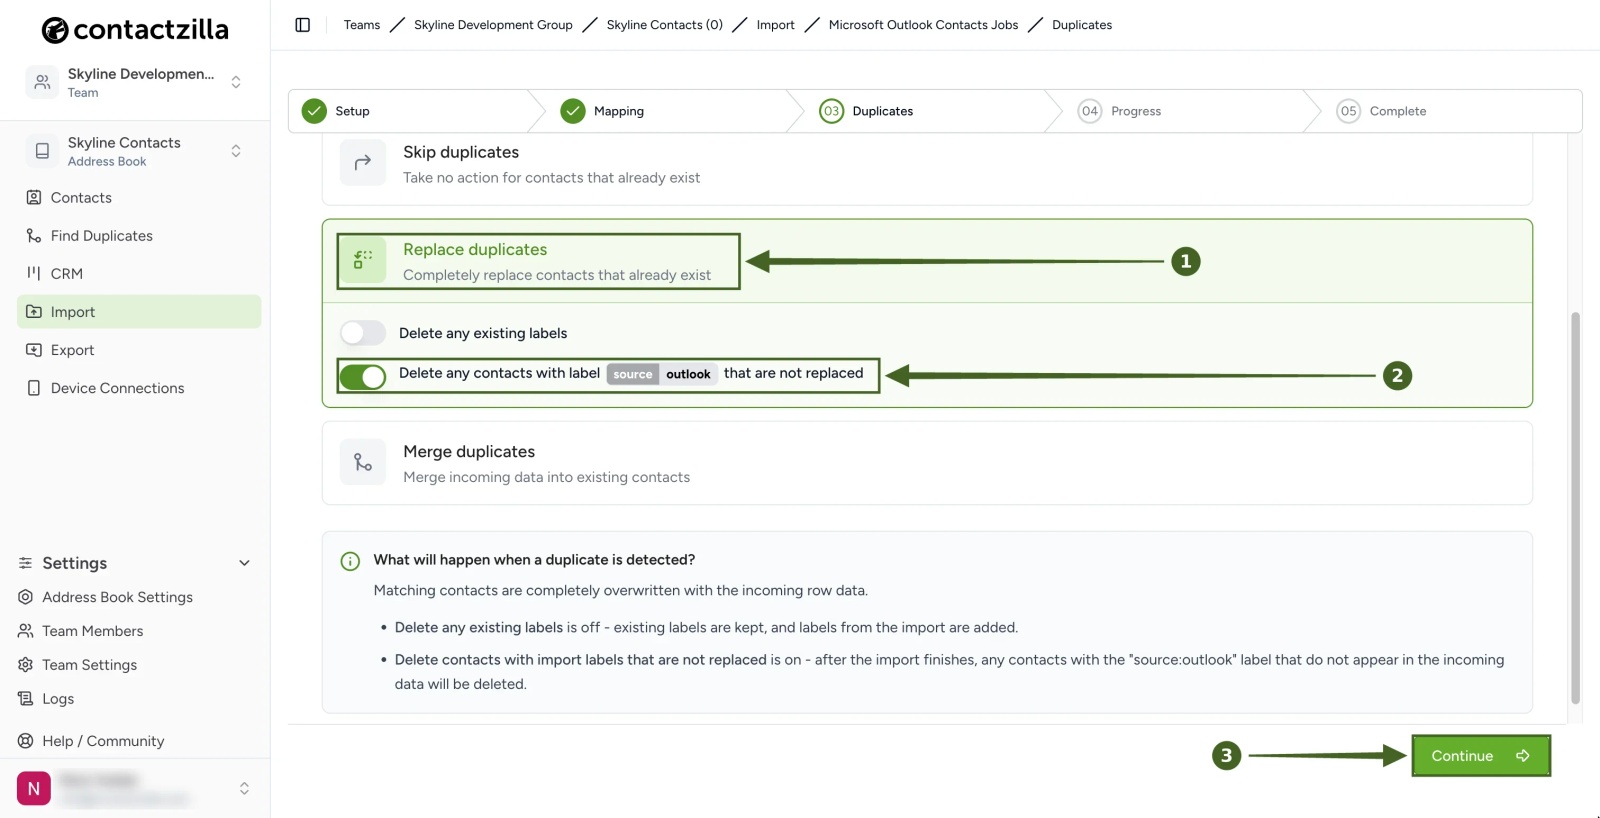
a) Choose what happens when an imported contact already exists in the address book:
- Skip duplicates (the default): leaves existing contacts as they are.
- Replace duplicates: replaces the existing contact completely with the Outlook data.
- Merge duplicates: merges the Outlook data into the existing contact.
The panel at the top shows how Contactzilla decides two contacts are the same, and links to Address Book Settings if you want to change that.
b) For a dedicated address book that should be an exact copy of the mailbox, choose Replace duplicates. Two switches appear:
- Delete any existing labels: leave this off, so existing labels are kept and the import's labels are added.
- Delete any contacts not replaced: turn this on. After the import finishes, Contactzilla deletes any contact in this address book that does not appear in the mailbox, so the address book stays an exact copy of it.
If you set an import label in Step Three, the second switch is named Delete any contacts with label … that are not replaced and only deletes contacts that carry that label. A note under the options explains the current setting of each switch.
c) Click Continue to start the import.
⚠️ Important: with no import label, the delete switch removes every contact in the address book that is not in the mailbox, including contacts someone added by hand or from another source. If anything else is added to this address book, set an import label in Step Three so the delete only applies to contacts that carry that label. Otherwise leave the delete switch off.
Contactzilla saves your choice and starts the import.
Run the Import and Confirm It Finished
Step Six: Watch the Import and Confirm It Finished
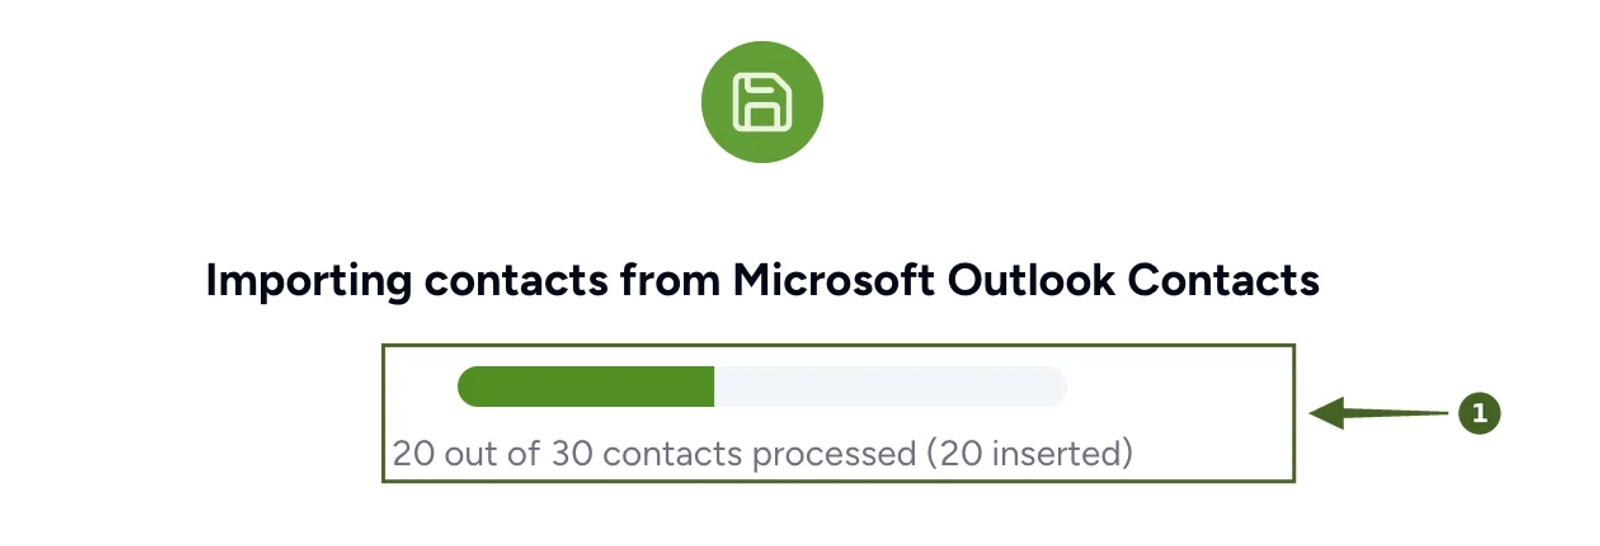
1) While the import runs, the Progress screen shows a bar and a running count, for example 20 out of 30 contacts processed (20 inserted). Leave the page open until it moves on.
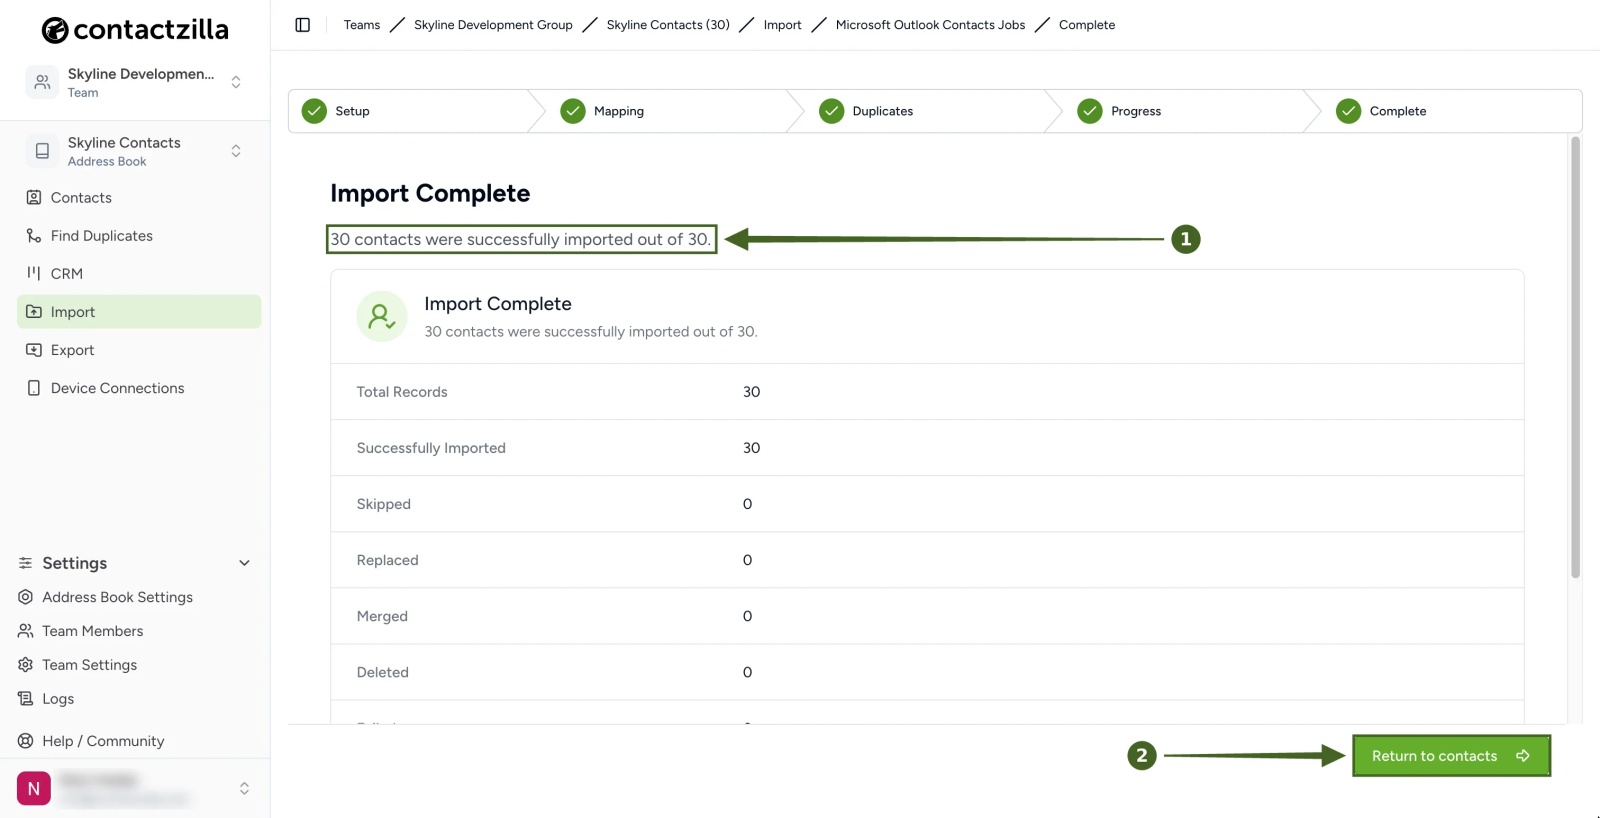
2) On the Import Complete screen, read the result message, for example 30 contacts were successfully imported out of 30. The table below it lists the totals for Total Records, Successfully Imported, Skipped, Replaced, Merged and Deleted.
3) Click Return to contacts.
The import has finished, and the contacts are now in your address book.
Check the Imported Contacts in Contactzilla
Step Seven: Open the Address Book and a Contact
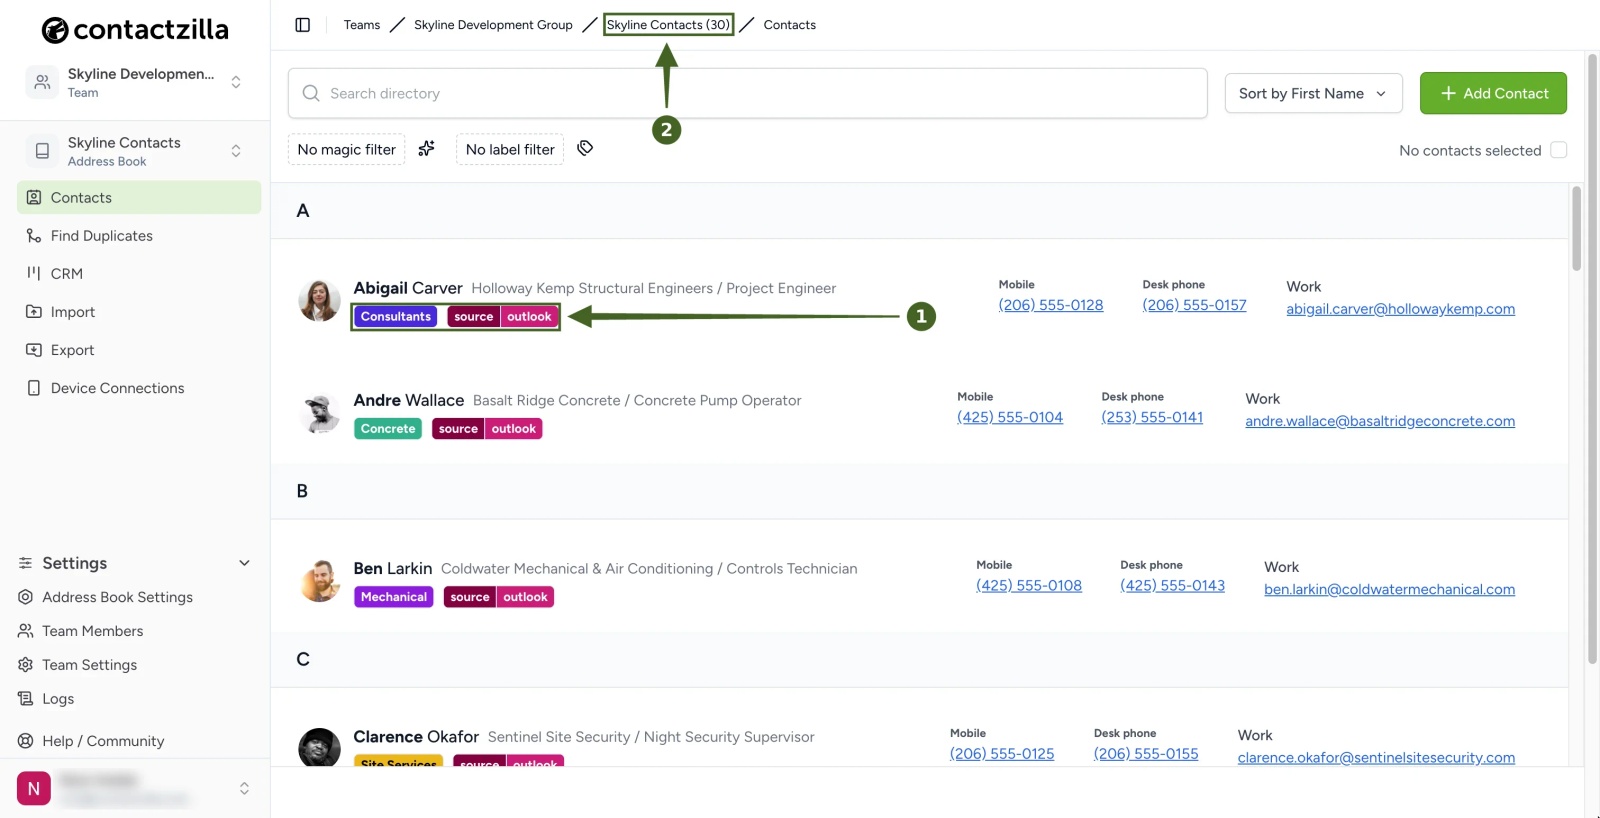
1) In the contact list, check the labels on each contact. You should see any Outlook categories, plus your import label if you set one (here source:outlook).
2) Click a contact to open it. The Outlook photo is the avatar, and the labels sit in the labels row.
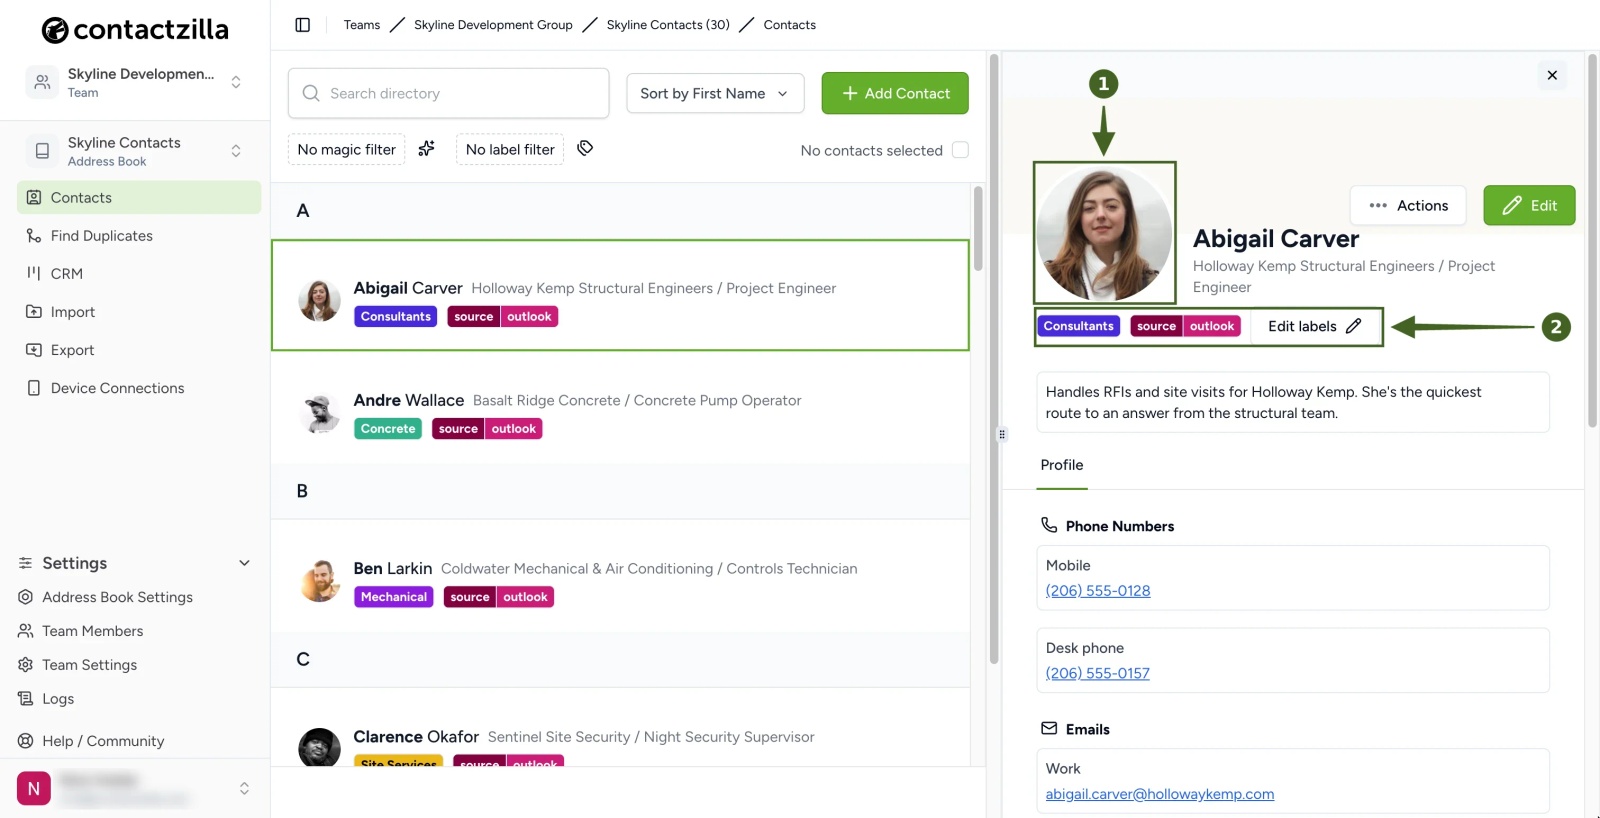
The address book now lists the mailbox's contacts, each with its labels and, where Outlook has one, its photo.
Re-run, Schedule and Manage the Outlook Import
Step Eight: Use the Importer Menu
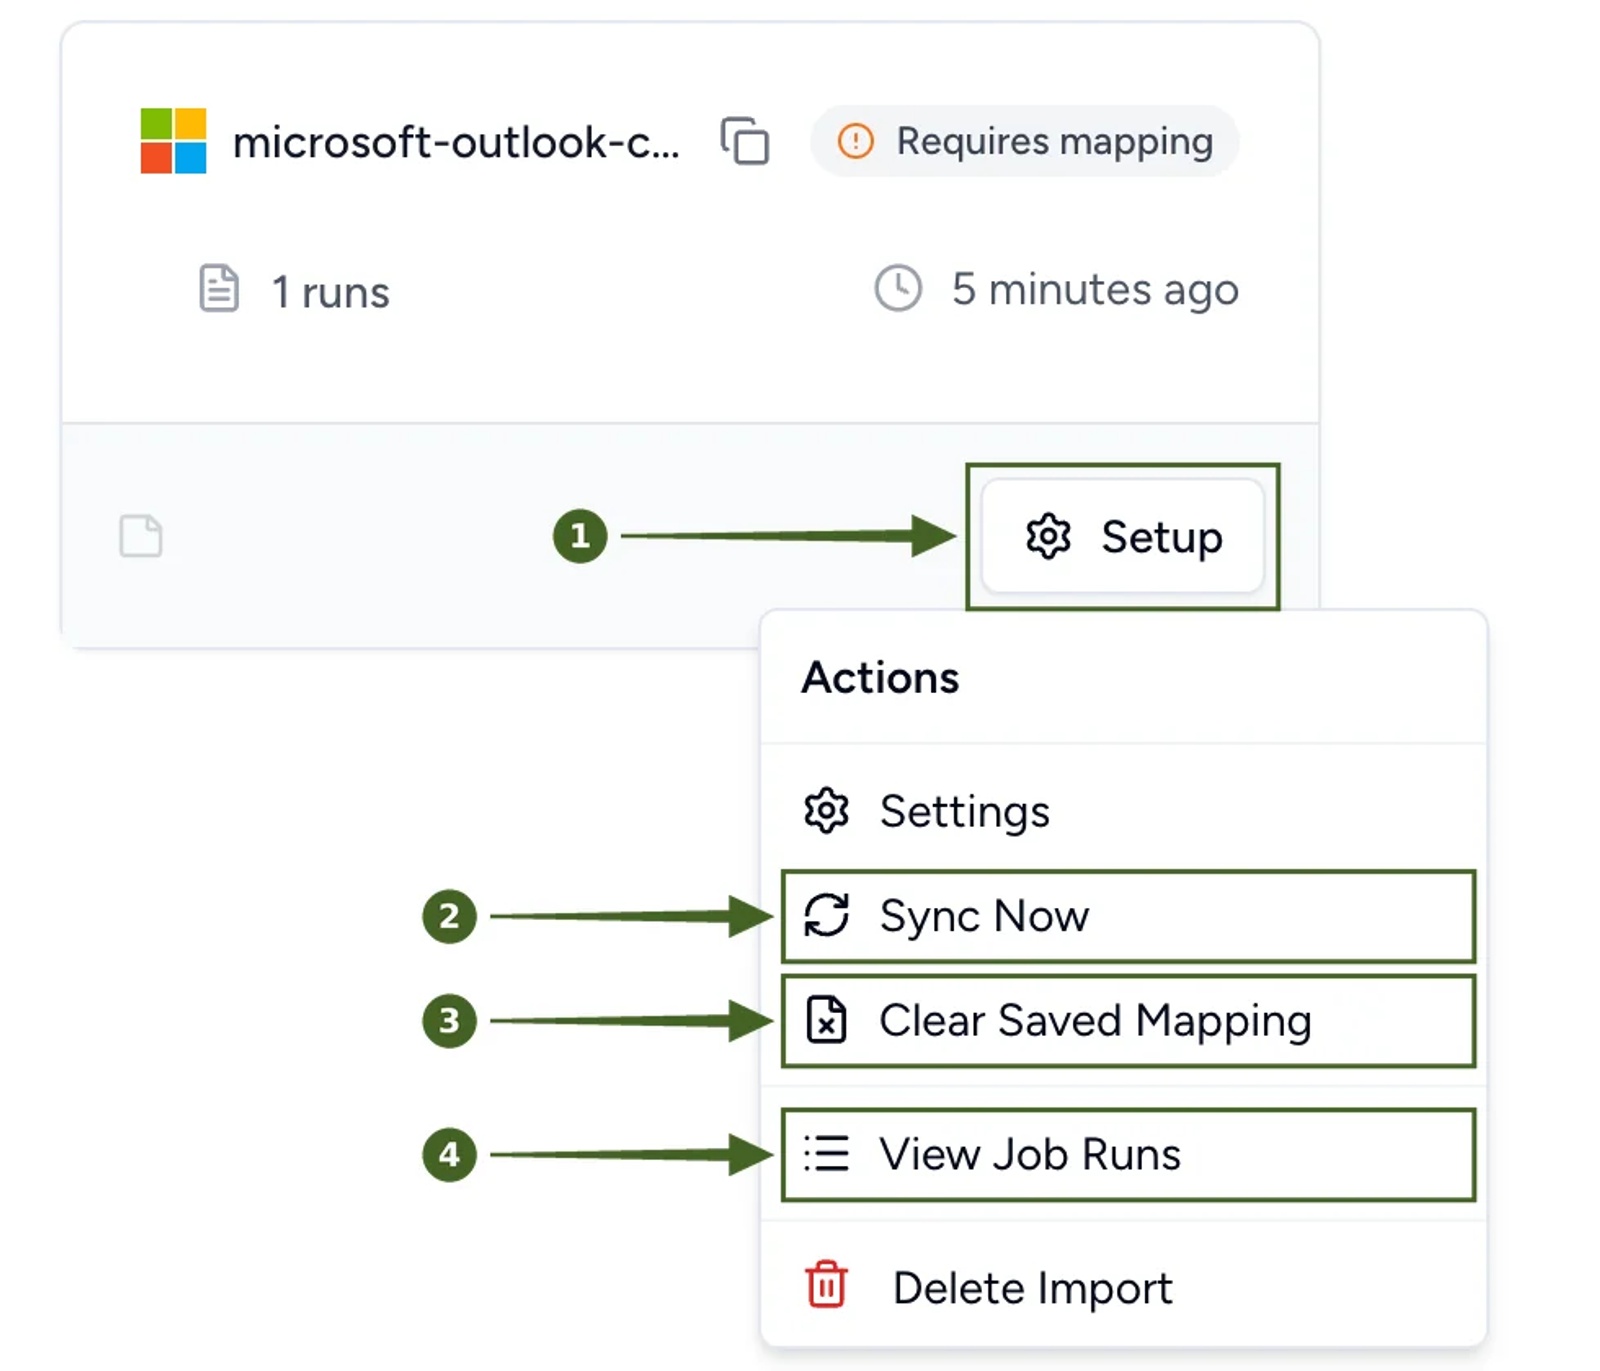
a) Import > Microsoft Outlook Contacts, then click Setup on the importer's card to open its menu.
b) Choose Sync Now to run the import straight away instead of waiting for the schedule.
c) Choose Clear Saved Mapping if you want to review the mapping and duplicates options again on the next run.
d) Choose View Job Runs to see every run (Step Ten). The menu also has Settings and Delete Import.
💡 After Clear Saved Mapping, run Sync Now again. The card can stay on Pending import for a few minutes, so reload the page. When it changes to Requires mapping, open the importer and the Mapping and Duplicates screens come back already filled in.
Step Nine: Change the Schedule
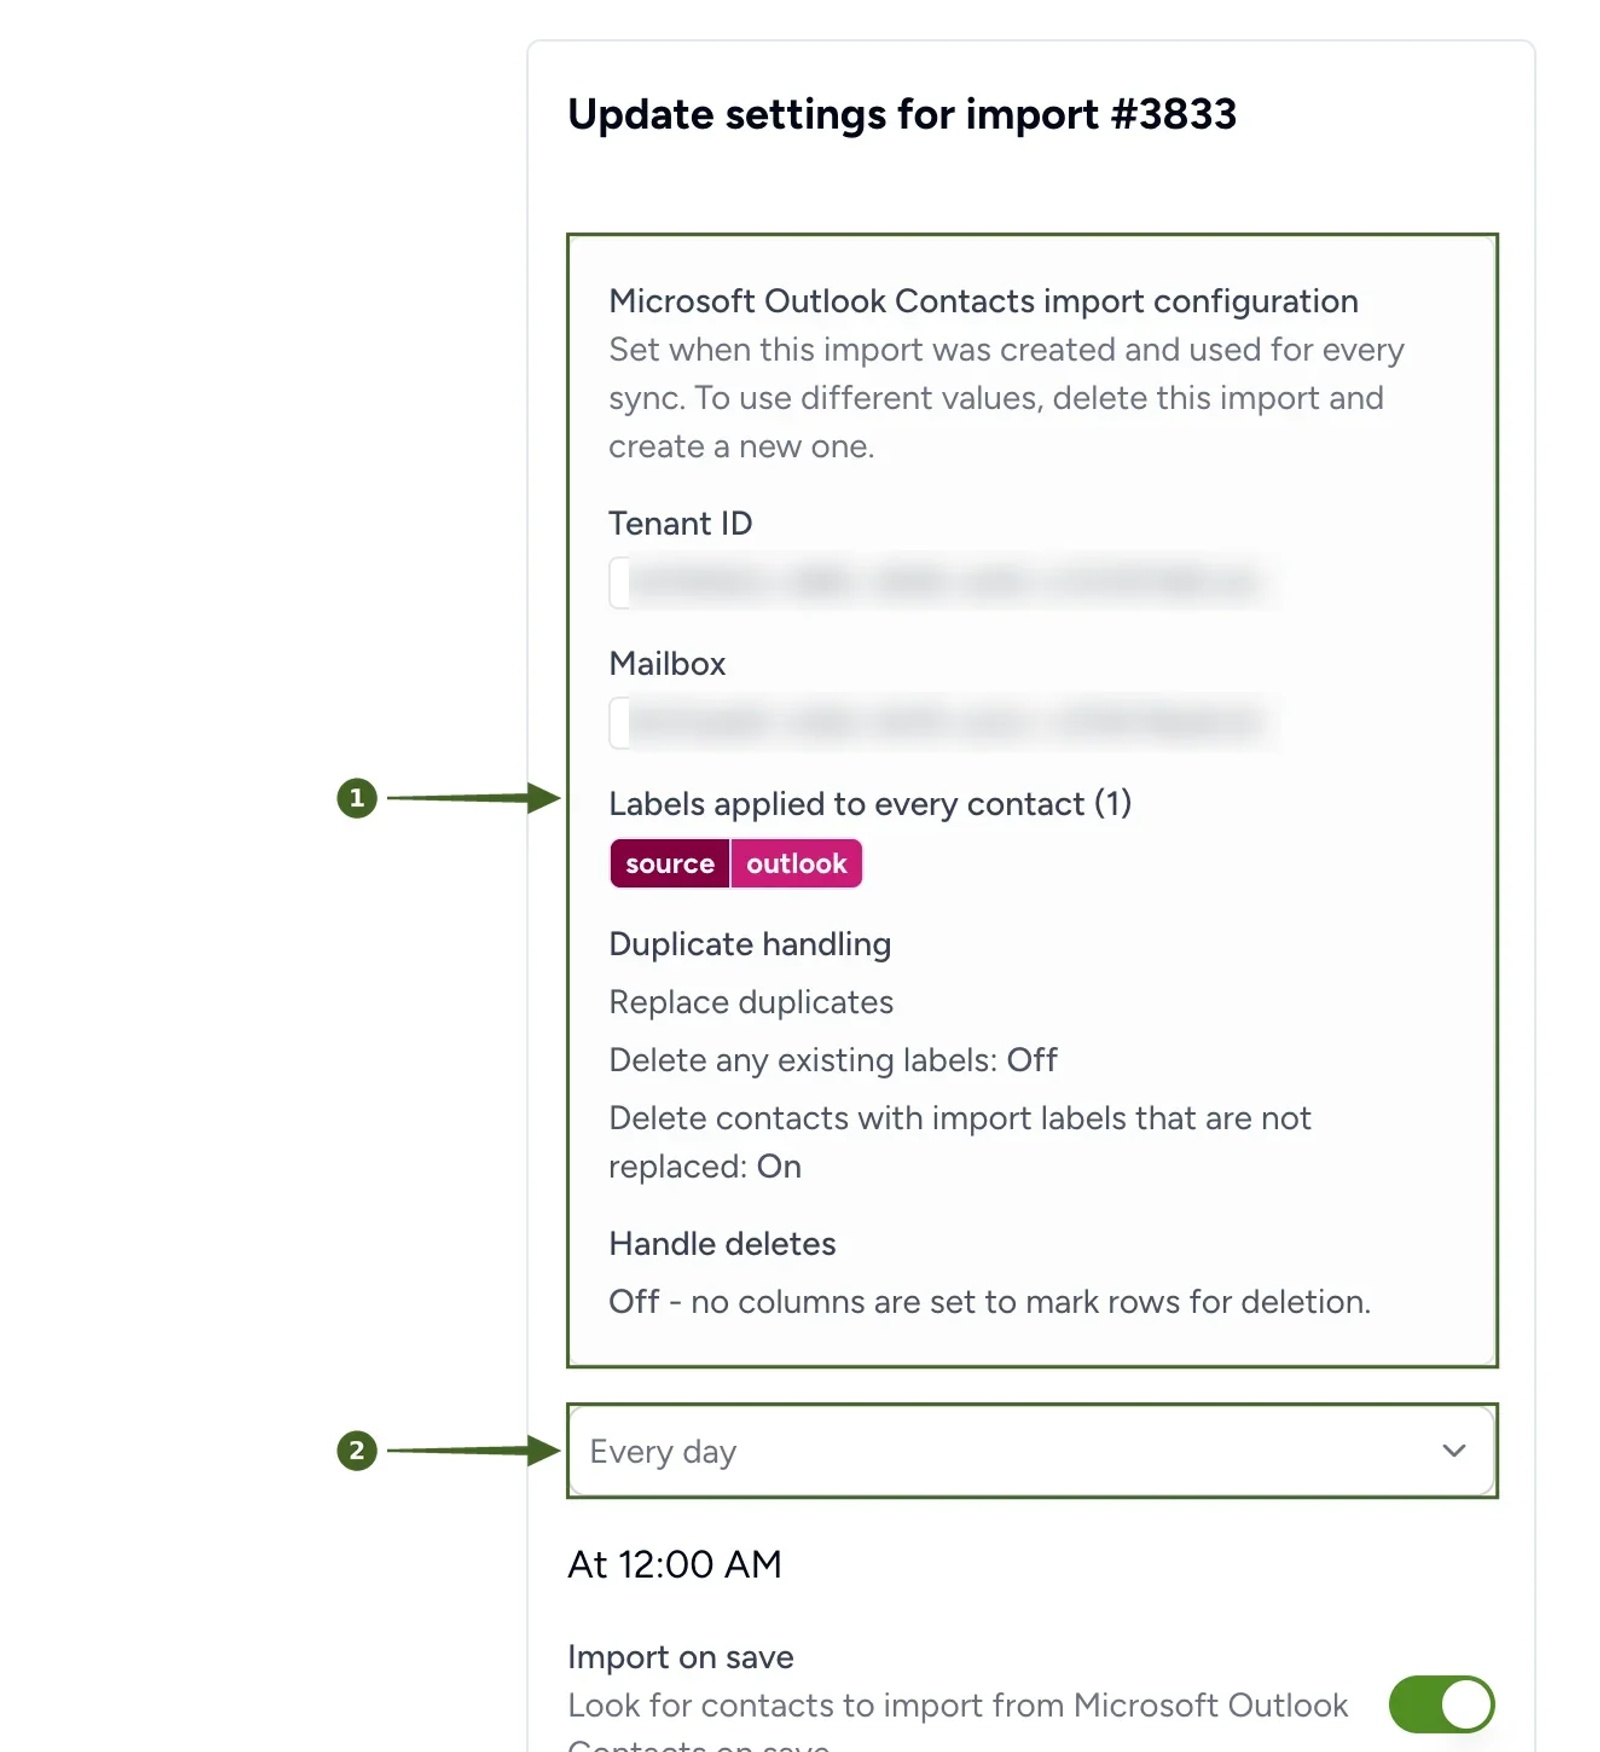
a) Setup > Settings. The configuration you chose when you created the import is shown here as read-only.
b) Once you are happy with the import, use the schedule dropdown to choose how often it runs:
- Manual: only when you run Sync Now
- Every 4 hours, Every 8 hours or Every 12 hours
- Every day, which runs at 12:00 AM
- Every week
- Every month
c) Click Update to save the new schedule. The Import on save switch below the schedule is on by default and tells Contactzilla to look for contacts to import when you save.
Step Ten: Check the Job Runs
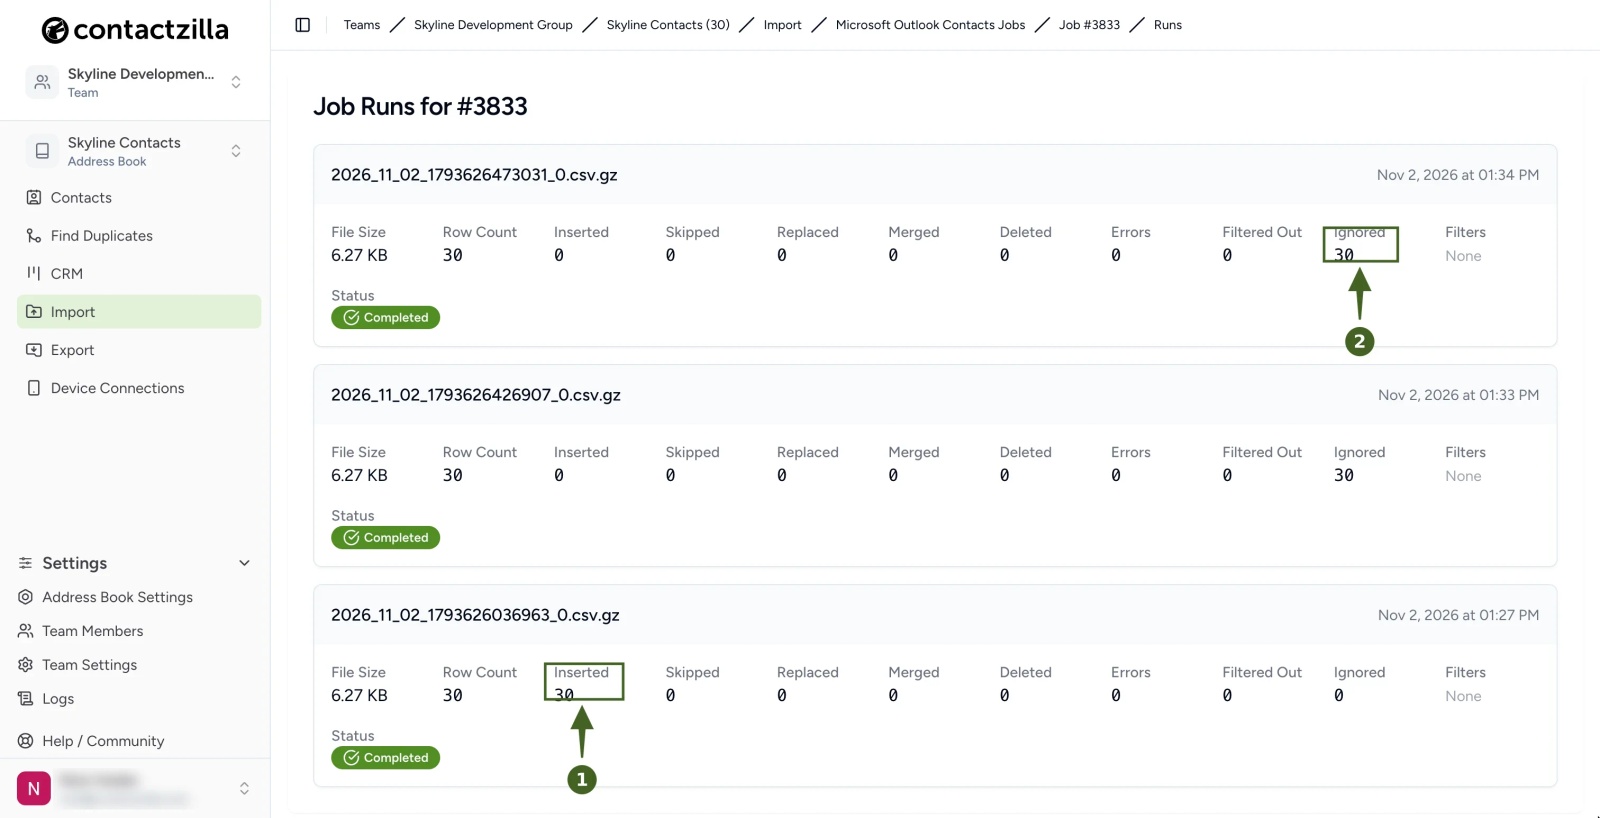
a) Setup > View Job Runs. Each run lists how many contacts were inserted, skipped, replaced, merged, deleted, filtered out, ignored or errored.
b) Compare your first and latest runs. The first run inserted all of the contacts. A later run on unchanged data inserts and replaces nothing and shows every contact as Ignored.
The job runs list shows each import, and repeat runs leave unchanged contacts alone.
You've now imported the contacts from your Microsoft 365 mailbox into Contactzilla. They sit in your address book with their labels and photos, ready to be delivered to your staff's phones, and Contactzilla runs the import again on the schedule you set in Step Nine.
Still need help?
Our support team is available to assist you with any questions or issues you may have.