How can we help you?
Browse Categories
How to Set Up Hybrid Contacts on iPhones: Shared Company Contacts Plus Private Contacts

This guide shows you how to set up hybrid access in Contactzilla and deploy it to iPhones through your MDM, so staff get your shared address book as read-only contacts plus their own private address book for people they add themselves. The MDM steps work the same way in any MDM that can deploy custom configuration profiles; our screenshots use Microsoft Intune. It assumes you're a Contactzilla team administrator and can create configuration profiles in your MDM.
How Hybrid Works
With hybrid, each iPhone gets two Contactzilla accounts:
- Your shared address book (Skyline Staff in our example), read only, so staff can't change or delete the company's contacts.
- The phone's own device address book, read and write. You choose its name, for example My Contacts. Contacts a person adds on their phone are saved here, so you can see them in Contactzilla.
You choose what happens when someone edits a shared contact on their phone: Contactzilla can reject the edit, or save the edited contact to the phone's own address book and hide the original. Device address books are only visible to administrators, in the Device Address Books tab.
What You'll Need
- A Contactzilla team with a shared address book that has contacts in it. See Setting up a Team and Address Book.
- Administrator access to Team Settings in Contactzilla.
- An MDM with your iPhones enrolled (Microsoft Intune in this example), and permission to create and assign configuration profiles in it.
⚠️ Important: hybrid needs an MDM, such as Microsoft Intune, Jamf Pro or Mosyle. Both hybrid profiles use your MDM's device ID and serial number variables, so each iPhone can only sign in as itself. Installed by QR code, email or by hand, they won't sign in.
Turn On Hybrid for Your Team in Contactzilla
You do this once for the whole team, before creating any hybrid connections.
Step One: Name the Device Address Book and Choose Your MDM
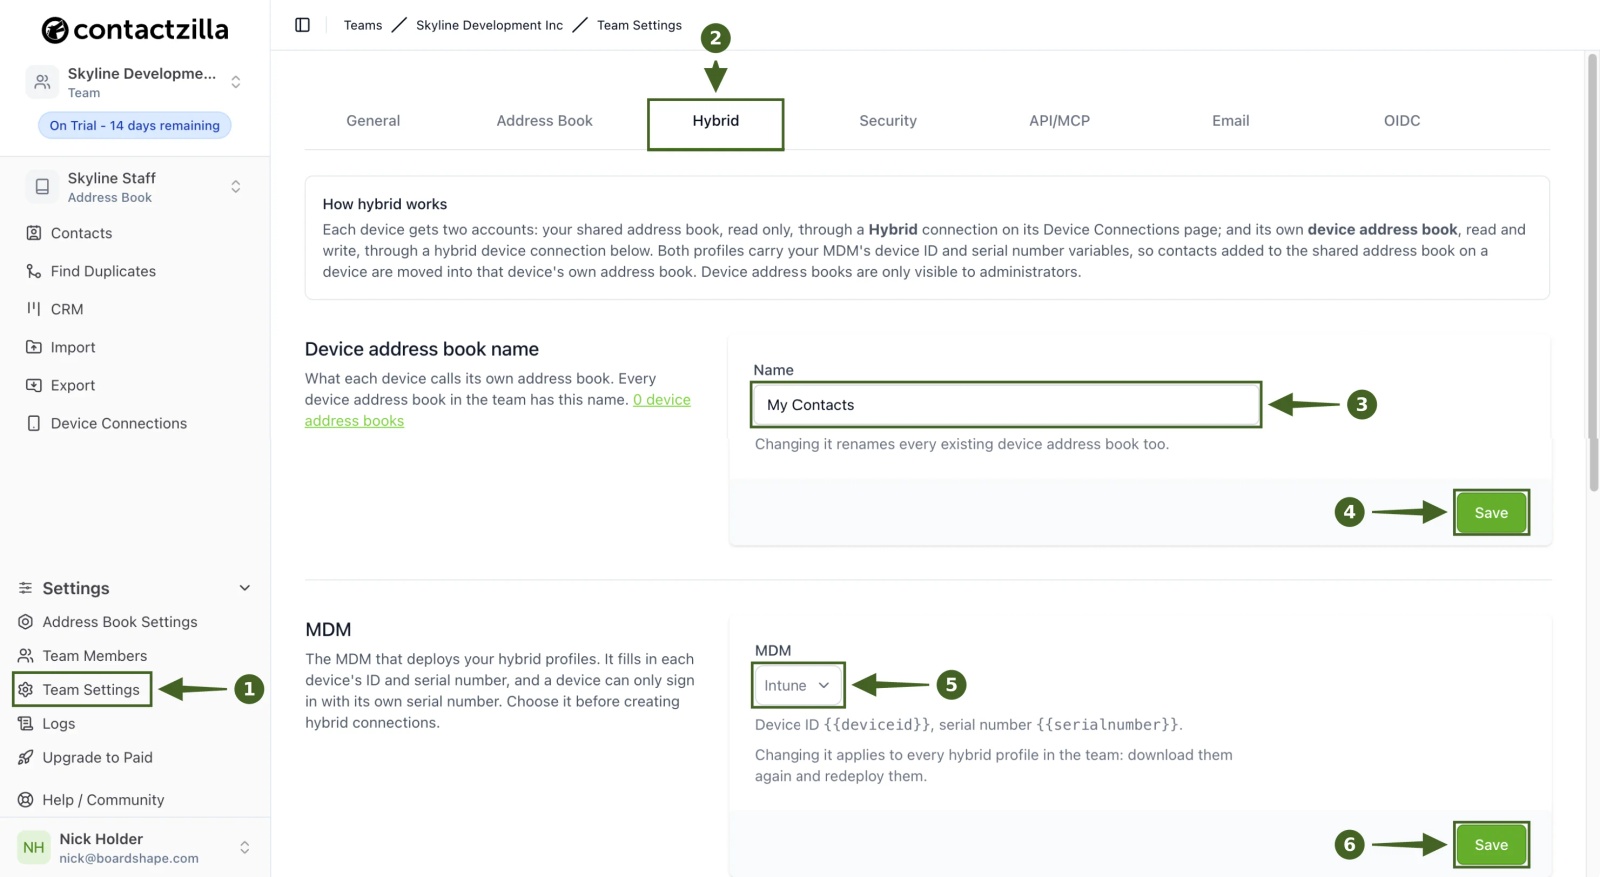
a) Team Settings > Hybrid.
b) Under Device address book name, enter the name staff will see on their phones, for example My Contacts, and click Save. Keep it short so it fits on the phone. Every device address book in the team uses this name.
c) Under MDM, choose the MDM that manages your iPhones (Intune in our example) and click Save.
💡 Choose your MDM before creating any hybrid connections. If you change it later, every hybrid profile in the team needs downloading and deploying again.
Step Two: Create the Hybrid Device Connection
Further down the same Hybrid page, under Add a hybrid device connection:
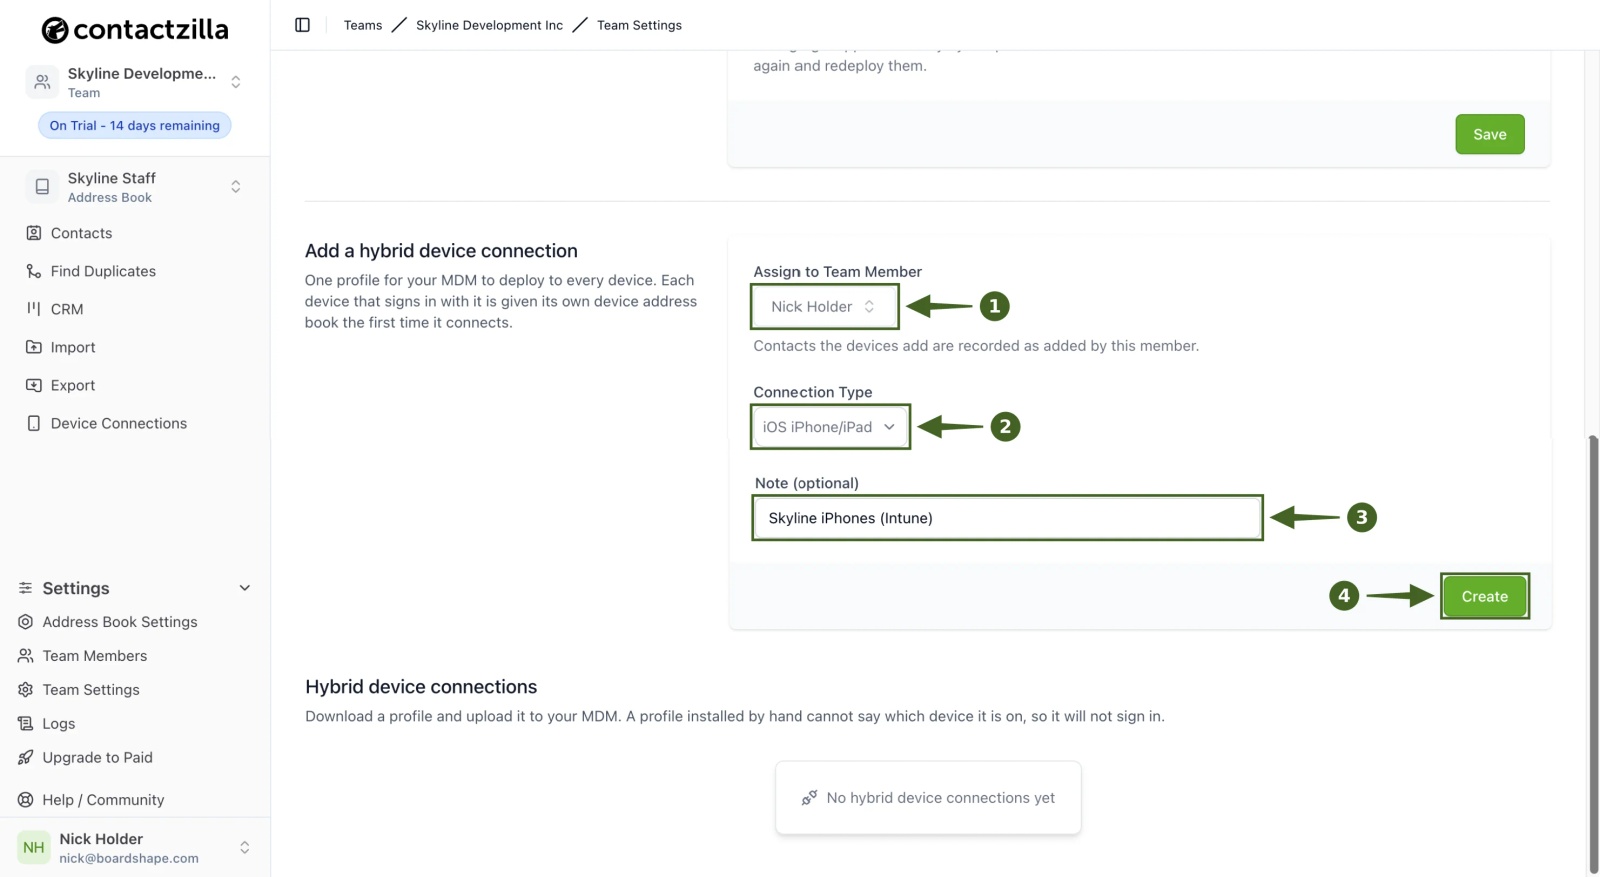
a) Under Assign to Team Member, choose any team member or MDM user. Contacts the phones add are recorded as added by this member.
b) Leave Connection Type as iOS iPhone/iPad, and add a Note if you like, for example Skyline iPhones (Intune).
c) Click Create.
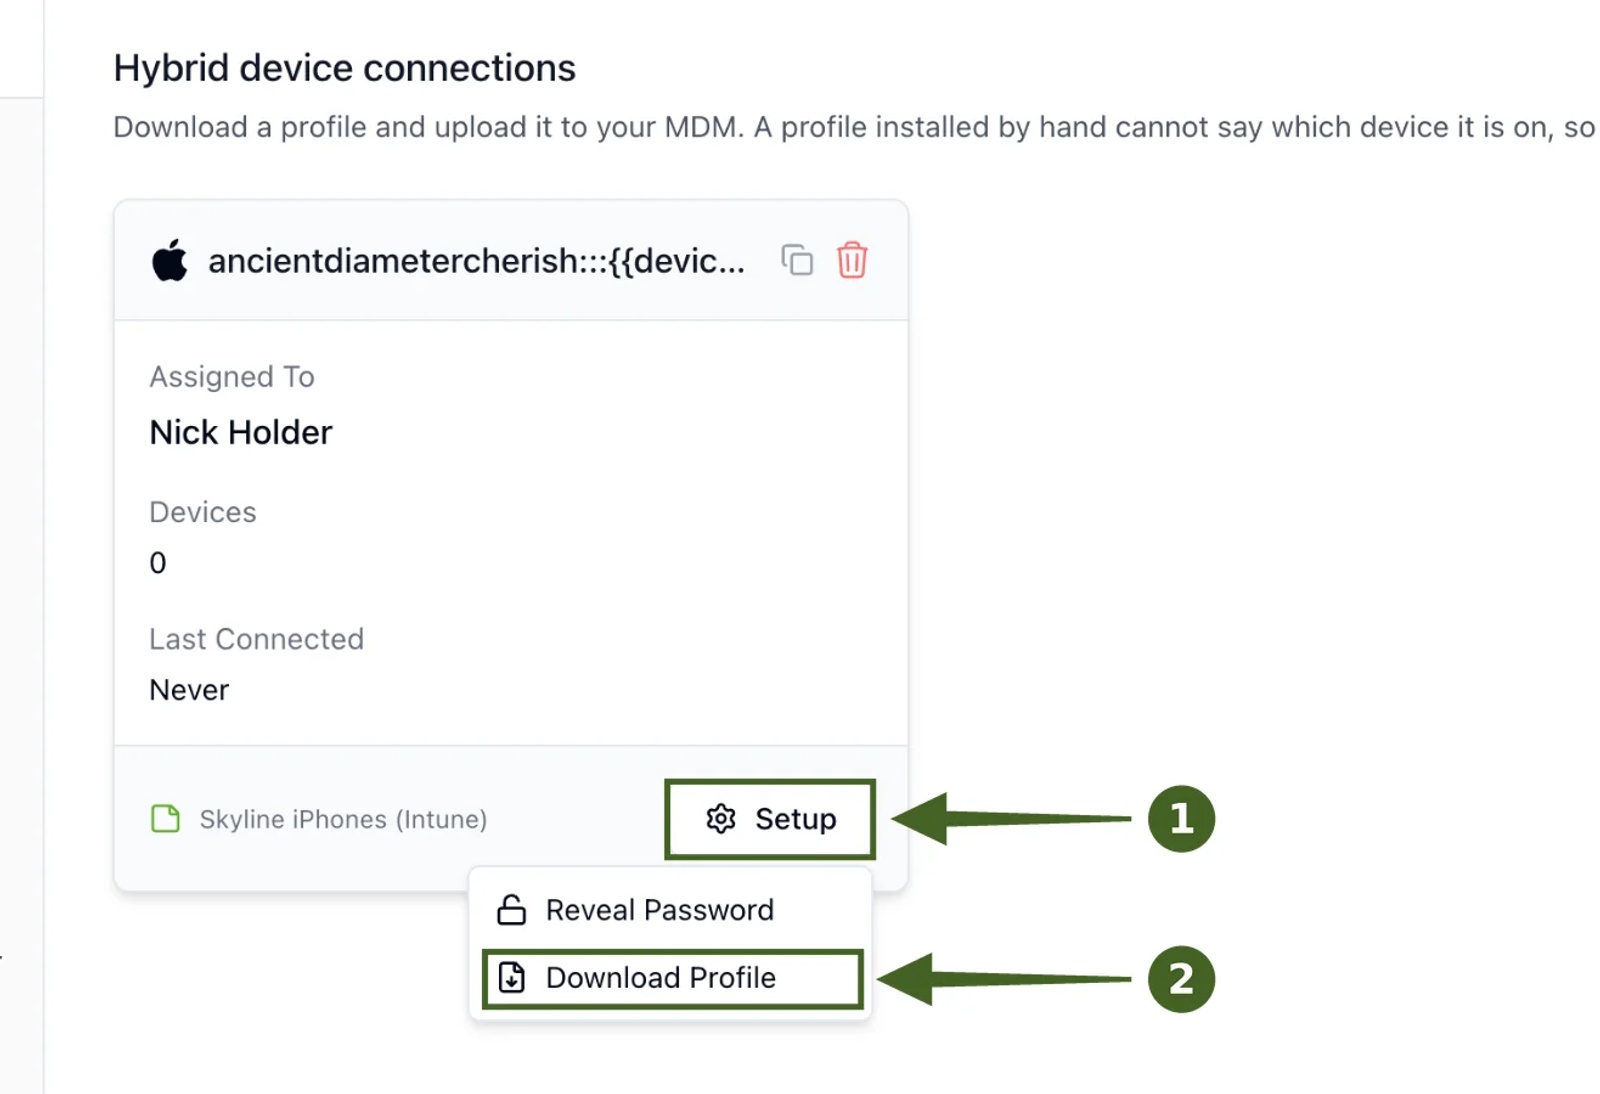
d) Under Hybrid device connections, click Setup > Download Profile on the new connection and save the .mobileconfig file. This profile gives each iPhone its own device address book.
💡 You only need one hybrid device connection for all your iPhones, however many shared address books you deploy.
You now have the device address book profile saved, ready for your MDM.
Add a Hybrid Connection to the Shared Address Book
Step Three: Create a Hybrid Device Connection
Switch to your shared address book with the address book switcher (Skyline Staff in our example).
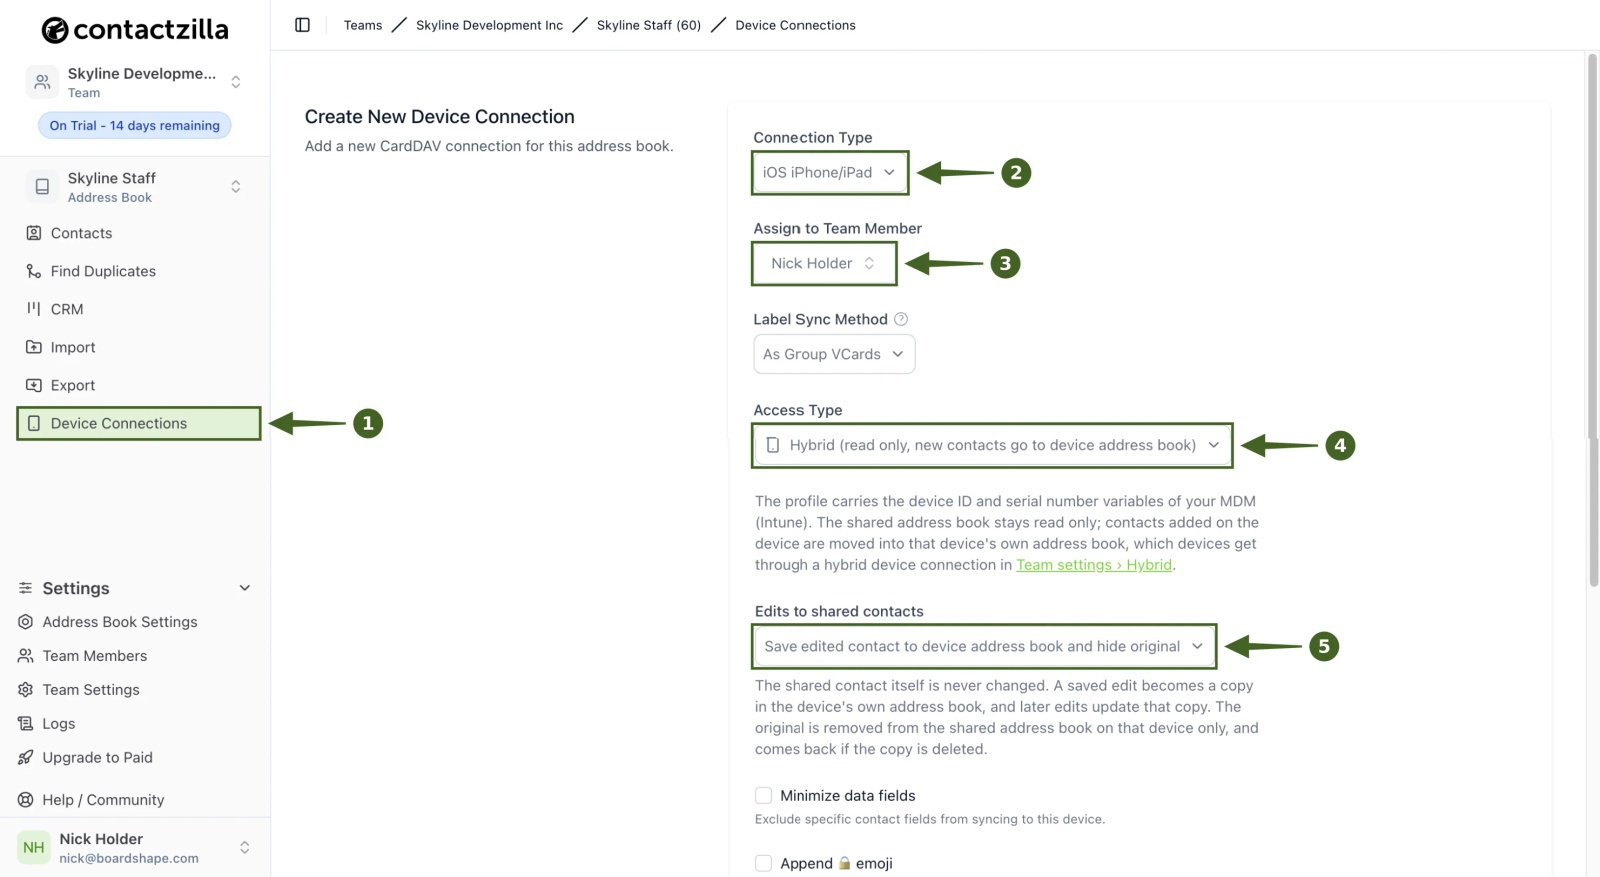
a) Click Device Connections.
b) Set Connection Type to iOS iPhone/iPad, and under Assign to Team Member choose any team member or MDM user.
c) Set Access Type to Hybrid (read only, new contacts go to device address book).
d) Under Edits to shared contacts, choose what happens when someone edits a shared contact on their phone:
- Reject edits: the change isn't kept.
- Save edited contact to device address book and hide original: the edited copy moves to the phone's own address book, and the shared original is hidden on that phone only. The shared contact itself never changes.
e) Scroll down, leave Number of Device Connections at 1, and click Create.
Step Four: Download the Shared Address Book Profile
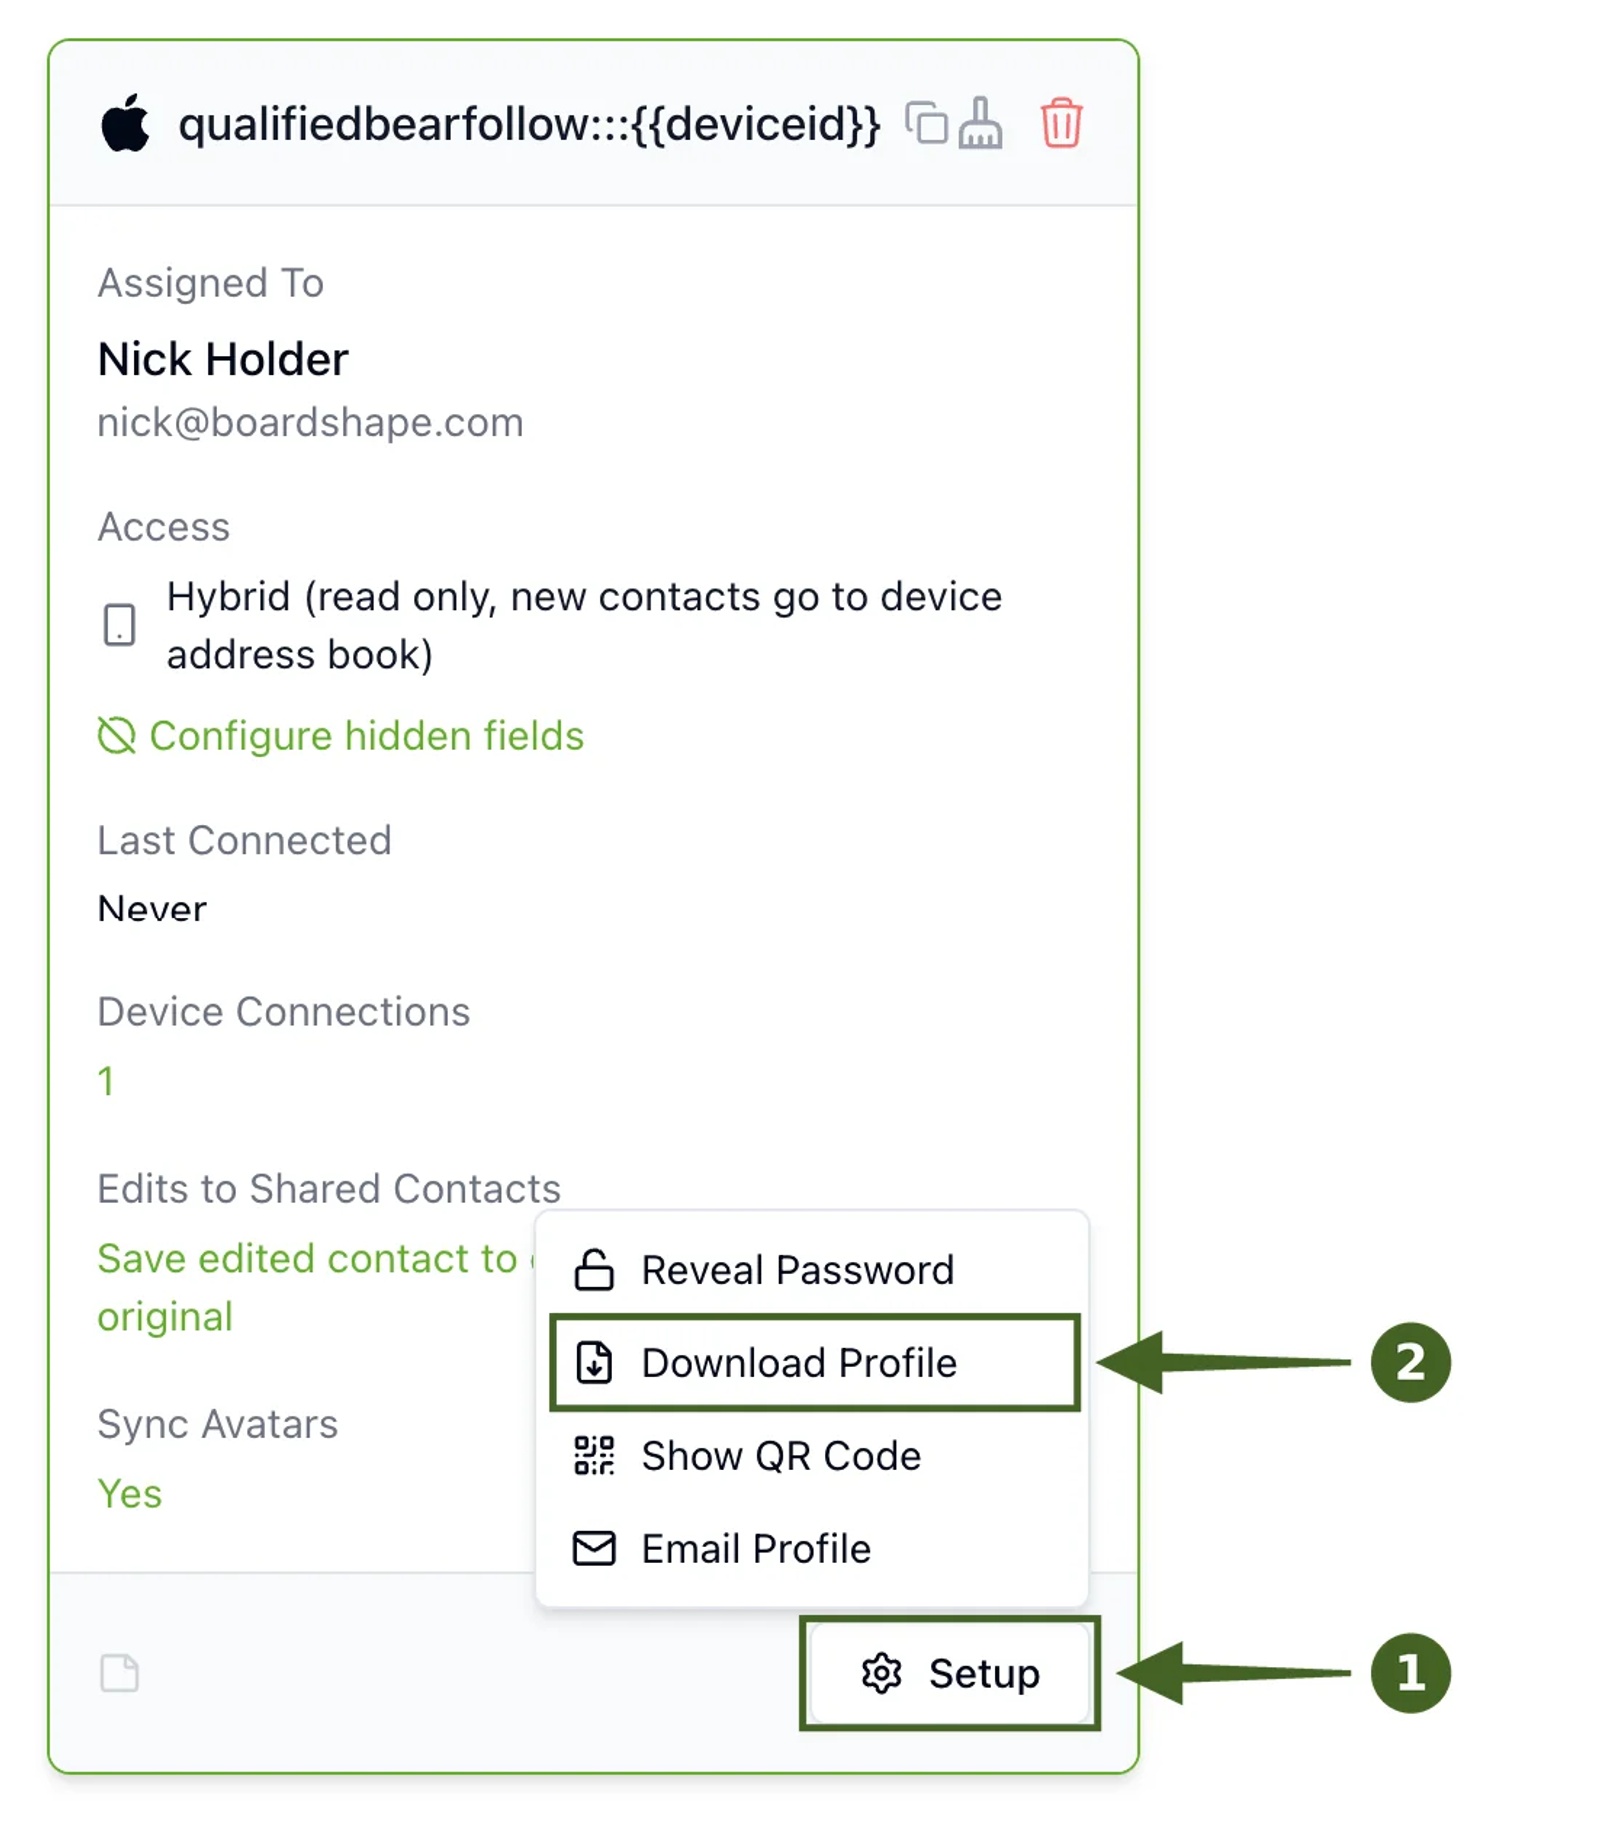
a) On the new connection card, click Setup.
b) Click Download Profile and save the .mobileconfig file.
💡 One connection covers every iPhone you deploy it to.
You now have two profiles: one for the device address book and one for the shared address book.
Deploy Both Profiles to iPhones with Your MDM
In your MDM, upload each profile as its own custom configuration profile and assign both to the same group of iPhones. We show the steps in Microsoft Intune; other MDMs use the same idea with their own menu names.
Step Five: Create a Custom Profile for the Device Address Book
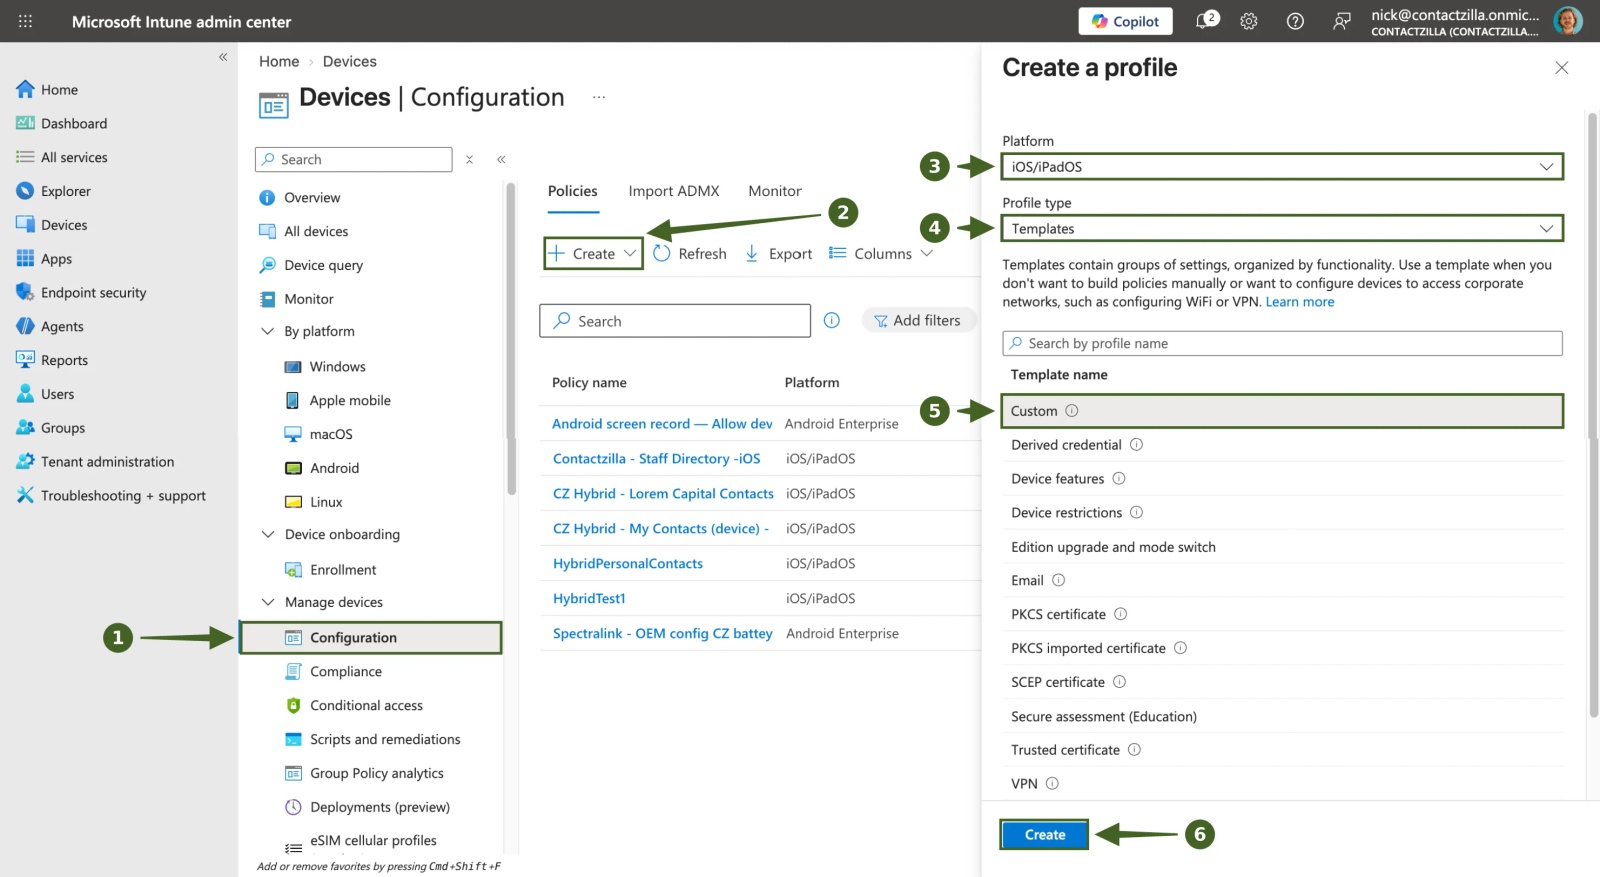
a) In your MDM, start a new custom profile for iOS. In Intune, open the Microsoft Intune admin center and go to Devices > Configuration.
b) Click Create > New Policy.
c) Set Platform to iOS/iPadOS and Profile type to Templates, choose Custom, and click Create.
d) On Basics, enter a name, for example Contactzilla Hybrid - My Contacts (device), and click Next.
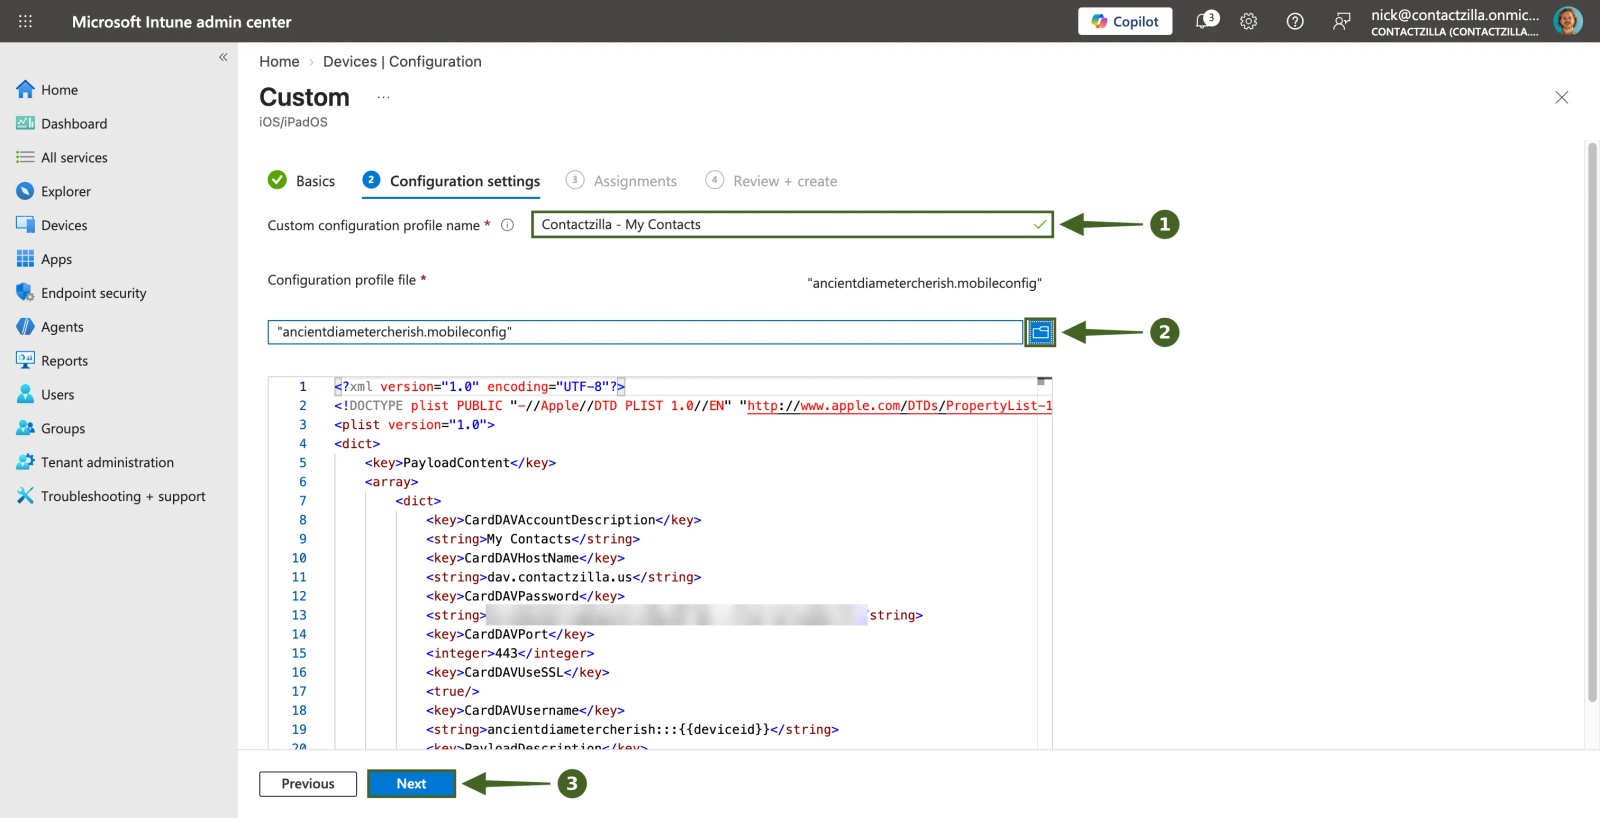
e) Under Configuration settings, enter a Custom configuration profile name, for example Contactzilla - My Contacts.
f) Click the folder icon, choose the device address book's .mobileconfig file from Step Two, and click Next.
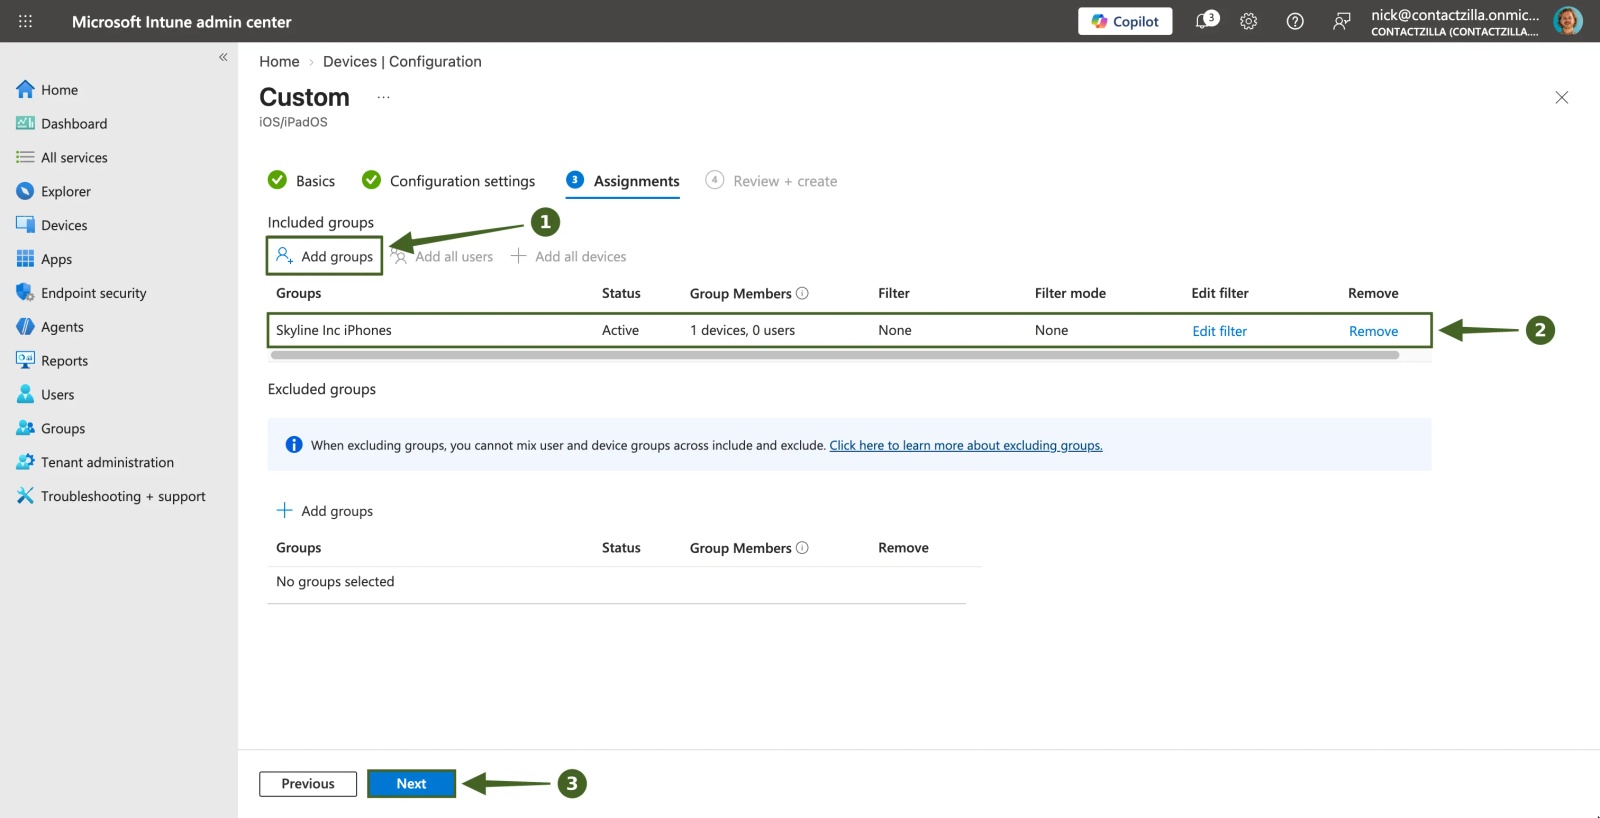
g) Under Assignments, click Add groups and choose the group that holds your iPhones (Skyline Inc iPhones in our example).
h) Click Next, then Create.
Step Six: Create a Custom Profile for the Shared Address Book
Repeat Step Five with the shared address book's .mobileconfig file from Step Four, named for example Contactzilla Hybrid - Skyline Staff (shared), and assign it to the same group.
Your MDM now lists both profiles (in Intune, under Devices > Configuration) and pushes them to the iPhones in the group at their next check-in.
💡 Using Intune? For more detail on creating custom profiles there, see MS INTUNE: How to Deploy Contactzilla Address Books to iOS Devices using Microsoft Intune MDM.
Check Hybrid on an iPhone
Once your MDM has pushed both profiles, check an iPhone in the group. If the profiles haven't arrived yet, trigger a device sync from your MDM (with Intune, you can also open Company Portal on the phone and check the device's status).
Step Seven: Confirm Both Address Books Are on the iPhone
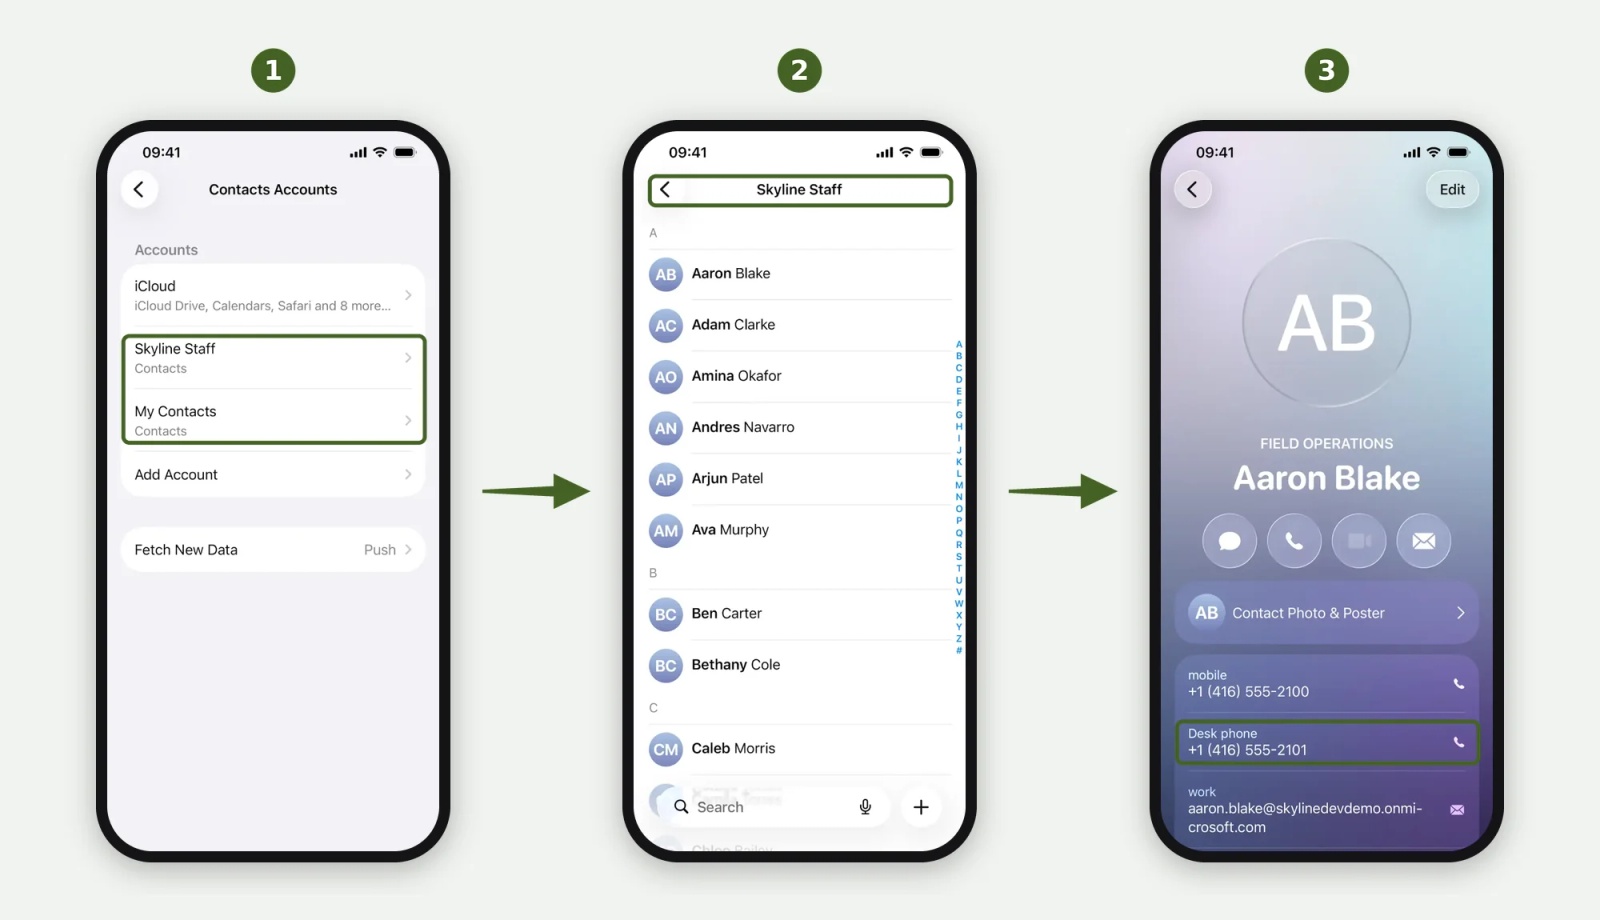
a) Open Settings > Apps > Contacts > Contacts Accounts. You should see your shared address book (Skyline Staff) and the device address book (My Contacts).
b) In the Contacts app, open the shared address book to see your shared contacts.
c) Open a contact to check their details came through.
Step Eight: Add a Contact on the iPhone
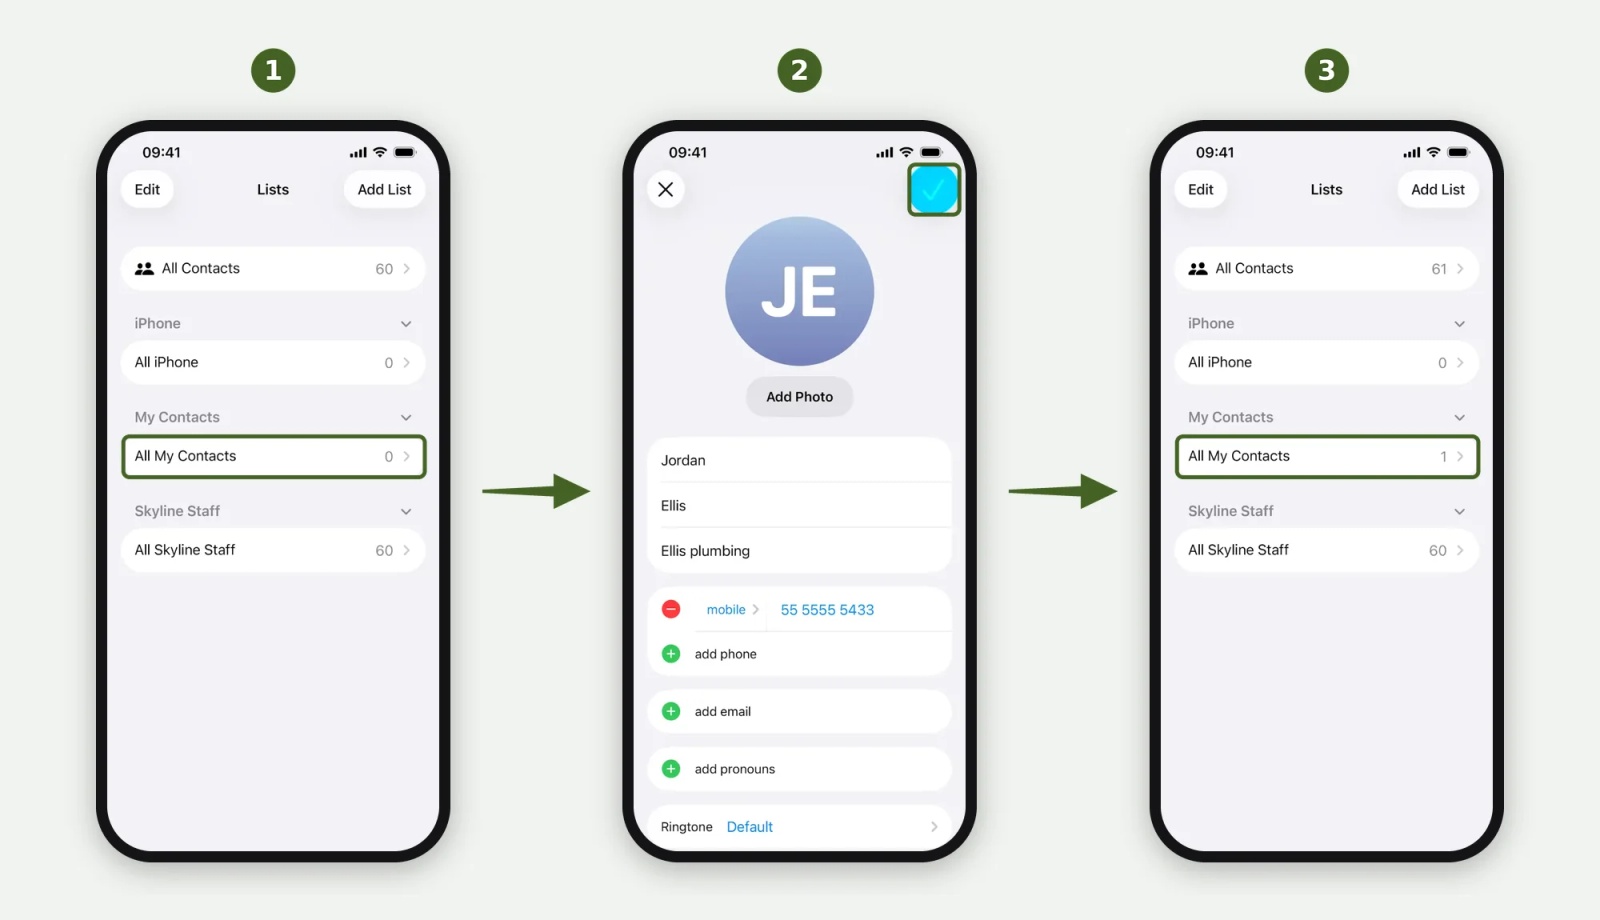
a) In Contacts > Lists, note the count next to My Contacts.
b) Add a test contact and tap the tick to save it.
c) Back in Lists, pull down to refresh. The new contact is in My Contacts, and the shared address book is unchanged.
💡 Even if someone saves a new contact into the shared address book on their phone, Contactzilla moves it into that phone's My Contacts. It can take a minute or two to appear.
Step Nine: Edit a Shared Contact on the iPhone
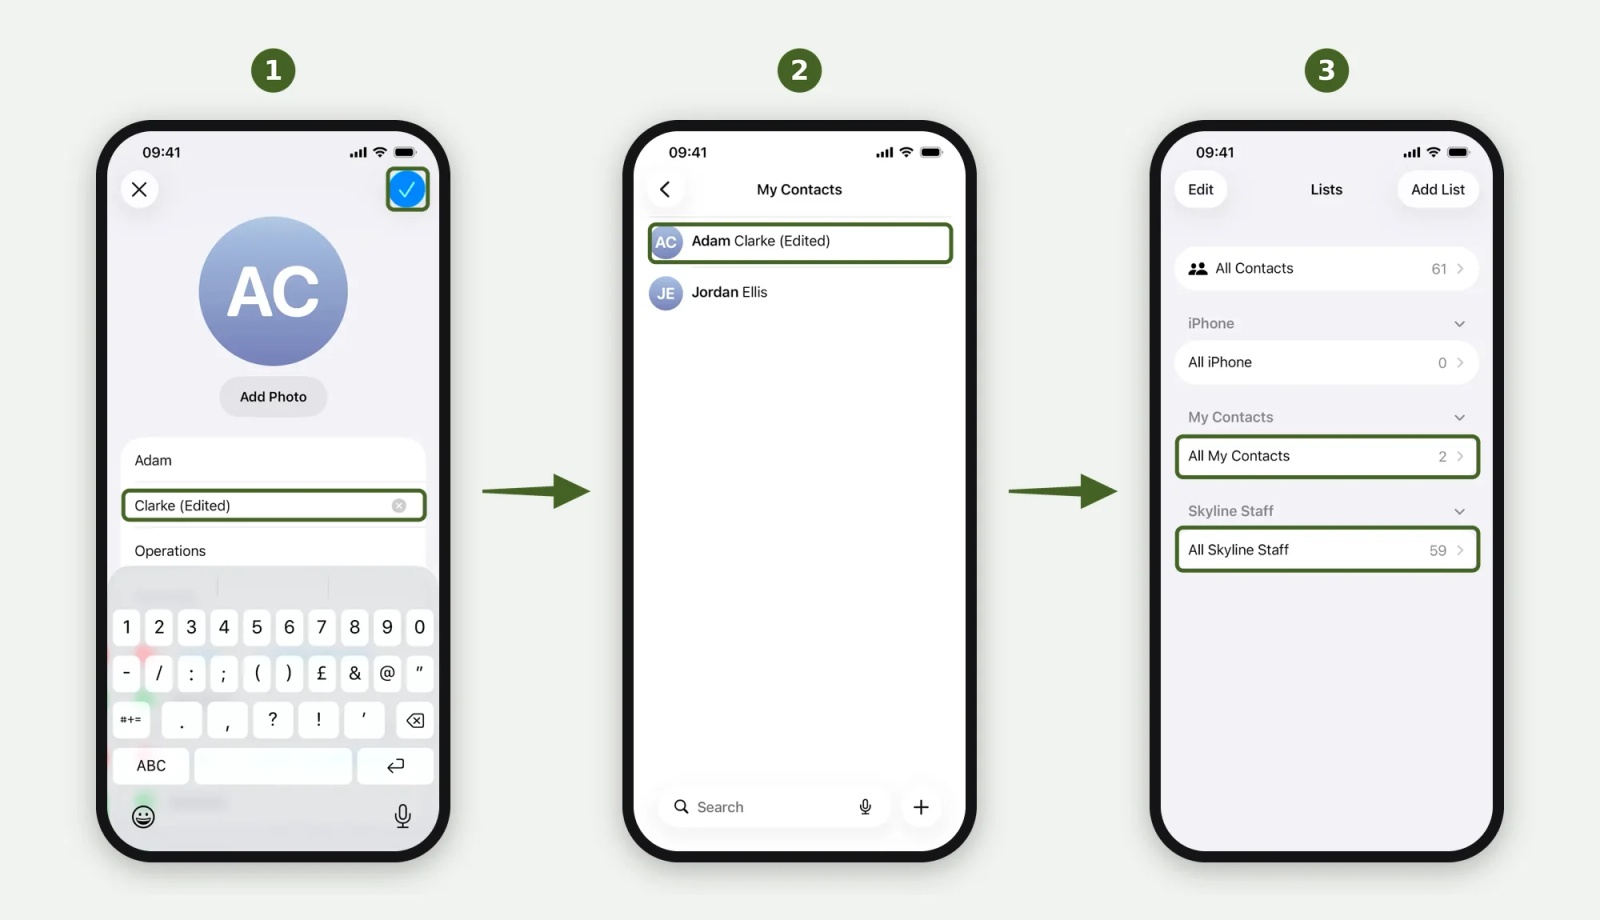
This shows what happens when Edits to shared contacts is set to Save edited contact to device address book and hide original (Step Three).
a) Open a shared contact, tap Edit, change something and tap the tick to save.
b) Open My Contacts: the edited copy is there.
c) Open Lists: My Contacts has gone up by one and the shared address book down by one, because the original is hidden on this phone only. The shared contact doesn't change for anyone else.
Later edits update that copy, and if the copy is deleted, the original comes back. Each iPhone now shows the shared address book read only, and saves new or edited contacts to its own My Contacts.
See Each iPhone's Contacts in Contactzilla
Every iPhone gets its own device address book, so you can see and manage the contacts each person has added or edited.
Step Ten: Open the Device Address Books
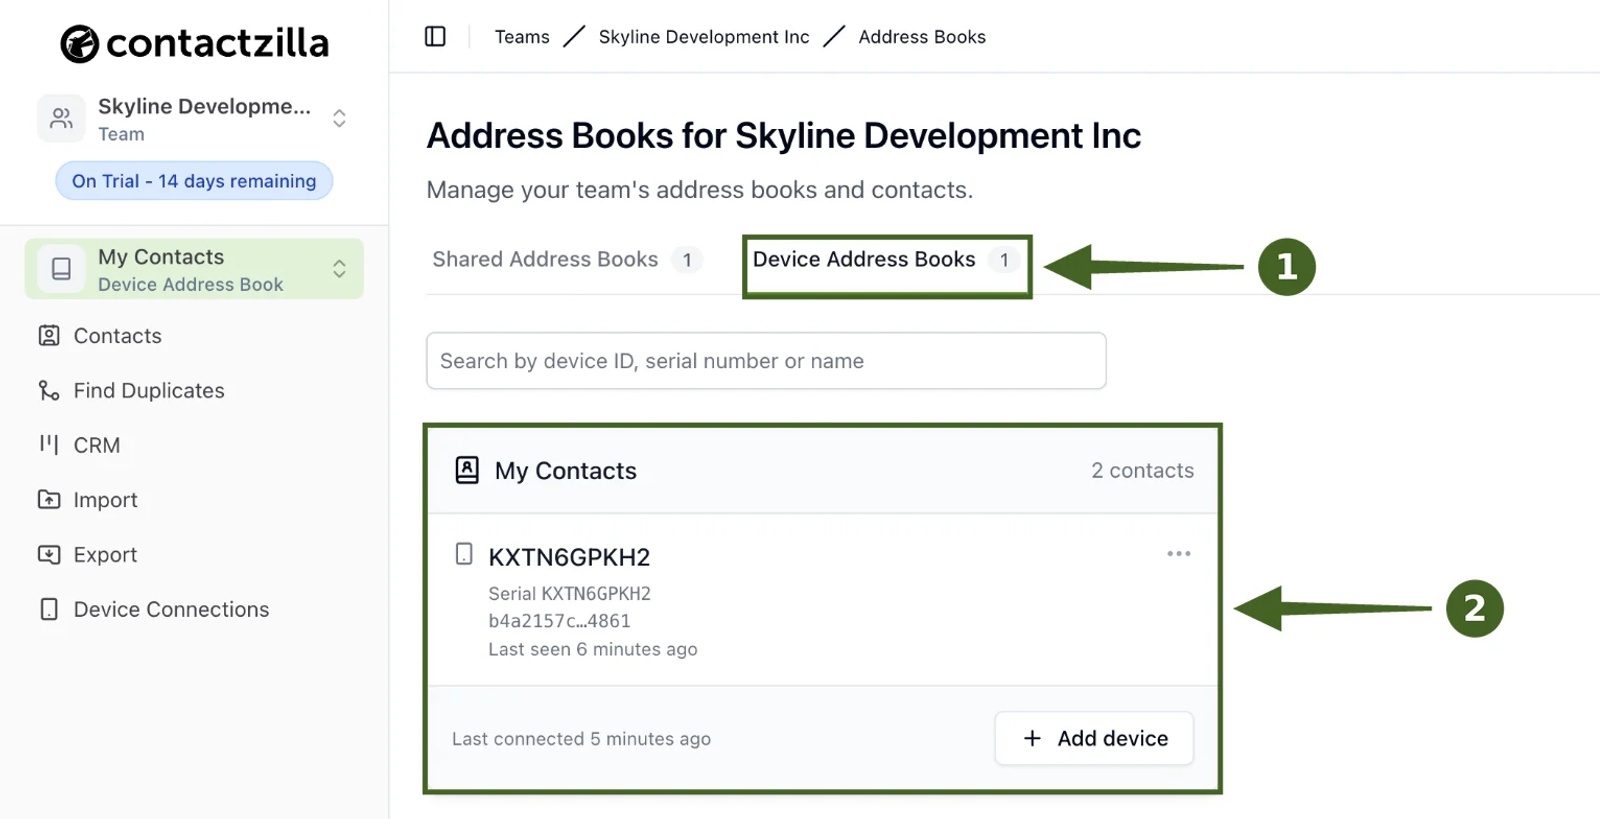
a) In Contactzilla, click your team name in the breadcrumb at the top of the page to open Address Books, then choose the Device Address Books tab.
b) Each device address book shows the serial number of its iPhone. Search by device ID, serial number or name to find one.
Step Eleven: View and Manage an iPhone's Contacts
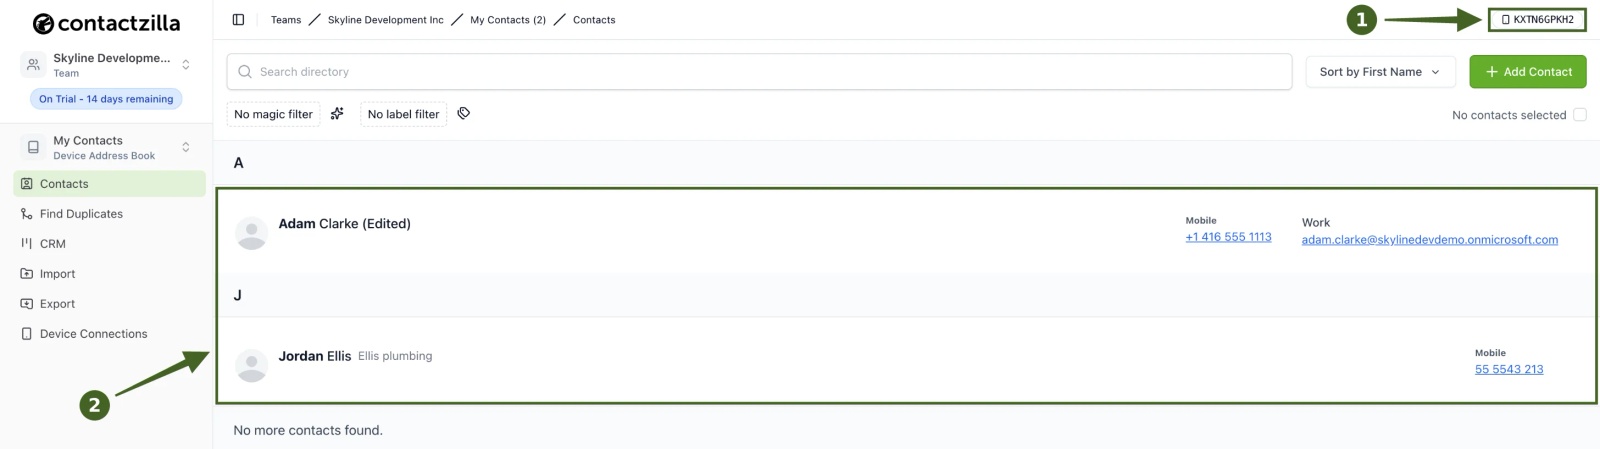
a) Open the book. The phone's serial number shows at the top right, so you know whose contacts you're looking at.
b) You'll see every contact added or edited on that phone, and you can manage them like any other address book.
You can now see what each iPhone has added or edited.
Your iPhones now have the shared address book as read-only contacts, and a private address book of their own for anyone staff add themselves. To add hybrid to another shared address book, repeat Steps Three, Four and Six for that book. The device address book profile stays as it is.
Still Need Help?
Our support team is available to assist you with any questions or issues you may have.
Still need help?
Our support team is available to assist you with any questions or issues you may have.