Push Shared Contacts to Every Android Device — Fully Managed via SOTI
Deploy Contactzilla address books to Android fleets using SOTI MobiControl's managed app configuration. Contacts appear in the native contacts app with zero end-user setup required.
Deploying shared contacts to Android devices works differently from iOS. On iPhones, contacts are pushed directly via a CardDAV configuration profile. Android doesn't have CardDAV built in, so Contactzilla uses a lightweight sync connector app called Contactzilla Sync that runs in the background and delivers contacts into the device's native contacts app.
The overall workflow has three main stages: generate an Android JSON configuration file in Contactzilla, add the Contactzilla Sync app from Managed Google Play in SOTI MobiControl, then paste the JSON values into the managed app configuration and assign the policy to your Android device group. From the end user's perspective, the contacts simply appear in their native Android contacts app — no manual setup needed.
This guide assumes you already have SOTI MobiControl set up with Android Enterprise, Managed Google Play is configured, and your Android devices are enrolled in a device group. We'll walk through every step from creating the MDM user in Contactzilla to verifying contacts on the device.
Create an MDM User in Contactzilla
Before generating the Android configuration, you need a special type of user account in Contactzilla. Navigate to the address book you want to deploy and click Device Connections. Select Android from the Connection Type dropdown.
The next step is assigning the connection to a team member. While you can assign connections directly to individual team members (useful for personal QR-code-based setup), MDM rollouts require a special account type called an MDM User — this is a device-only account not tied to a specific person.
To create one, go to Team Members and click Add an MDM user (device only access). The email address field is arbitrary — you can enter any placeholder email. Click Add and the MDM user will appear under your team members list.
- MDM users are device-only accounts designed specifically for MDM rollouts
- The email address for MDM users is arbitrary — use any placeholder
- Individual team members can self-setup via QR code, but MDM rollouts need MDM users
- The MDM user will appear in your team members list once created
Configure Access Level and Generate the JSON Profile
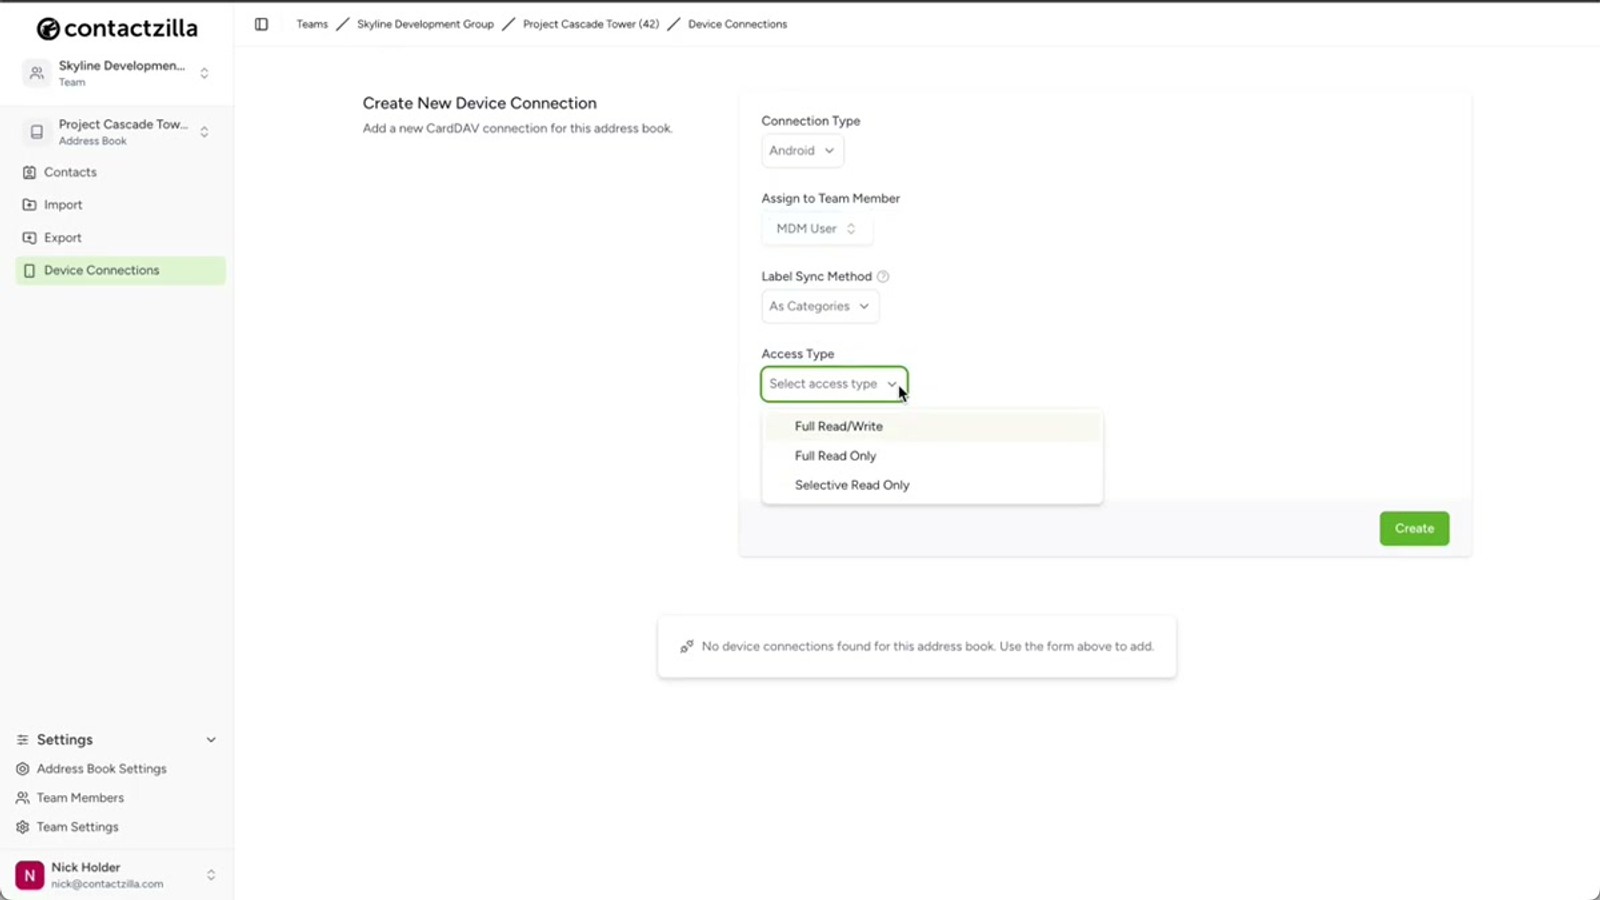
Back in Device Connections, select the MDM user you just created from the user dropdown. Leave the Label Sync setting at its default.
Now choose the access level for end users. Contactzilla offers three options: Full Read-Only prevents any accidental changes to your master contact list and is the most popular choice for managed rollouts. Full Read-Write gives end users the ability to edit contacts, with an optional sub-setting to allow editing but still prevent deletion. Selective Read-Only is particularly powerful — instead of sending the entire address book, you choose one or more labels and only contacts tagged with those labels are deployed to devices.
Set the number of device connections to match the size of your rollout. Click Create, then under the new device connection click Setup and download the Android JSON profile. This JSON file contains the values you'll paste into SOTI's managed app configuration.
- Full Read-Only — most popular for managed rollouts, prevents accidental edits
- Full Read-Write — allows editing with optional delete-prevention toggle
- Selective Read-Only — deploy only contacts with specific labels, not the full book
- Set device connection count to match your fleet size
- Download the JSON profile — you'll need five values from it for SOTI
Selective Read-Only is ideal when different teams need different subsets of your address book. You can deploy the same address book multiple times with different label filters to different device groups.
Create an App Policy in SOTI MobiControl
Switch to the SOTI MobiControl dashboard. Navigate to Policies and ensure you're on the Apps tab. Click New App Policy in the top right corner. Hover over Android and choose Android Enterprise from the submenu.
Give the app policy a descriptive name — for example, Contactzilla Sync Install Android. Click the Apps tab within the policy, then click Add New App under the Managed Google Play Apps section. Pick your enterprise binding from the dropdown and click Next.
If Contactzilla Sync is already approved in your Managed Google Play, it will appear in the list. If not, click the plus icon, search for Contactzilla, click through to the app listing, and select the Contactzilla Sync app. Tick the checkbox next to the app and click Next.
- Navigate to Policies → Apps tab → New App Policy
- Select Android → Android Enterprise
- Name your policy descriptively (e.g.
Contactzilla Sync Install Android) - Add the Contactzilla Sync app from Managed Google Play
- If the app isn't listed, use the plus icon to search and approve it first
Set Installation Options and App Permissions
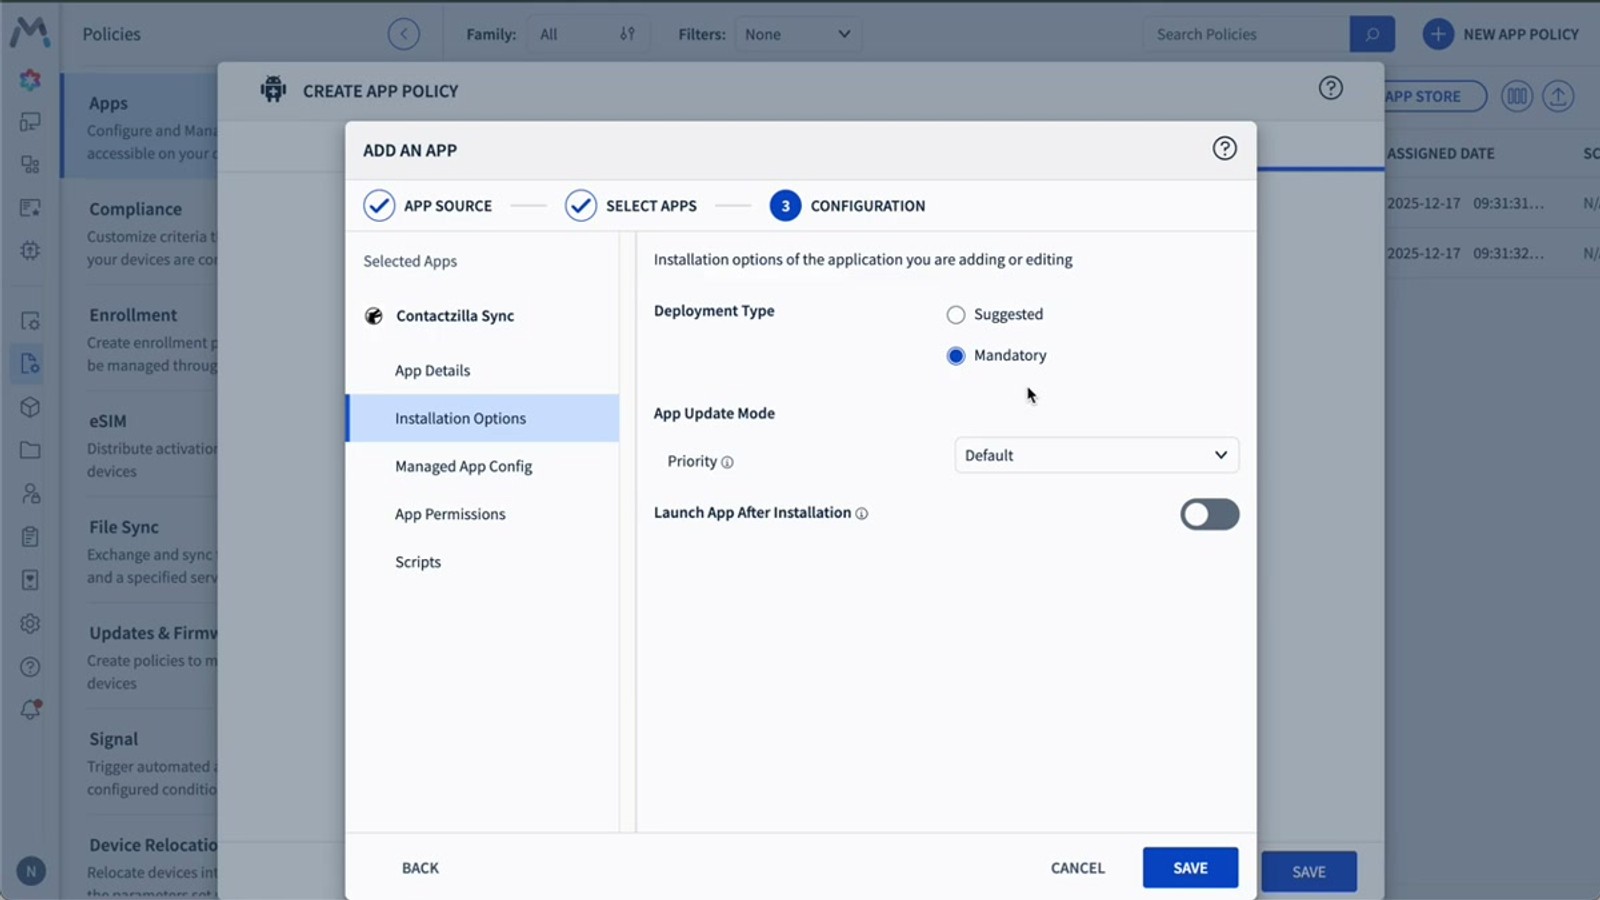
With the Contactzilla Sync app selected on the left-hand side, you'll see several configuration tabs. Most settings on the main page can be left at their defaults. Under Installation Options, leave the default setting — this ensures a mandatory install on any devices in your chosen group.
The critical setting is under App Permissions. Set the Default Permission Policy to Allow. This automatically grants Contactzilla Sync the permissions it needs — specifically access to the device's contacts and the ability to write to the native contacts app. Without this, end users would be prompted to manually grant permissions, which defeats the purpose of a managed deployment.
Leave the Scripts section disabled — it's not needed for this deployment.
- Leave installation options at default for mandatory install
- Set Default Permission Policy to Allow under App Permissions
- This auto-grants contacts read/write access — no user prompts
- Leave Scripts disabled
Setting the permission policy to Allow is essential for a zero-touch deployment. If you skip this, users will be prompted to grant contacts access manually, which can cause confusion and support tickets.
Paste the JSON Values into Managed App Configuration
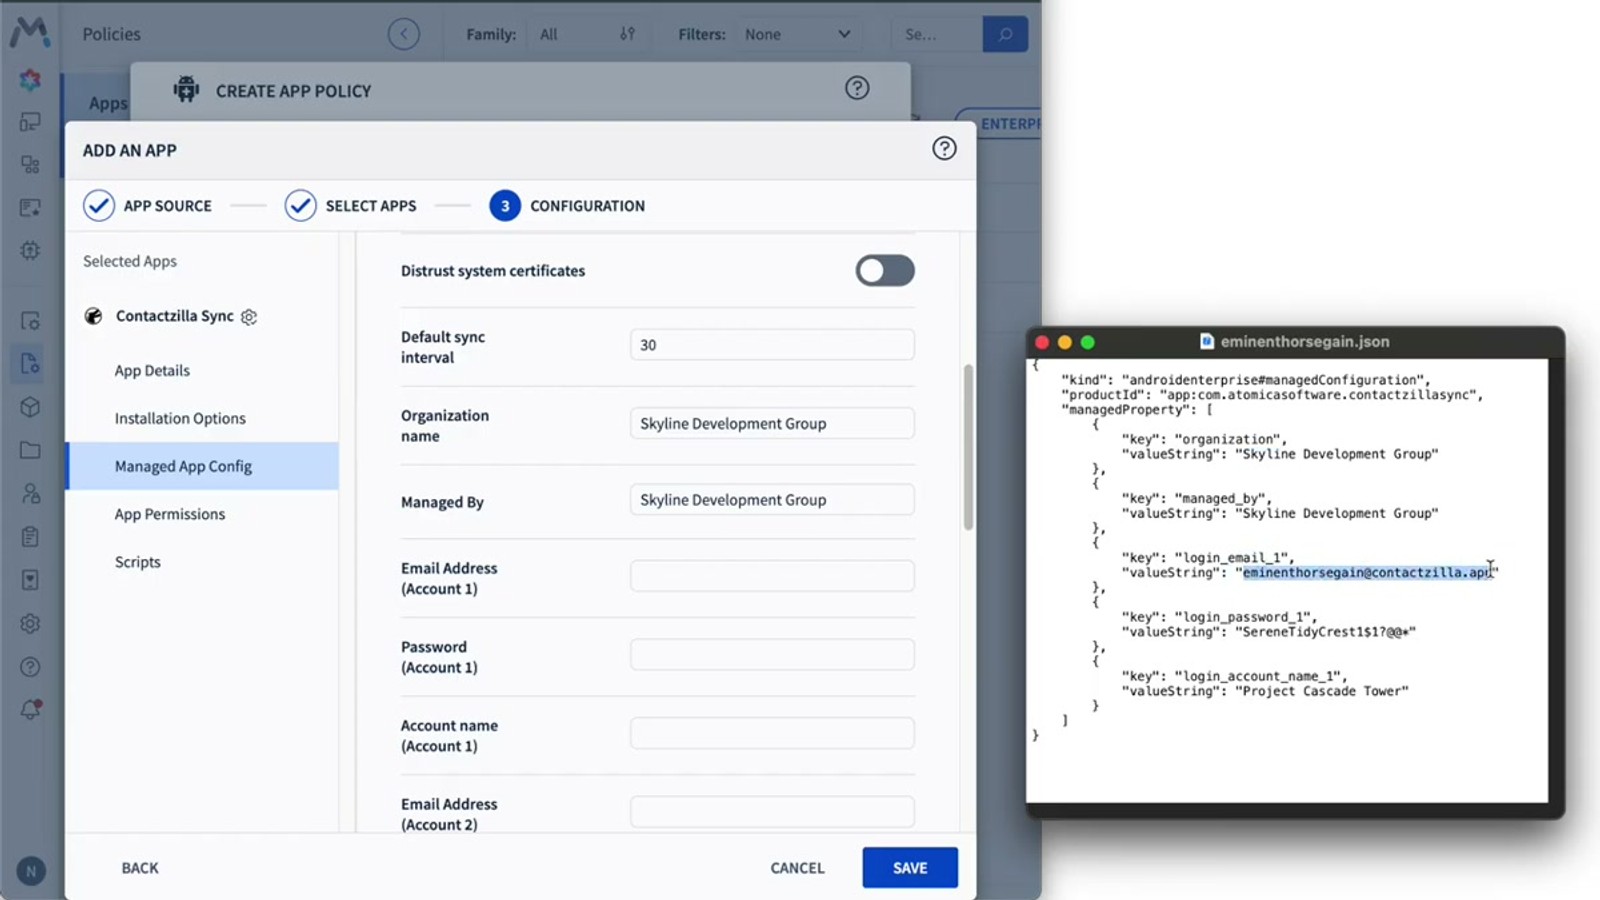
Navigate to the Managed App Config tab and toggle the switch on to reveal the configuration fields. Most of the fields that appear can be left at their defaults.
Scroll down to the Default Sync Interval field. This is optional but useful — entering 30 means Contactzilla Sync will check for updates every 30 minutes and pull any contact changes automatically.
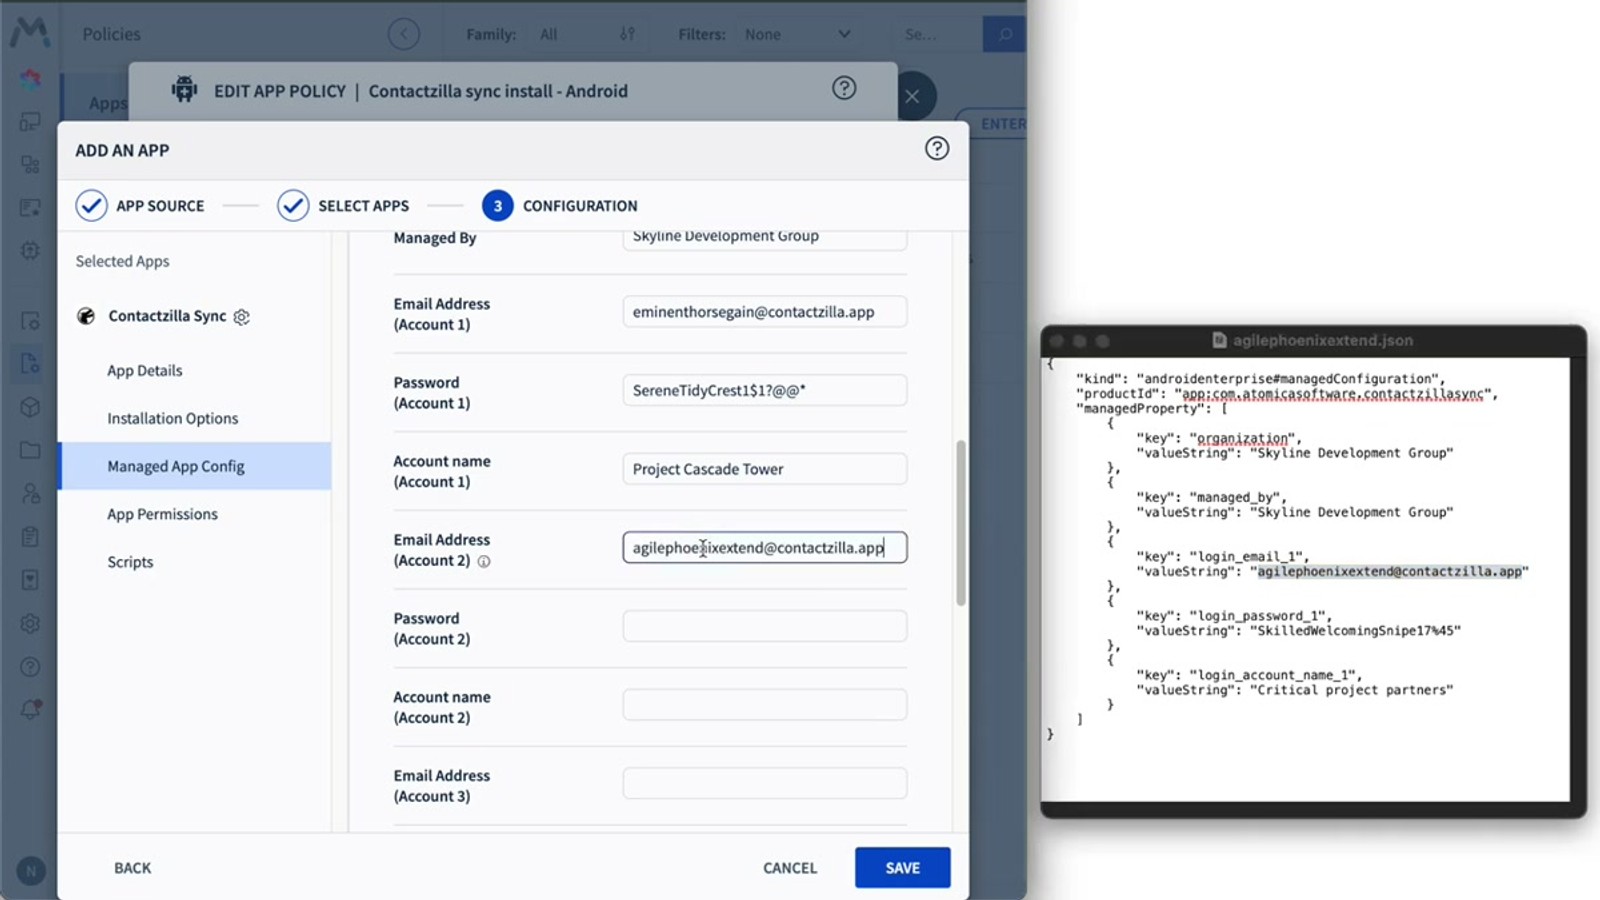
Below the sync interval, you'll find five fields that need to be filled from your downloaded JSON file. Open the Contactzilla JSON configuration file and copy the values:
1. Organization — paste the organization name from the JSON (this is your Contactzilla team name) 2. Managed By — paste the same organization name here 3. Email — copy and paste the email address from the JSON file 4. Account Name — this is your address book name 5. The fifth field maps to remaining values in the JSON
Leave all other settings at their defaults and click Save.
- Toggle the Managed App Config switch on to reveal fields
- Set Default Sync Interval to your preferred minutes (e.g.
30) - Copy Organization from JSON line into the Organization field
- Paste the same value into Managed By
- Copy the email address from the JSON into the Email field
- Account Name is your address book name from the JSON
Keep the JSON file open side-by-side with SOTI — you'll be copying five values across. The organization name from the JSON is your Contactzilla team name, and it goes into both the Organization and Managed By fields.
Assign the Policy to Your Device Group
With the managed app configuration saved, the final step is assigning this app policy to your Android device group. Click Save and Assign at the bottom of the policy.
In the assignment dialog, find your target device group — for example, Skyline Field Devices Android — and click Assign. The policy is now linked to that group.
On the devices' next check-in, SOTI will automatically install Contactzilla Sync and apply the managed configuration. The app will begin syncing contacts based on the interval you configured. If you want to test immediately rather than waiting for the next scheduled check-in, you can force a check-in from the SOTI console.
- Click Save and Assign to save the policy and open the assignment dialog
- Select your target device group from the list
- Contacts will deploy on the devices' next check-in cycle
- You can force an immediate check-in for testing purposes
Force a Check-In and Verify on the Device
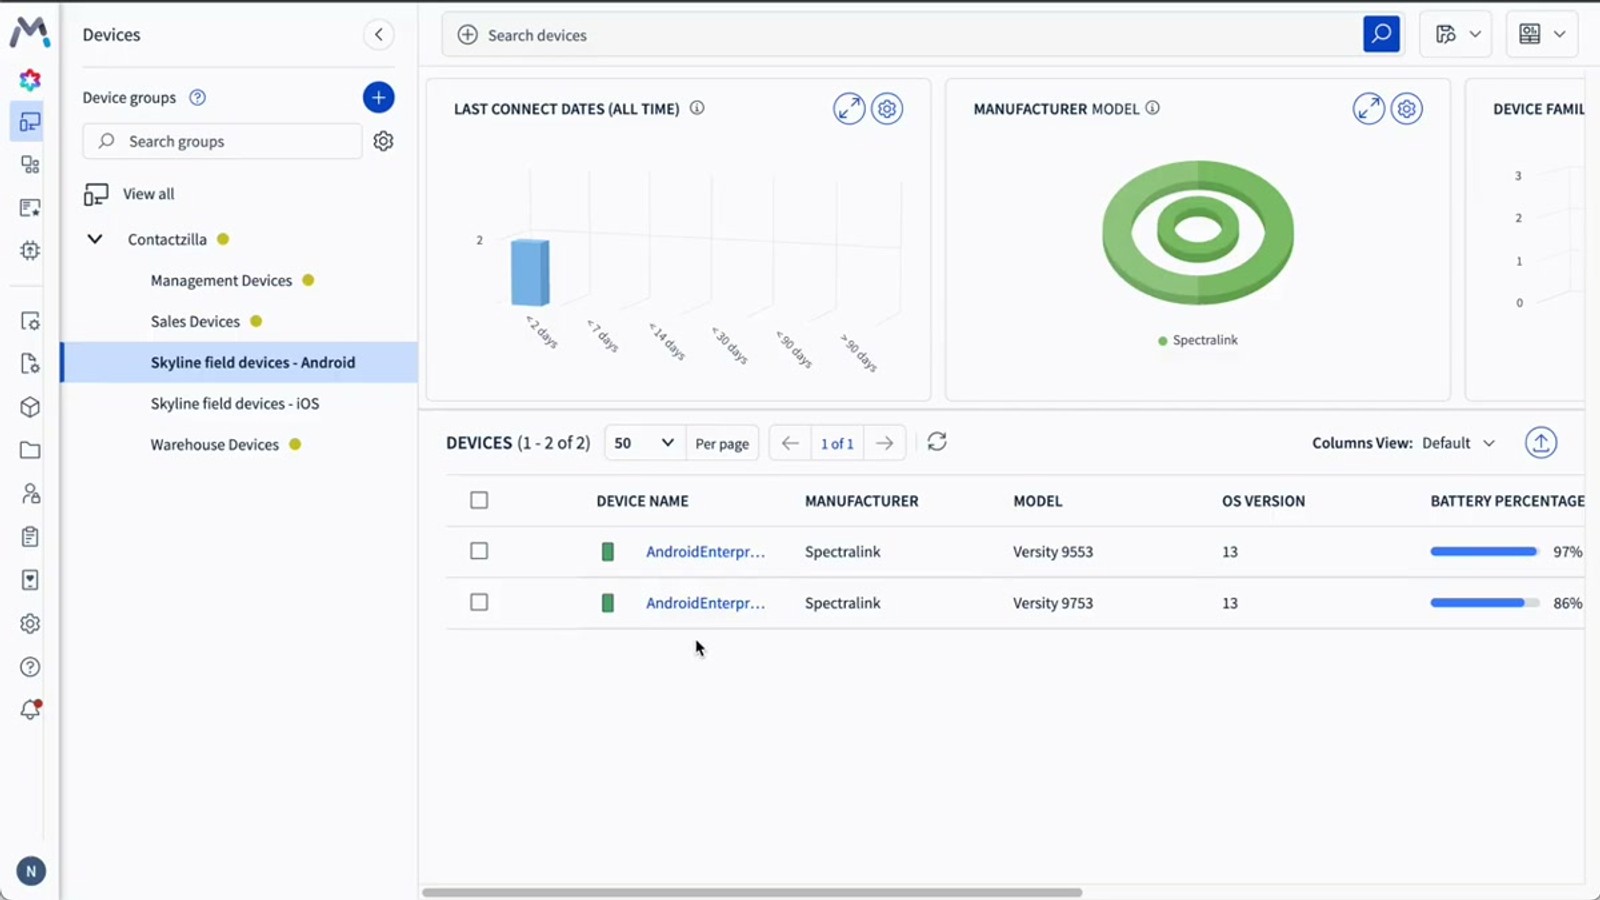
To test immediately, navigate to Devices in SOTI, select your Android test device, and click Check-in at the top of the device details. Confirm the action and refresh the page to monitor progress.
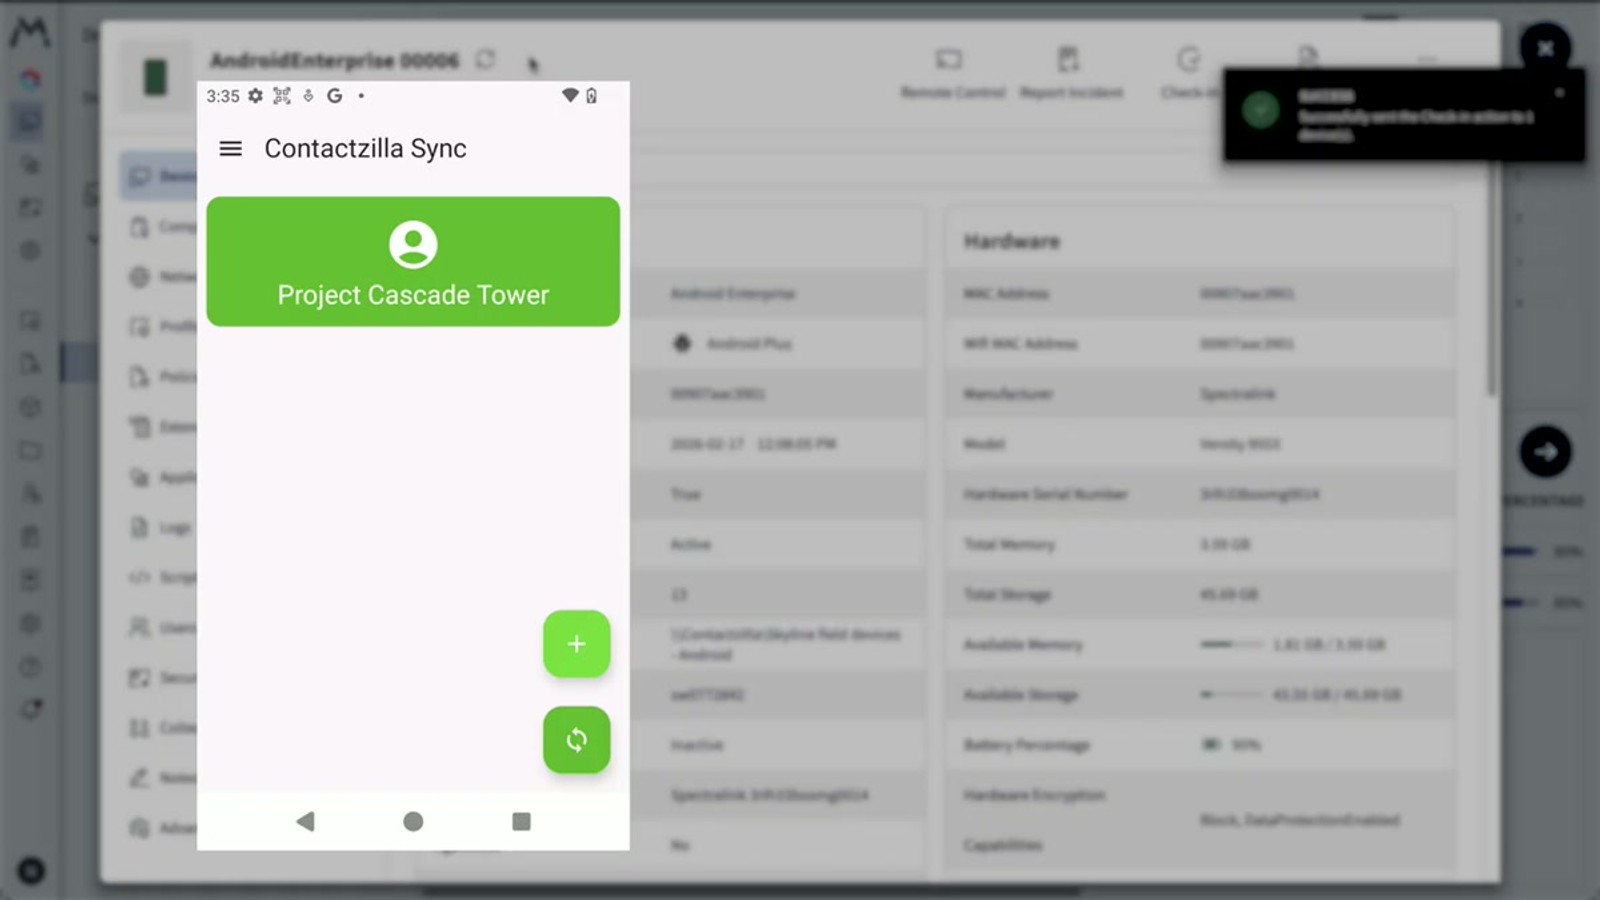
On the test device, you should see that Contactzilla Sync has been installed. Open the app and your address book (e.g. Project Cascade Tower) will appear. The app syncs automatically based on your configured interval, but you can tap the Manual Sync button to trigger an immediate sync.
Open the native Contacts app. Depending on your device's account configuration, you may need to tap the avatar icon in the contacts app and select the new Contactzilla address book from the account list. You can also access the hamburger menu to view labels and filter contacts by group — for example, viewing only the Engineers group.
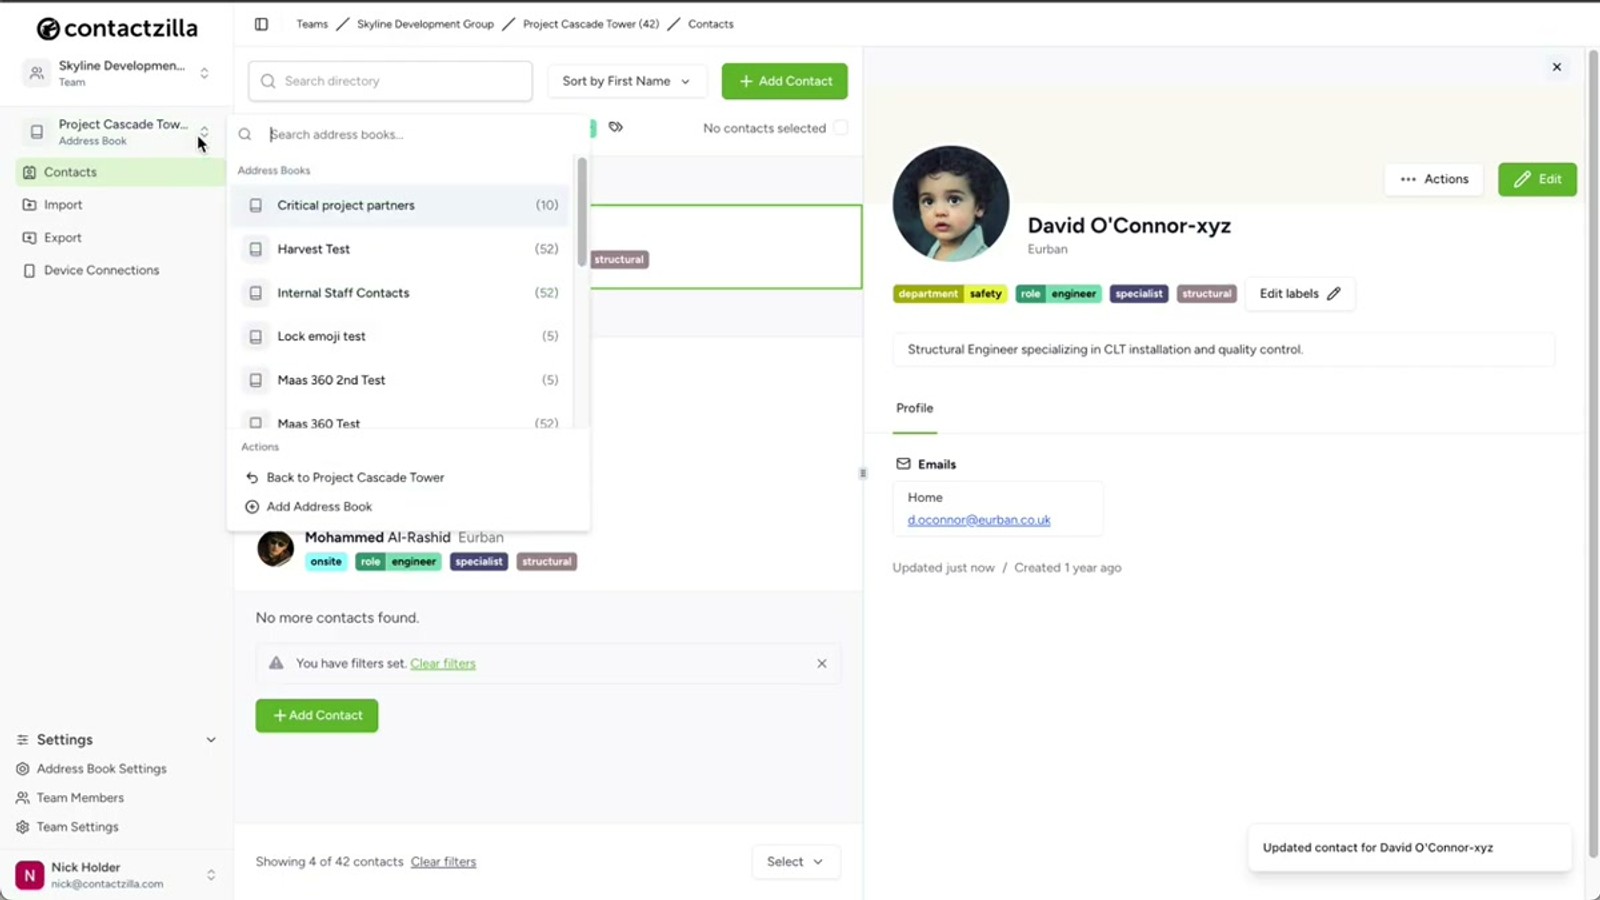
To verify live sync, go back to Contactzilla, filter contacts by a label, edit a contact's name, then trigger a manual sync on the device. The updated name should appear immediately.
- Go to Devices → select device → click Check-in → confirm
- Open Contactzilla Sync on the device to see your address book
- Tap Manual Sync to trigger an immediate sync
- In the native Contacts app, tap the avatar to switch to the Contactzilla account
- Use the hamburger menu to browse contacts by label/group
- Test live updates by editing a contact in Contactzilla and syncing again
If contacts don't appear in the native contacts app right away, check that you've selected the Contactzilla address book account by tapping the avatar icon. Multi-account Android devices sometimes default to a different account view.
Key Takeaways
Why Use SOTI MobiControl with Contactzilla
Frequently Asked Questions
Why does Android need a sync app when iOS doesn't?
iOS has CardDAV built into the operating system, so contacts can be deployed directly via a configuration profile. Android doesn't include CardDAV support natively, so Contactzilla uses a lightweight sync connector app called Contactzilla Sync that runs in the background and writes contacts into the native Android contacts app.
What is an MDM User and why do I need one?
An MDM User is a device-only account in Contactzilla designed specifically for MDM rollouts. Unlike regular team member connections (which are tied to individuals and use QR code setup), MDM users are anonymous accounts that can be shared across an entire device fleet. The email address for an MDM user is arbitrary — you can enter any placeholder value.
Can I deploy only a subset of contacts instead of the entire address book?
Yes. When configuring the device connection in Contactzilla, choose the Selective Read-Only access level. This lets you pick one or more labels, and only contacts tagged with those labels are deployed to devices. This is useful when different teams or device groups need different contact subsets from the same address book.
What happens if I skip setting the permission policy to Allow in SOTI?
If you don't set the Default Permission Policy to Allow, the Contactzilla Sync app won't be automatically granted access to the device's contacts. End users will be prompted to manually grant permissions when the app launches, which undermines the zero-touch deployment experience and can lead to confusion or support requests.
How often do contacts sync, and can I trigger an immediate update?
Contacts sync automatically based on the Default Sync Interval you set in the managed app configuration — for example, every 30 minutes. For immediate updates, open the Contactzilla Sync app on the device and tap the Manual Sync button. Changes made in Contactzilla (like editing a contact name) will appear on the device after the next sync.
Can I deploy multiple address books to the same device group?
Yes. Create a separate app policy in SOTI for each address book, each with its own managed app configuration containing the values from that address book's JSON file. Assign all policies to the same device group, and devices will receive contacts from all configured address books.

