Push Shared Contacts to Every Android Device — Managed from One Dashboard
Use NinjaOne MDM to silently install Contactzilla Sync on enrolled Android devices, so company contacts appear in the native contacts app with zero end-user setup.
What This Walkthrough Covers
This tutorial walks through the complete process of deploying a Contactzilla shared address book to Android devices using NinjaOne as your MDM provider. Unlike iOS, Android doesn't have built-in CardDAV support, so instead of a configuration profile you'll deploy a lightweight connector app called Contactzilla Sync. This app runs in the background and feeds contacts directly into the device's native Android contacts app — end users see contacts exactly where they'd expect them.
The overall flow has three stages: first, generate the Android JSON configuration file in Contactzilla; second, add Contactzilla Sync from Managed Google Play into your NinjaOne Android policy; and third, paste the JSON values into the app's managed configuration fields. Once saved, the policy pushes to enrolled devices and contacts appear within seconds.
This guide assumes you already have Android Enterprise set up in NinjaOne and that your Android devices are enrolled and online. If you're deploying to iPhones instead, Contactzilla has a separate iOS walkthrough using configuration profiles. Everything here is specific to the Android deployment path.
Generate the Android JSON Configuration in Contactzilla
Start in your Contactzilla dashboard by opening the address book you want to deploy. Click on Device Connections to access the deployment options.
From the Connection Type dropdown, select Android. This is important — the Android option generates a JSON configuration file specifically formatted for managed app configuration in your MDM, which is different from the iOS configuration profile.
Next, you need to assign the connection to a team member. For individual deployments, you can assign directly to any team member who would scan a QR code to set things up themselves. However, for MDM rollouts you'll want to create a special MDM User — a device-only account designed for this purpose.
- Open the address book you want to deploy
- Click Device Connections
- Select Android from the Connection Type dropdown
- For MDM rollouts, assign to an MDM User (device-only account) rather than an individual team member
MDM Users are device-only accounts specifically designed for managed rollouts. They decouple the connection from any individual person, which is what you want when deploying to a fleet of devices.
Create an MDM User in Contactzilla
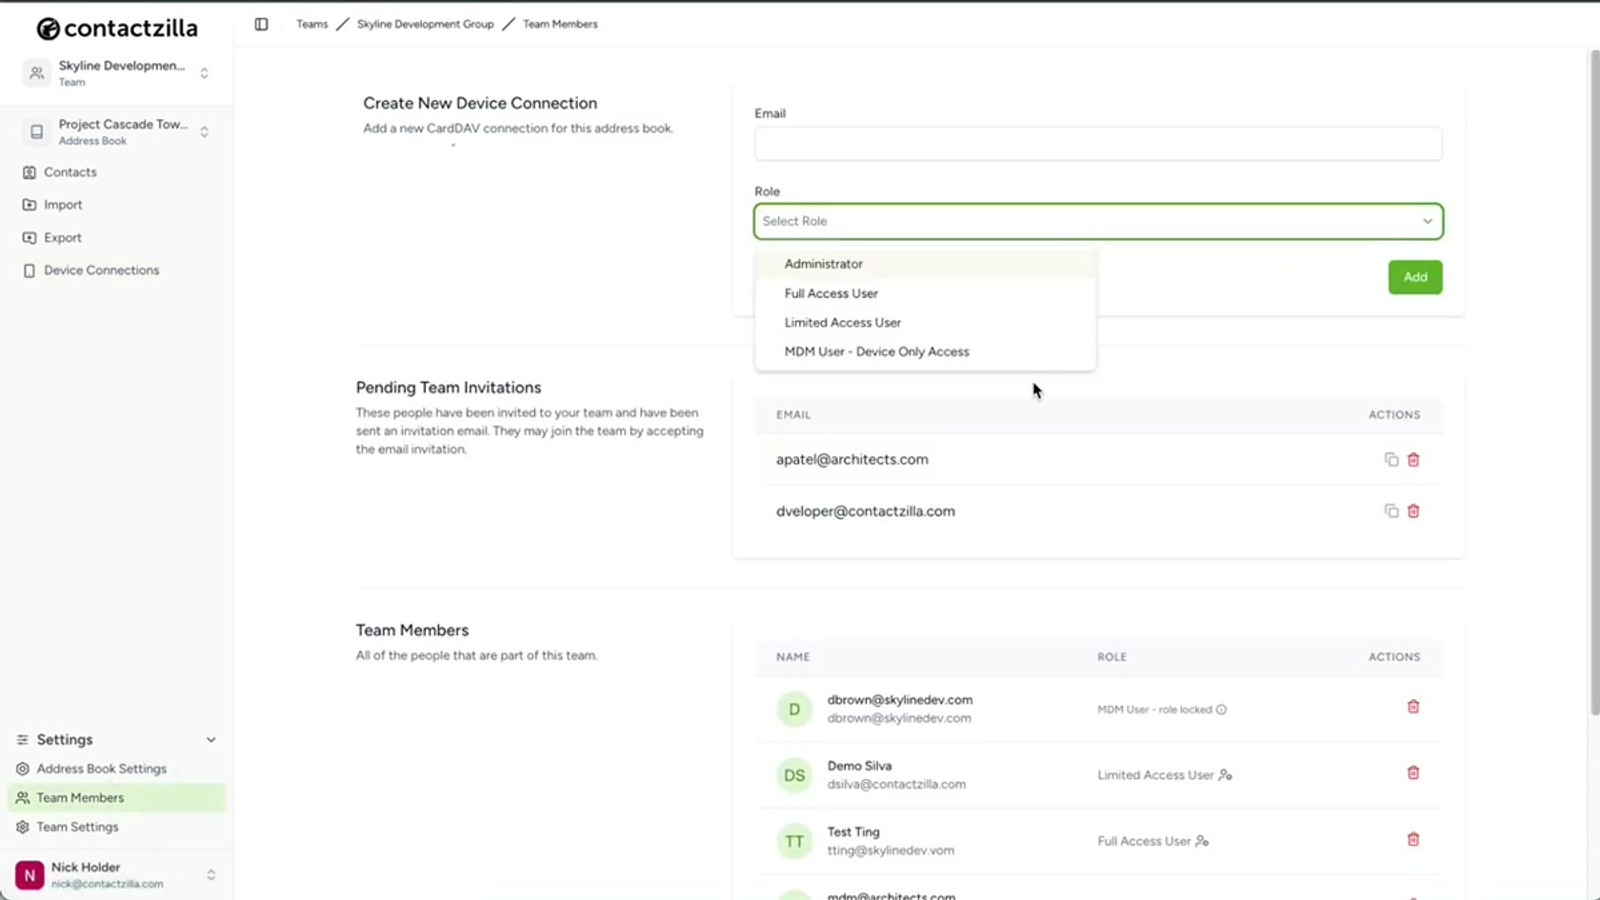
Navigate to Team Members in your Contactzilla dashboard and click to add a new user. Select MDM User, device only access as the user type.
The email address field is arbitrary — you can enter anything here since this isn't a real user account. It's simply a device-only account used to authenticate the MDM connection. Enter any placeholder email, click Add, and the MDM user will appear in your team members list.
Head back to Device Connections and select the newly created MDM user from the assignment dropdown. The Label Sync setting can be left at its default value for most deployments.
- Go to Team Members → Add → MDM User, device only access
- The email address is arbitrary — use any placeholder
- Click Add to create the MDM user
- Return to Device Connections and select the new MDM user
Choose the Access Level and Create the Connection
Now you need to decide on the access level for end users. Contactzilla offers three options, each suited to different deployment scenarios.
Full Read-Only is the most popular choice for managed rollouts. It prevents any accidental changes to your master contact list — users can view contacts but cannot edit or delete them.
Full Read-Write gives end users the ability to edit contacts on their devices, with changes syncing back. If you select this option, there's a handy sub-option to allow editing but still prevent users from deleting contacts — a useful safeguard.
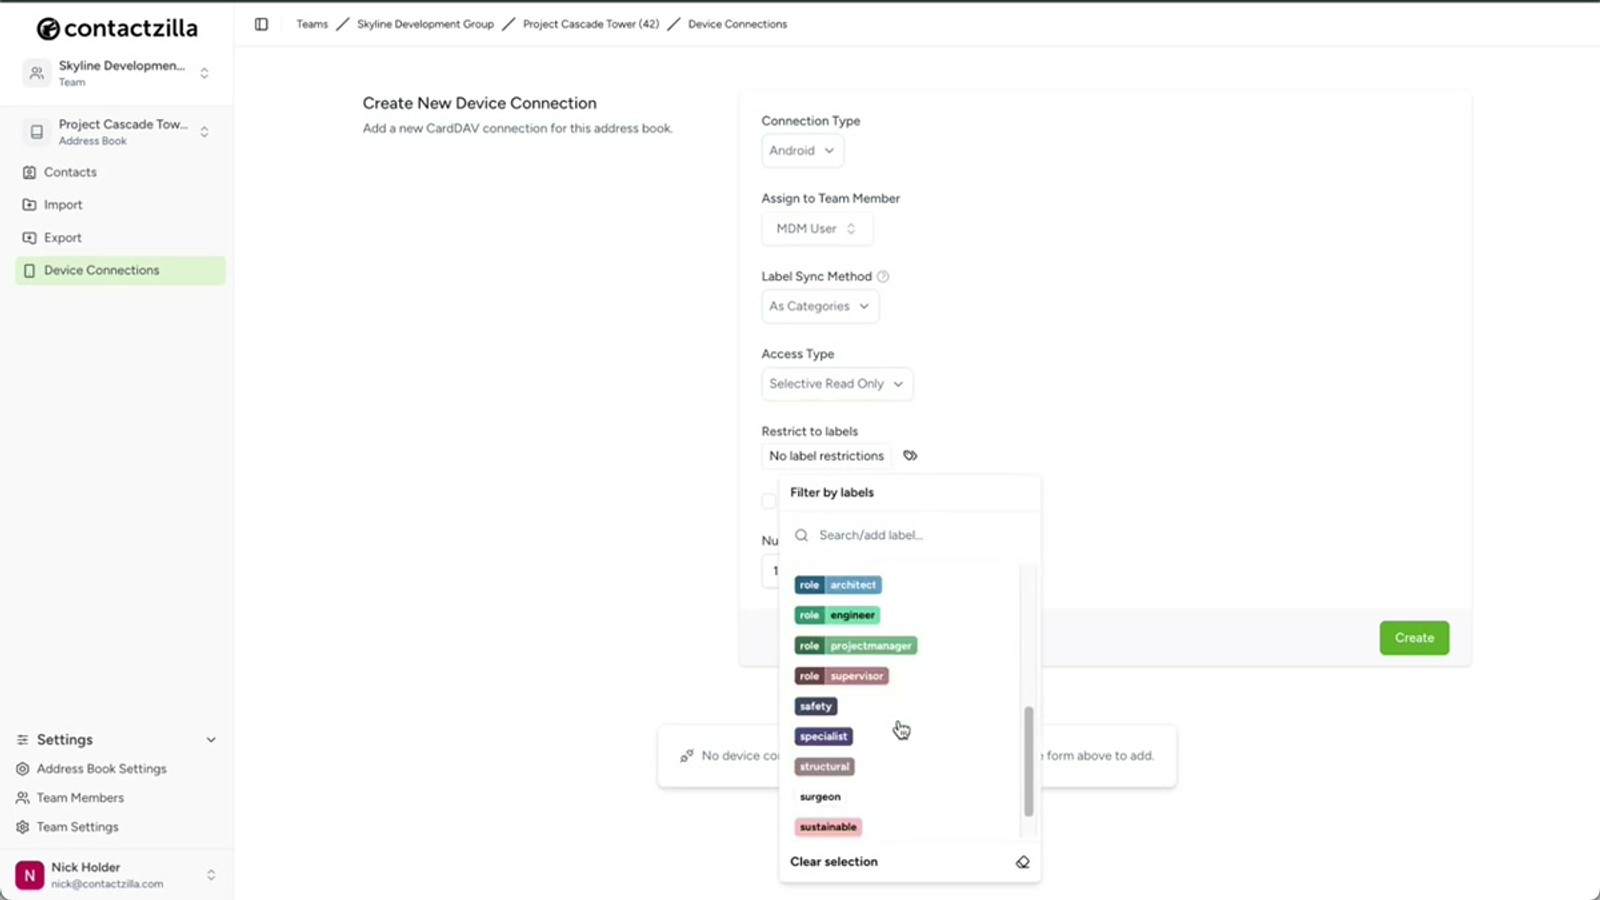
Selective Read-Only is a powerful feature that lets you deploy only a subset of your address book. Instead of sending every contact, you choose one or more labels and only contacts tagged with those labels are deployed to devices. This is ideal when different teams need different contact lists from the same address book.
Finally, set the Number of Device Connections to match the size of your rollout, then click Create. Under the new device connection, click Setup and download the Android JSON profile file.
- Full Read-Only — most popular for MDM; prevents accidental edits to master list
- Full Read-Write — allows editing; optional toggle to still prevent deletion
- Selective Read-Only — deploy only contacts with specific labels
- Set Number of Device Connections to match your device count
- Click Create, then Setup to download the JSON file
The Selective Read-Only option is especially useful if you have one large address book but different departments only need certain contact groups. Assign labels in Contactzilla and only those contacts get pushed to devices.
Add Contactzilla Sync from Managed Google Play in NinjaOne
Switch over to NinjaOne. Navigate to Administration → Policies → MDM Policies and open your default Android Mobile Policy (or whichever policy applies to your target device group).
Under the Applications section, click Management. Don't change any of the existing settings on this screen — scroll down and click Add Apps, then choose Play Store.
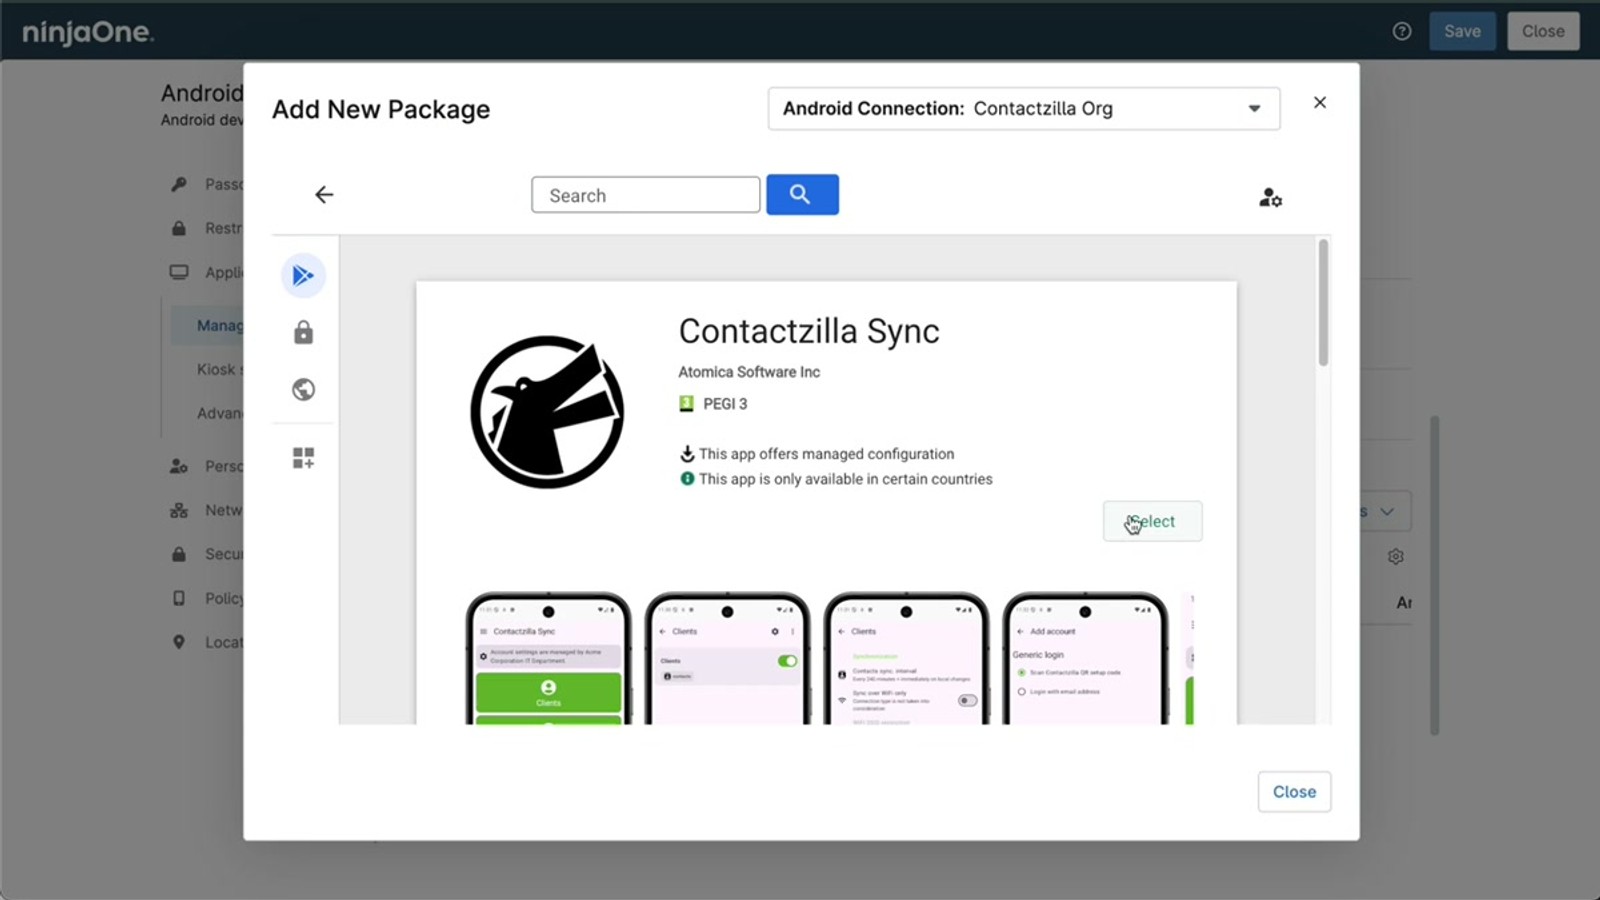
Search for Contactzilla Sync in the Managed Google Play store. Click on the app in the search results, then hit Select and close the window. Contactzilla Sync will now appear in your application list within the policy.
- Navigate to Administration → Policies → MDM Policies
- Open your Android Mobile Policy
- Go to Applications → Management
- Click Add Apps → Play Store
- Search for
Contactzilla Sync, click it, and hit Select
Configure Assignment Type and Permissions
Once Contactzilla Sync appears in your app list, click the three-dot menu (⋮) next to it and choose Edit.
On the first tab, change the Assignment Type to Force Installed. This is critical — it makes the app install automatically on all devices in the policy and prevents end users from uninstalling it. Without this setting, users would need to manually install the app from the Play Store.
Next, change the Default Permission Policy to Grant. This automatically grants the contacts permission that Contactzilla Sync needs to write to the device's native contacts database. Without this, users would see a permission prompt on their device, which defeats the purpose of a silent, zero-touch deployment.
Leave everything else on this tab as Unspecified — no other settings need to be changed here.
- Click the ⋮ three-dot menu next to Contactzilla Sync → Edit
- Set Assignment Type to Force Installed (auto-install, prevents removal)
- Set Default Permission Policy to Grant (auto-grants contacts permission)
- Leave all other settings on this tab as Unspecified
Setting the permission policy to Grant is essential for a true zero-touch deployment. If left at the default, users will be prompted to grant contacts access manually, which creates support tickets and delays rollout.
Enter Managed Configuration Values from the JSON File
Switch to the Managed Configurations tab within the Contactzilla Sync app settings. This is where you'll paste the values from the JSON file you downloaded from Contactzilla.
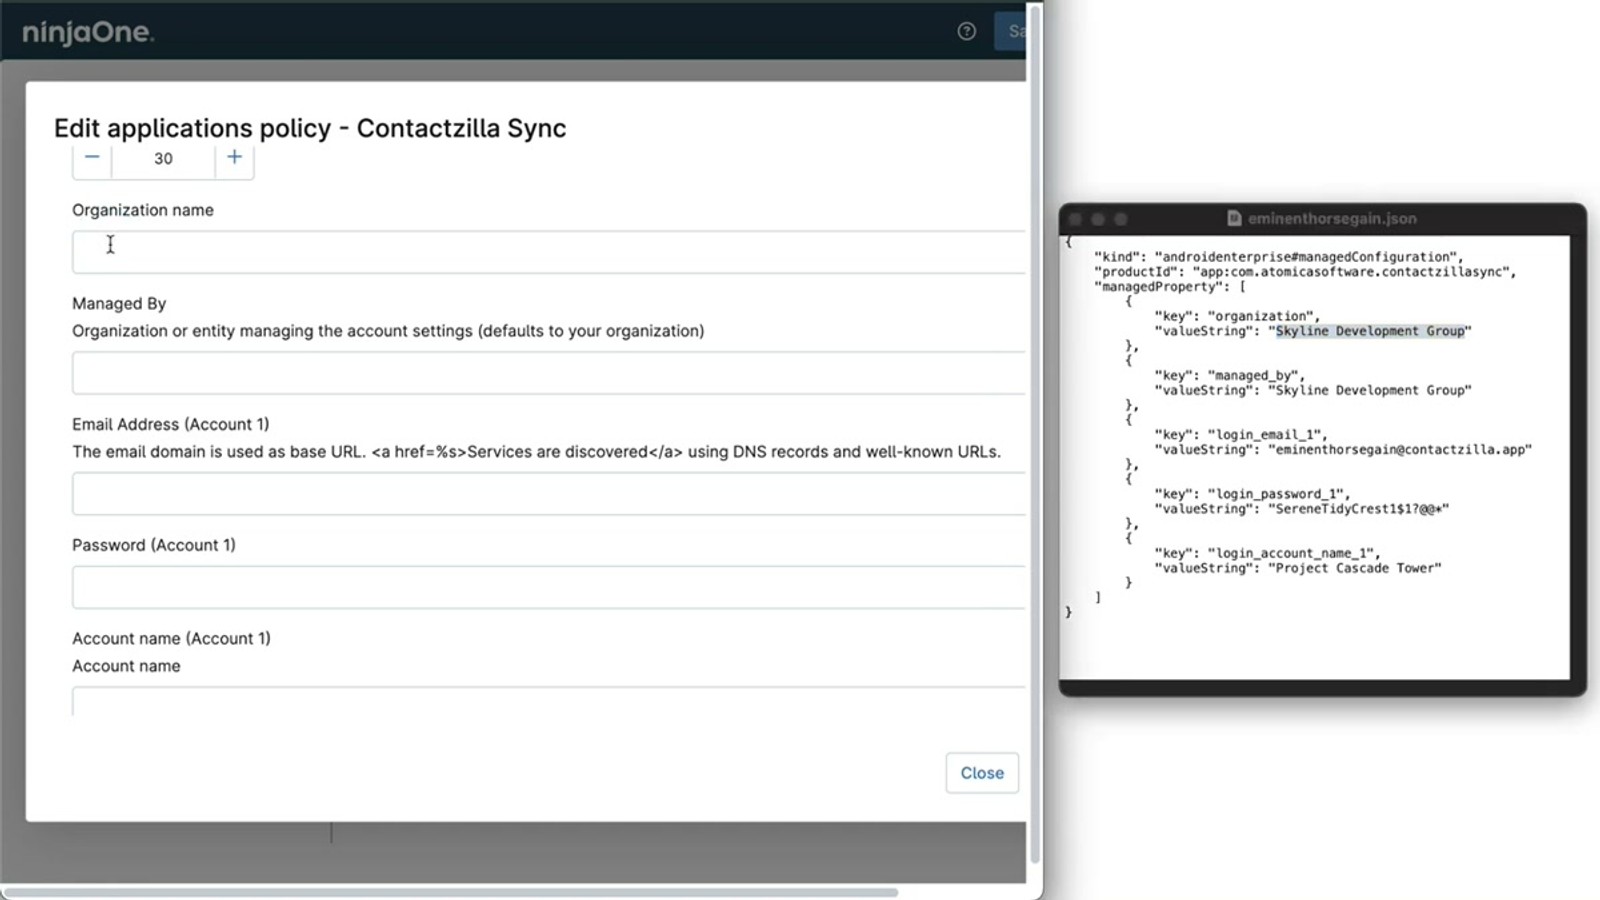
Leave the first few fields at their default values. You can optionally set the Sync Interval — for example, entering 30 means Contactzilla Sync will check for contact updates every 30 minutes.
Scroll down to the configuration fields and open the JSON file you downloaded. Copy the values directly across:
1. Organization — your Contactzilla team name (e.g. Skyline Development Group)
2. Managed By — paste the same organization name here
3. Email — copy the email address from the JSON file
4. Password — copy the password from the JSON file
5. Account Name — the name of the address book (e.g. Project Cascade Tower)
Once all fields are populated, click Update to save the app configuration. Then save the policy itself.
- Switch to the Managed Configurations tab
- Optionally set Sync Interval (e.g.
30for 30-minute checks) - Copy Organization from JSON line into the Organization field
- Paste the same value into the Managed By field
- Copy the Email and Password from the JSON file
- Enter the Account Name (the address book name) from the JSON file
- Click Update, then save the policy
The JSON file contains all the values pre-filled — you just need to copy-paste them into the corresponding fields. Don't manually type these values, especially the password, to avoid typos that would prevent sync.
Verify Deployment on a Test Device
Once the policy is saved, the updated configuration pushes to all enrolled Android devices in that policy group. If the device is online, the change is typically applied within seconds.
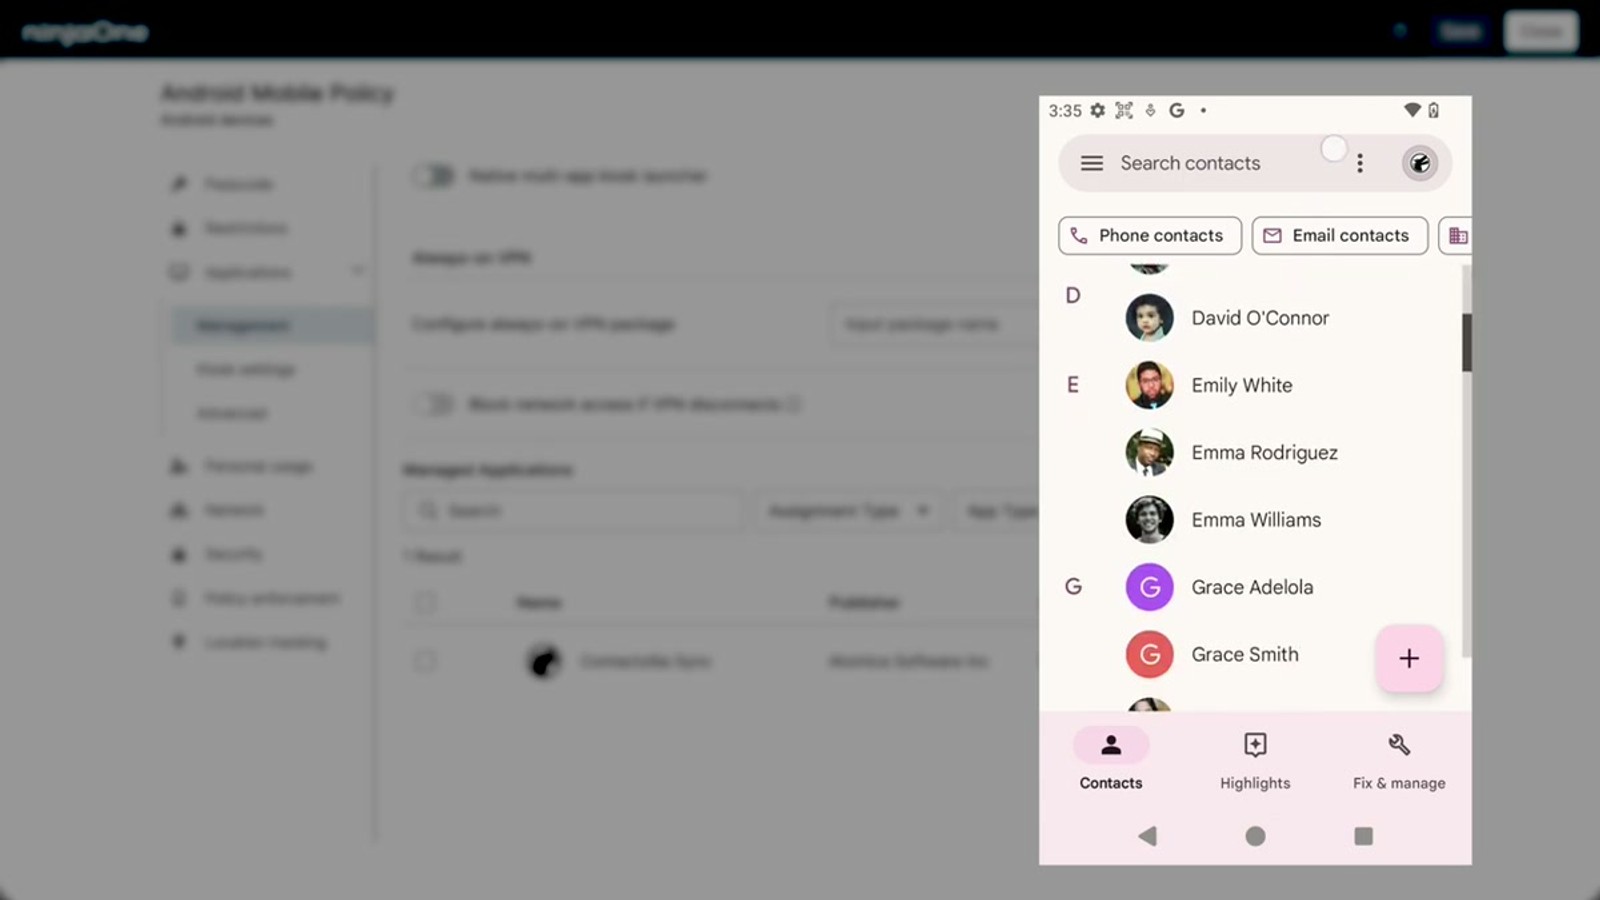
On your test device, verify that Contactzilla Sync has been automatically installed. Open the app and you should see your address book listed (e.g. Project Cascade Tower). The app will sync automatically based on the interval you configured, but you can hit the Manual Sync button to trigger an immediate sync.
Switch to the native Contacts app. Depending on how accounts are configured on the device, you may need to tap the avatar icon in the contacts app and select the new Contactzilla address book account to view those contacts. You can also tap the hamburger menu to view contacts organized by your Contactzilla labels (e.g. Engineers, Sales, etc.).
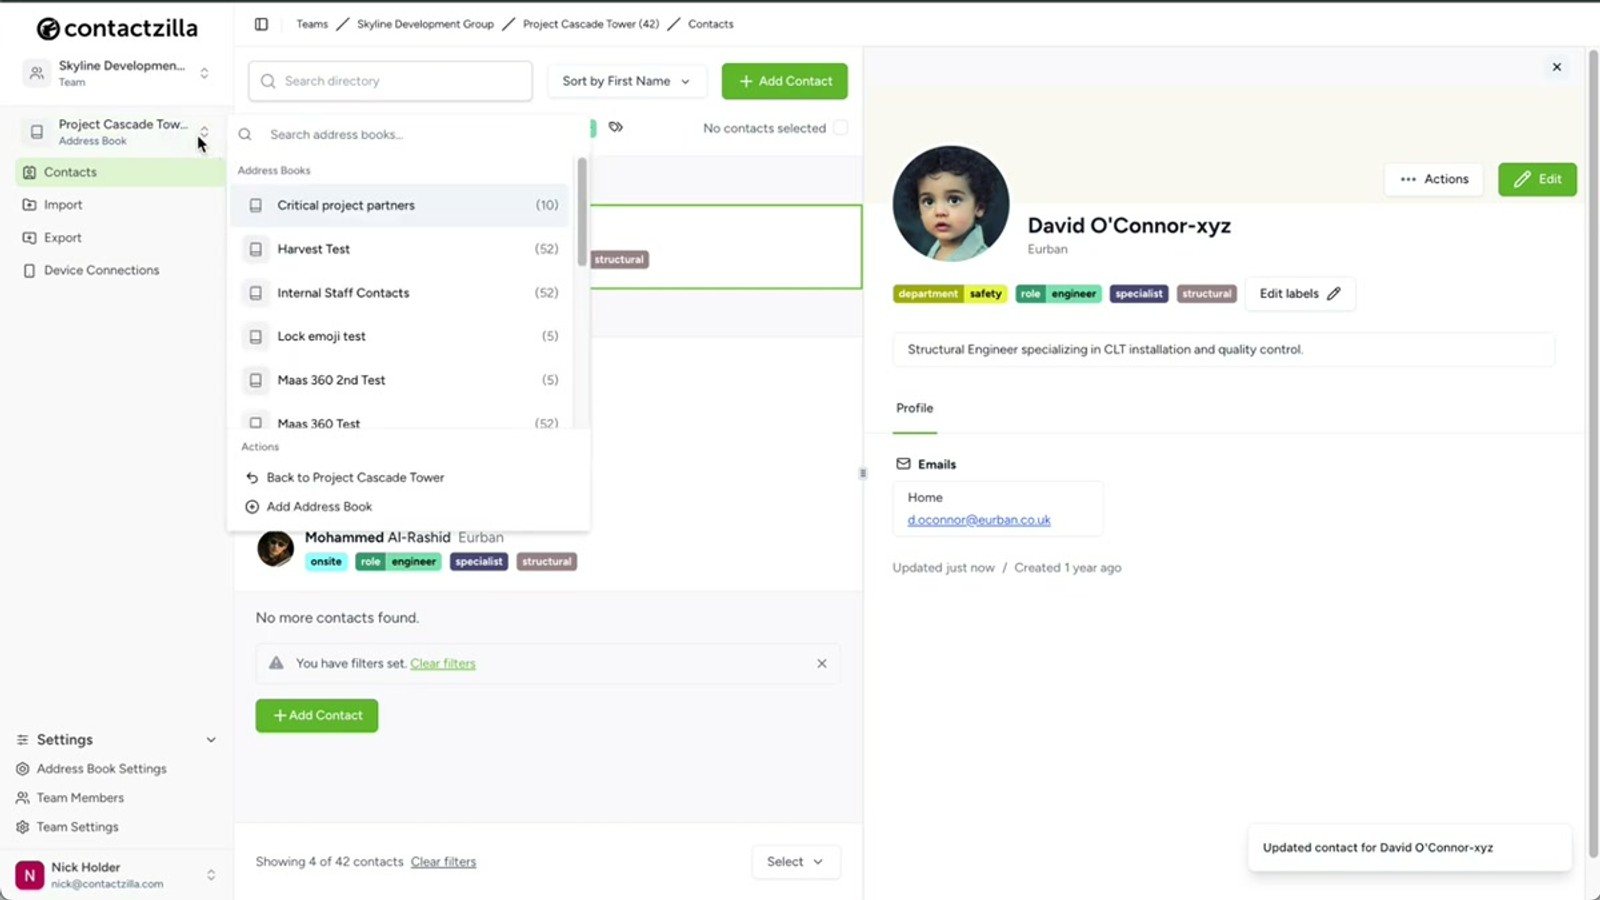
To test ongoing sync, make an edit to a contact in your Contactzilla dashboard — for example, change a contact's name. Then either wait for the automatic sync interval or open Contactzilla Sync and tap Manual Sync. The updated contact should reflect on the device immediately.
- Contactzilla Sync installs silently — verify it appears in the app drawer
- Open the app to confirm your address book is listed
- Use Manual Sync for immediate first sync
- In the native Contacts app, tap the avatar to select the Contactzilla account if needed
- Use the hamburger menu in Contacts to browse by label
- Test a contact edit in the Contactzilla dashboard and verify it syncs to the device
Deploy a Second Address Book to the Same Devices
If you need to deploy an additional address book to the same device group — for example, a set of critical emergency contacts that should be kept separate — you can do this by adding a second account within the same Contactzilla Sync app configuration.
In Contactzilla, open the second address book and go to Device Connections. Select Android, assign the same MDM User, choose your access level (e.g. Read-Only), and optionally tick the lock emoji feature. This adds a 🔒 emoji to contact names so end users can visually identify which contacts are read-only.
Set the device connection count, click Create, and download the new JSON file.
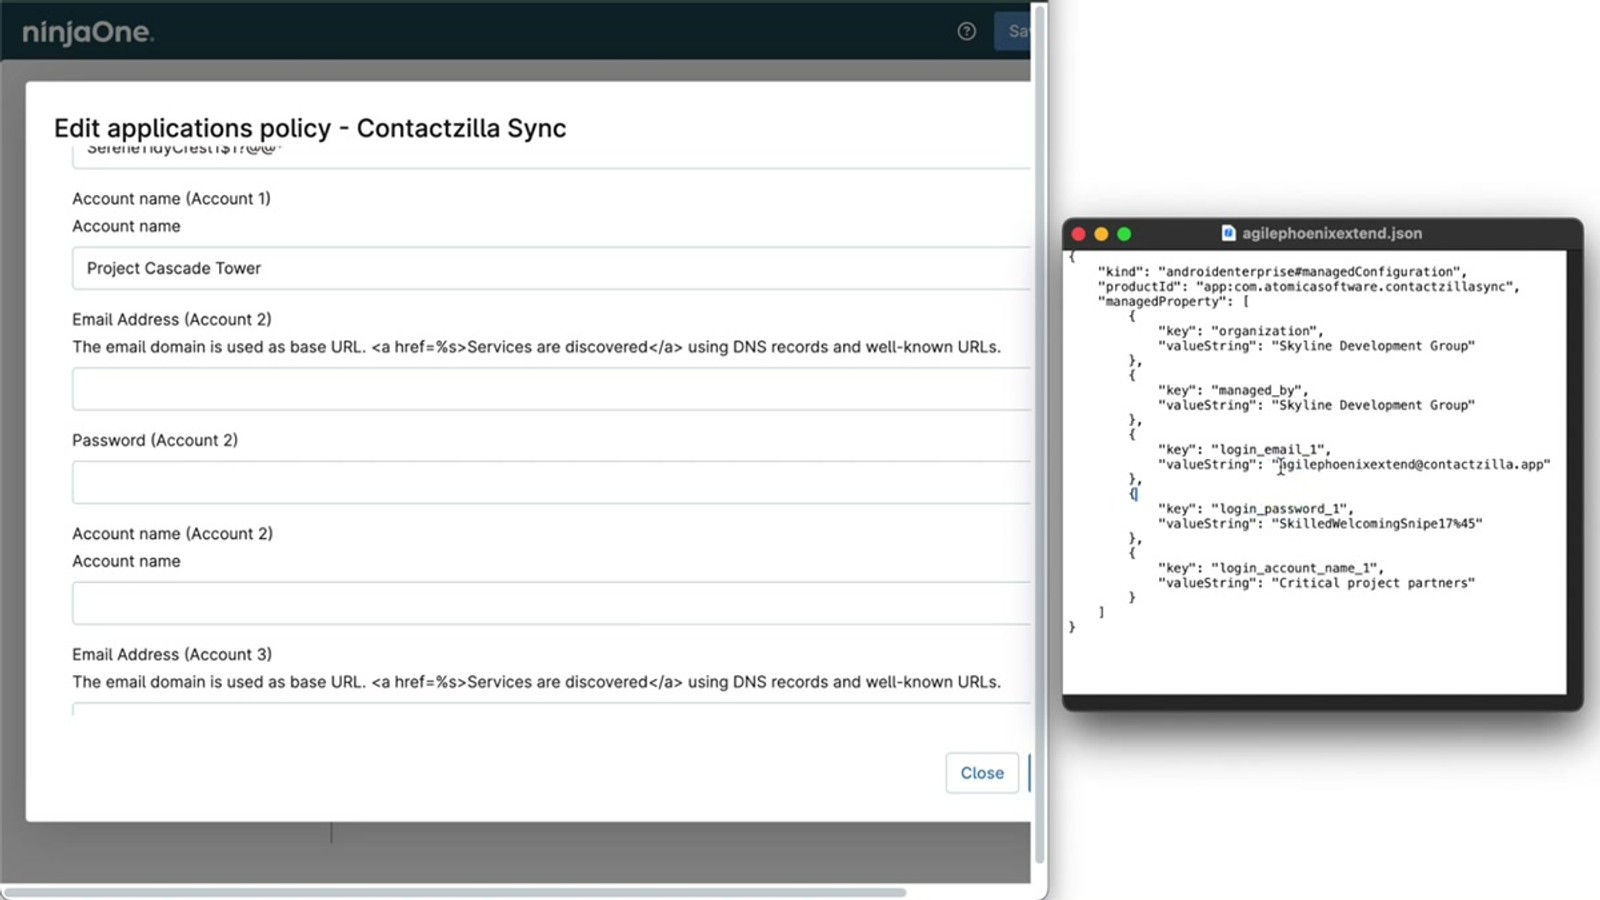
Back in NinjaOne, edit the existing Contactzilla Sync app (three-dot menu → Edit → Managed Configurations tab). Scroll past the Account 1 fields that you populated earlier. You'll find a second set of fields labeled Account 2. Populate these with the values from your new JSON file — Organization, Managed By, Email, Password, and Account Name — just as you did for the first address book.
Click Update and save the policy. The second address book will now also sync to all devices in the policy group.
- Open the second address book → Device Connections → Android
- Assign the same MDM User and choose access level
- Optionally enable the lock emoji feature for read-only visual indicator
- Download the new JSON file
- In NinjaOne, edit Contactzilla Sync → Managed Configurations → scroll to Account 2 fields
- Populate Account 2 with values from the second JSON file
- Save and the second address book syncs alongside the first
The lock emoji (🔒) prepended to contact names is a nice UX touch for read-only address books. It gives end users a visual cue that they can't edit those contacts, reducing confusion and support requests.
Key Takeaways
30 for 30-minute automatic updates Why Use NinjaOne with Contactzilla for Android
Frequently Asked Questions
Why does Android need a connector app when iOS doesn't?
iOS has built-in CardDAV support, so Contactzilla can deploy a configuration profile that the OS handles natively. Android lacks built-in CardDAV, so the lightweight **Contactzilla Sync** app acts as a bridge — it runs in the background and writes contacts into the native Android contacts database.
What should I use for the MDM User email address?
The email address when creating an MDM User is arbitrary — you can enter any placeholder email. It's not a real user account; it's a device-only account that authenticates the sync connection for your MDM rollout.
Can I deploy only certain contacts instead of the full address book?
Yes. Choose **Selective Read-Only** as the access level when creating the device connection. You can then select one or more **labels**, and only contacts tagged with those labels will be synced to devices. This is useful when different teams need different subsets of the same address book.
How do I deploy multiple address books to the same Android devices?
You don't need to add the Contactzilla Sync app a second time. Instead, edit the existing app in your NinjaOne policy, go to the **Managed Configurations** tab, and scroll down to the **Account 2** fields. Populate them with values from a second JSON file generated in Contactzilla. The app supports multiple accounts within a single configuration.
How quickly do changes appear on devices after saving the policy?
If the device is online, configuration changes are typically applied **within seconds** of saving the policy. For ongoing contact updates, the sync interval you configure (e.g. every 30 minutes) determines how quickly edits in the Contactzilla dashboard appear on devices. You can also trigger an immediate sync using the **Manual Sync** button in the Contactzilla Sync app.
What does the lock emoji feature do?
When creating a read-only device connection, you can tick the option to add a 🔒 lock emoji to contact names. This gives end users a visual indicator that those contacts are read-only and cannot be edited, which helps reduce confusion when a device has a mix of editable and non-editable address books.

